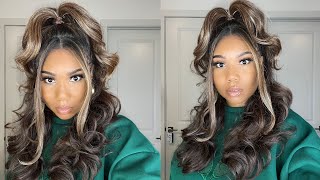
Half Up Half Down Frontal Wig Install With Bang || Ft. Sunber Hair
- Posted on 09 February, 2021
- Hair Knowledge
- By Anonymous
In todays video I will be showing you how I installed this 13x4 lace frontal wig that I received from Sunber Hair Company. I decided to do this cute half up half down style with a bang. I hope you guys enjoy this step by step tutorial!
●▬▬▬▬▬♛ SUNBER HAIR♛ ▬▬▬▬▬●
#sunberhair #humanhair#bodywave#lacefront
60%-70% OFF,Also Enjoy Extra 25% OFF: sunber25
Official Website➤http://bit.ly/2XHYmaM Sunber Hair Hot selling 70% OFF➤http://bit.ly/35HFEEh
I’m Wearing This Wig ➤http://bit.ly/3nTQf5D
Hair Information:13*4 lace front body wave 24 inches
Need this?13*4 lace frontal wigs➤http://bit.ly/39ykM3E
Quick installation Headband Wigs➤http://bit.ly/2LRahQG
Affordable lace closure wigs here➤http://bit.ly/3bI3eoy
☛Best wigs 5*5 HD LACE frontal wigs➤http://bit.ly/39AWNRg
beginner-friendly 99J lace closure wig➤http://bit.ly/2LPmPIv
VIP Price New Remy Human Hair➤http://bit.ly/3bJL9Gq
Blonde 613 Lace Frontal Bob Wigs➤http://bit.ly/3oLlNLX
Best selling on Aliexpress store➤http://bit.ly/3iqHuPn
Amazon Sunber Hair➤ https://amzn.to/2NJtuAc
SunberHair YouTube Channel: https://goo.gl/A8pbkz
Want to learn how to create a specific style?
Don't be shy!
Like - Comment - Subscribe and submit your requests!
My goal is to help you recreate your very own Pariis Hairstyle
For sponsorships and business inquires email us at:
Email: [email protected]
FOLLOW ME:
INSTAGRAM: Nae.Simone ( https://www.instagram.com/nae.simone/ )
Pariishair (https://www.instagram.com/pariishair/)
SNAPCHAT: Nae.Simone
*Don't forget to hit that notification bell so you'll be the first to know when I upload*
-XOXO
Irish ay figure - that's my type, hey guys! Welcome back to my channel so today i'll be showing you guys how to apply and style a frontal lace wig, so the wig i'll be using is from sunburn hair. So i'm just going to show you guys what i received in my package. So this wig is a body wave wig. It is 24 inches long and 180 density, i'm showing you guys the clips. It has an adjustable strap at the back and i find that the lace also blends in with my skin pretty well, so i went ahead and bleached the knots and washed it out and all that good stuff. So now i'm going in with my dex and my bio silk and i'm just going to blow dry the hair and flat iron. It tweeze it out a bit and then we'll be good to apply the wig. So when i apply my wigs, i braid my hair in six straight backs. You just want it to be flat and i'm going in with my got to be free spray and i'm just spraying my baby hairs. That way, i can lay them back. So i have no glue whatsoever on them trying to keep these edges next. I'M going to use this wig cap that i received in my box, and i'm going to put it on cover my ears, i'm going to make a hole so that my ears stick out of the wig cap and i'm just gon na use my free spray. After just to secure the wig cap down on my hairline once it is all dry, you want to make sure to dry and not wet. I am just going to cut the cap all along my hairline and i'm just going to get it as close to my hairline as possible, so sometimes you're going to have to lift off what you've already kind of glued down just so you can get as close To your hairline, so now i'm going in with my makeup brush, i'm just using my concealer and i'm just applying it all over the front of this wig cap. I also use the same concealer and apply it to the back of the lace on the wig as well to help it blend in with my skin. So the glue i'm using today is from celeb goodies. It is the hold me tight, gummy glue and i'm just going along the edge of the cap and i'm just putting a little that way. I can spread it, so the little fine pieces of the cap will actually blend in better. So it's not really my first layer of glue, but i'm just applying it to blend the um, the stocking cap better. That'S all so, once the glue is dried, i'm going to use the back comb to stick in the middle of the back of my head. That way, i know the wig is in the middle and i'm just going to bring the wig forward. I'M going to cut off the sides that cover my ears, so the little flap i'm just going to cut it off, i'm going to part it cut it. So that way, when i glue the wig, it sits perfectly more so now that i'm ready to glue the wig down. I am just going to roll the wig back a bit and i'm going to apply the glue, a good amount of glue not too much not too little, because you want it to be secure, i'm just going to apply it in little dots and i'm going to Smooth it with the back of my tail comb, and you want to make sure it's smooth like it's like a thin layer. You don't want it too bulky, so i'm only gon na apply two layers just because i'm not gon na have the wig on for too long. I'M just gon na go in with two layers and wait for it to completely dry, and you know it's dry when it's basically cleared so now. I'M gon na roll the wig back forward and you want no hair in the way so make sure you comb all the hairs back and i'm just gon na stick it down. You want to make sure that it's covering the glue that you put down. Okay, guys make sure you pull it up into the right place. That'S why we measured it and yeah i'm just going in with my comb, i'm using my hand as well. I wouldn't suggest going too hard with your hand, but just use your comb and comb it into the glue in a way that way, you know what sticks and i'm using this elastic band to just so wrap around my hairline to help that melt. I got this elastic from the dollar store. You can use anything to just kind of hold it down and you just want to wait for it to dry. I did go in with my blow dryer, so you can also do that. So now i'm just removing the band and i'm going in with my hot comb. I feel like the hot comb just helps me melt it a bit. I don't know it's it's a me thing, but i'm going in with my hot comb and i'm just combing down the front of the wig kind of pressing it with the glue and all that good stuff. So once that is done, i'm going to start cutting the lace, and i put two slits at the sides with my scissors and then i go in with the razor just so that you're not cutting it in a straight line. The razor kind of gives it a little edge, so i go in with the razor i cut the lace and then once the lace is done, cutting i go back with a little bit of glue anywhere. That does not have glue. I'M just gon na touch it up and then put that same elastic band back around the hairline okay. So now i'm going in with my wax: stick, i'm preparing my hair to get styled now, so i'm just brushing it all over the front and i'm gon na go in with my hot comb and run the hot comb over it. Do you see that? Do you guys see that so yeah? That'S what i'm doing right now so so, once the hair is flat, i'm going to remove the elastic band and i'm just going to part out my bang area, i'm parting it in like a half a u section, and i'm just going to clip that part away Because i'll be working on that last so now that that's out the way i'm going back in with my wax stick, we will be using this wax. Stick a lot, i'm going back in with my wax stick, and i am just going to now hot comb. The top area that i didn't get i'm also going to be parting out the size and sections and hot combing it using the wax, stick first and then hot comb, hot combing. It because i find that it allows the hair to be flat flat. You don't want no humps, you want it to be flat flat. So that's why we're using the wax stick and then we're going over with the hot comb. So after pulling back this hair, i found that it was a bit too dense in my hairline. So i went in with my tweezers and i started taking out some hair, make sure you're using your hand to hold down the lace that you just glued because you do not want it to come up now. I'M using my fingers to find the middle to catch up the top and once it meets in the middle, i'm going to separate the hair. Put some down bring some up and i'm going to use an elastic band to catch up this ponytail the same razor. I used to cut the lace is the same razor. I am using to cut my little baby hairs at the side and i'm going to go in with my got to be free spray and my edge control brush, and i'm just going to form my edges. Okay, guys, i know it looks like i already curled my hair and i did, but i did not like it so i'm going back in and i'm going to wand curl the hair. I did record the bang, but i'm gon na put it in at the end. So you can see how i achieved it, but right now i'm just curling the hair with my curling wand. This wand is from hot tools. I believe i bought it from sally's, so you guys can check them out as well. So i'm just combing my bang forward, because i want to have like a little dip coming up and i'm using my hot comb to form it. You can also put some of the wax stick if you want more of a hold and then i'm just going in with my flat iron and i'm just giving it a soft curl. Now i'm trying to fix my baby hairs a bit, so i just combed it out and used some foam and just redid my baby hairs. I liked it better that way, and last but not least, i'm going in with some gloss spray, and i am just spraying my hair to give it a nice look. So this is how the style came out guys. I hope you guys liked it. I hope you guys enjoyed this tutorial. Let me know how you guys feel about it and if you stayed this long honey, i hope you're subscribed. Don'T forget to like comment and let me know what you would like to see me do next, bye, guys you


Comments
Vickie W: Another slay per usual
Marie Gilles: You’re always doing good jobs! Keep it up girl.
Hannah Reed: Your natural hair looks great! I bought my mom a name necklace from MyOwnNecklace.com last year. Amazing... She even cried when she saw the necklace.
Saskie Annie: Love it! I need to try this method
Imana Isis: I love this hairstyle you played this!
Nova Stylez: I just love watching your videos
Elzeather Miller-Wedderburn: Great job Nae.....
Antonio Neto: Beautivul! Top !
BigBoris J: