Wig Transformation! Tone And Lengthen A 613 Blonde Wig With Me!
- Posted on 20 November, 2020
- Hair Knowledge
- By Anonymous
Hello! In this video I transform this decent 613 Human Hair Amazon Wig into a long ash blonde beauty!! I am so in love with the color and length! Let me know what you think in the comments! :)
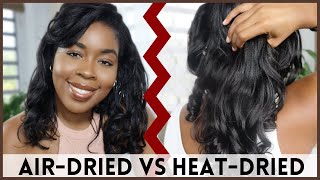
We start by mixing the purple shampoo with lukewarm water in a bowl. Then emerge the wig into the water and remove to check on color often. Different hair will process differently so keep an eye it to make sure you achieve the color you want! We then blow dry and flat iron and the tone is complete!!
Fanola Purple Shampoo:
Fanola No Yellow Shampoo Large Bottle, 33.8 Fl Oz https://www.amazon.com/dp/B00CGPMEAQ/r...
Secondly, to add length to the wig I purchased a 28” bundle (toned the same way) and cut them into the appropriate went size and glued them in between the tracks on the wig using nail glue. (Hair glue is a much longer process to dry but feel free if you want) You could also sew it but I thought this would be faster lol :)
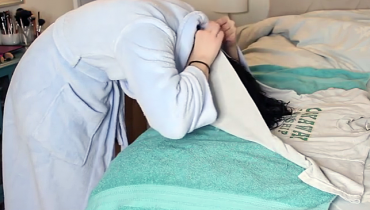
Hi everyone welcome to my channel. My name is nishan, it's kind of like my boyfriend is sleeping, so i am whispering but um yeah. As you guys know, my last video i bought a wig and it came out horrible. I have since i bought a new wig. So if you want to see how i transformed it from this into this, then keep on watching we're gon na tone. It first and then also add some tracks make a little longer. So let's go okay, guys we are back at it again. Second try! So i got another wig off amazon uh. This one is a full um, actual lace front like a t-part, the other one. It has the 13x4 lace in the front. It doesn't have that same issue with the knots this one. It just looks normal, so yeah, i'm happy with this one, i'm going to keep it, don't have to go for a third one. It is a 613 22 inches and we are going to go tone it. It'S very yellow right now, so we're gon na make it nice and ashy so we're gon na head on over to the bathroom and start the toning. So in this clip i just literally threw on the wig. So we could have a good before kind of starting point, so here it is, as you can see, it is very yellow and also it's super thin and very short, so anyways, that's enough! I'M showing that before so now we're gon na get into the toning okay. So what we're gon na do is just fill this bowl up with water. I just use like room temperature water. I don't think it matters the temperature and i'm gon na use this purple shampoo um. This is the vanilla which i've heard amazing things about, and it's super super strong um. I'Ve used it a few times and it's turned hair purple before because that's how strong it is so i just poured it in this bowl um. I honestly think i put a little too much. I think if you use less, it might be better because some of the pieces did turn purple. So now i just dipped in the ends just to kind of see how fast it was processing and it processed. It really quick, so i just threw the whole thing in there took it out kind of did some test trends. I would not leave it in there for long because it can process extremely quick. So that's why you see me put it in. Take it out see how it looks, put it back in take it out and go through that process and, like i said, the canola did turn the wig kind of purple. The wig looks really purple in this clip actually, but it really did not come with that. Purple once i rinsed it yeah, so here we are moving that away, and now we are rinsing it out the longer you leave the leave it with the water in there. It basically continues toning, so i'd recommend just washing it out once you're happy with it. So it does not turn purple or get stained purple um, and this is the actor. So, as you can see, it came out, nice, ashy, gray, silver color, basically the color i was going for and i'm just brushing it out after washing it. So first i'm just drawing it with a microfiber towel just to get all the excess water off. So i'm just gon na do that and then i'm going to be sectioning my hair and then starting to blow dry. But that part is pretty boring. I'M just going to kind of like fast forward through that also, i know my technique with the hair. Dryer is not good, but i have very weak arms and i cannot blow dry my hair properly. So this is what i work with okay, and this was, after the blow dry it. So the hair is partially um flat, but it is primarily dry. So this is again how the color looks when it is dried, very, like white, blonde ash platinum, blonde color, which i am obsessed with, and i love it so again, we're just gon na be sectioning and then now we're gon na go through it with the flat Iron and again, i'm just gon na fast forward through this, because it's just basic normal flat iron procedure. Nothing special here, hi everyone. So it's the next day. This is the final result when it's all dry at the roots and at the very tip at the bottom. It is kind of have a purple tone to it, but for the most part it's a cute like gray ash blonde, and i like it a lot. I don't really mind the purple. I know it'll fade soon, so it doesn't really bother me, but overall, i think it looks super cute. I think the tone came out really nice and i really like it. The only complaint i have is the wig is a little short. It says it's 22.. I don't know if it is, it seems kind of short to me for 22., but other than that. I really like a lot and i'm super happy with it. So i lied. I was not super happy with it um. I had like that for a few days and then i decided to buy this 28 inch bundle to add to the bottom of the wig, because it was just a little too short for me and i was not enjoying it. So i ordered this single bundle and we're just going to be doing the exact same process of just quickly toning, this, oh we're going to do this super quickly, because we literally just did it so again: water in the bowl add the purple shampoo mix it up. Mix it up, i think i put less this time because of how much it kind of turned last time um throw the bundle in. I would not recommend throwing it in like this, because it got all tangled. I just literally threw it in the way. It'S like wrapped up like that, which is not good, because as soon as i took it out, i really wanted to cry because it was super tangled and um horrible, so i recommend unfolding it first before you put it in and then here it is wet. I got basically the exact same color and i'm just drawing it about to blow dry and flatter that as well um just a tip. This is how i blow dry, my extensions all the time. So if i'll do it for wefts - and i do it for my clip-ins too - i basically just stick it in the cabinet of the bathroom and then i will go through it and blow dry it that way. It'S the basically the most effective way i found to blow dry or flat iron, any of my hair extensions or wraps, or anything like that. So first, i'm gon na be combing it from the bottom and then going higher and higher and just blow drying it. While i do that and then i'm gon na go and straighten it after and yeah, so once this is done, we're gon na add it into the wig okay. So here is the wig, and this is the weft that i just did. As you can see, the color match is amazing. Um also, as you can see, i didn't blow dry it that great and it's because i'm gon na be firing it once i sew it into the once. I glue it into the wig, so i was not worried about it, so this was actually very hard to film because the process was very weird, but basically i just took some nail glue. I dabbed it on at the end and then i glued it in between the tracks that are already on the wig. So basically i was gluing it onto like the lace piece like right in between where the wefts are so. I would put the glue on one end: stick that down and then put glue on the other end and then stick that down. I was originally using hair glue for this, but i realized that it took way too long to dry and the nail glue basically dries instantly. So i started using that and it was way way more effective and much faster. So i'm not sure this process i'm going to really show, because it's really repetitive, but basically i was just gluing it in brushing it down and then flat ironing it, and i just did that over and over again until i basically use up the whole bundle. So i just started at the bottom and just working my way up, and then i also went on the sides just to make sure it didn't look like weird and, like all the hair was coming from the back. I tried to make it look as even as possible, so this is like a full body shot of how it looks, excuse my boyfriend in the background, but it's super super long, but it is way too thin at the end. So i'm going to be cutting it, but this is how it looks immediately after i had glued in all the tracks onto the wig watching it back now. I actually don't think it's that thin and i wouldn't probably have mined it that much. I kind of wish. I kept it this long um. I cut off about that much as you can see right there um, but i kind of actually love how long it is in this clip. I'M kind of sad that i cut it um but yeah. So this is again just another picture, show another video, sorry another clip showing the wig and how long and pretty it was before i cut it. So this clip was post cutting. I literally just did a straight cut across, i feel like it makes it look just really full and just healthy, because the ends look just super full and not thin at all. So it's kind of what i chose to do with that, and here i'm just showing the results. It'S still super long still super pretty, and here it is after i styled it. Oh, my god, it looks amazing, so i just threw some curls in and put it half up, half down and i'm so so so, obsessed with how it looks, i think it looks absolutely gorgeous um yeah, i'm obsessed the color, the cut like everything. It'S amazing the length, the thickness. It'S absolutely perfection so happy with it. Thank you guys so much for watching. I hope you enjoyed the video and enjoyed this transformation. I am absolutely in love with how it looks. I think it's super cute. I love the ash. I love the color um yeah, so let me know your comments down below and subscribe thanks guys.

Comments
April Thomp: How much did the wig and extensions cost you ?