You Need This Wig!! | Honey Blonde Wig Install & Review Ft. Onemorehair | Jessicanicole
- Posted on 22 August, 2021
- Hair Knowledge
- By Anonymous
Hey babes,
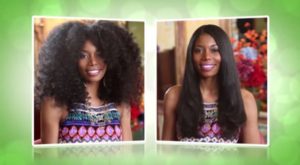
In today's video I'll be installing and reviewing this beautiful hair by OneMoreHair. This hair is really everything and all my girls need this color! Make sure to leave any questions below and don't forget to subscribe!!
______________________________________________________________________
●▬▬▬▬▬▬▬▬▬ ♛ #Onemorehair ♛ ▬▬▬▬▬▬▬▬●
➤One More Hair Official Store: https://bit.ly/3CNbPRT
☛Using My Special Code To Get $10 OFF:JN10
➤The same hair in this video :
Highlight Straight Lace Front Human Hair Wig 26"
☛Same direct link: https://bit.ly/3jXoSHP
Top Sale 13x4 Lace Frontal Wigs: https://bit.ly/3ALyjAO
Cheap human hair lace closure wig: https://bit.ly/3k1YXyI
Hot sell blonde & color wig: https://bit.ly/3g8Hxze
Transparent lace part wig: https://bit.ly/3CWfnB4
3 Bundles With Lace Closure: https://bit.ly/3m3BGz0
3 bundles with 13x4 frontal: https://bit.ly/3AQyAlQ
➤Contact Us :
Email: [email protected]
WhatsApp: +86 139 2500 7095
Phone Number: +1 (929) 419-5004
Follow One More Hair To Get Free Hair:
Follow @"onemorehair" on FaceBook: https://www.facebook.com/onemorehair/
Follow @"one_more_hair" on Instagram: https://www.instagram.com/one_more_hai...
Follow @"One More Hair" on YouTube: https://www.youtube.com/c/onemorehair
#highlighthair #coloredwig #onemorehair #humanhairwig #lacefrontwig #backtoschool #wiginstall #wigsforblackwomen #wigforsale
____________________________________________________
Follow your girl's socials:
Instagram: Jesss_nicole_
Twitter: Jesss_nicole_
_________________________
Some facts about me
-Age: 22
-College: Temple University
-Ethnicity: Ghanaian
__________________________
Don't forget to like and subscribe! xox
Wow y'all y'all, hey guys, welcome back to my channel if you're new here. Thank you so much for clicking on this video and, if you're, not new, here welcome back to yet another video. So, as you read by the title today is going to be a hair review, slash hair, tutorial, install of this beautiful hair by one more hair, so yeah, i'm going to be showing you guys exactly how i installed the wig and everything like that step by step Details: okay, i'm going to be giving you all the details in the next clip, so let's go ahead and start the video okay. So i went ahead and i did the ball cap method already for you guys um. So i know my background looks really really plain, but that's because you know i just moved into my new apartment literally like exactly a week ago, but um i'm like not done decorating it or anything. So that's why it looks like role playing in the back, but you know what it's fine, okay, so um! I did go ahead and already like open it, because i was too excited. So i have to take a little peek, but this is how the box comes. So cute guys, i love the little bow right here and then on the back. It like shows you how you wash it and everything um. You know all the directions on the back, but once you open the box, okay, the wig comes in here y'all. I love this color um. I tried it once, but i actually dyed it myself, so i'm excited to try it when it's already like dyed for me um this one's like a little bit different, but it's super super cute um. So what when you get this, it actually comes in a hair net, but i took it out already because you know i had to take a look but um. This is the hair y'all. How pretty is she but the hair does come pre-plucked and it also comes with some baby hairs. This is what it looks like wait. Let me give y'all like a good look, but um yeah. So this is what it looks like. I am gon na go ahead and i'm gon na pluck it a little bit more. I always do that with my wigs every time i get it and, of course, on the inside. We have the two clips right here and then we have one in the middle and of course it comes with the adjustable strap. You know, so you can adjust the wig the way you need to, but this wig is really really nice guys. It'S super super soft and it's actually really shiny. I haven't put any product in it at all. I haven't brushed it like literally nothing um. It also comes with this uh. What do you call these, like? I guess, a draw, not a drawstring bag. I think they're called origanza bags, i think, but it comes in this cute silk bag and then on. The inside has some goodies inside um, of course, a wig cap, and this is two in here and then it also comes with lashes. How cute are these lashes? Y'All can y'all see, look how cute these lashes are. Literally i'm going to be wearing these. Usually, when i be getting the lashes that come with the hair, i never wear them, but this one is like super super cute and y'all like i know this is something small, but the fact that they gave me a freaking edge brush and then it also has Like the end with a little comb right here, listen, do you know how bad i need an edge control brush like bad, okay, but yeah. I'M super excited, i'm definitely going to be using that and then it comes with a cute thank you card and then a qr code. It says if you need any help, just let us know so yeah you can go ahead and use that qr code. When you get your package for any questions or anything like that, and then also has their contact here on the bottom, with their email and their whatsapp, so yeah i'm really really excited. I love their packaging. I'M really really like i don't know, i feel like their packaging is like really thought out. Their lashes are really pretty and like the edge brush. I'M sorry, but i'm literally not gon na get over that, but yeah. Basically, what i'm going to go ahead and do is pluck the wig i'm not going to bleach the knots, i'm probably just going to put like foundation on it. Um and that's fine. Just because, like the knots really aren't even bad like at all. So i think i'll be fine without dyeing it um. I think it's still gon na look really really good, but this hair is um 24 inches and i believe it's 180 density, i'm literally gon na put everything down below all the information. All the links that you guys are going to need, but yeah i'm gon na go ahead. I'M gon na plug the wig and i will be back okay guys. So i am done plucking the hair. It looks so much more natural now um, so i'm just going to go ahead and put this wig on. I already went ahead and i put the straps like closer together because you know i look. You have a small head. I mean i feel like. I have a small head, but yeah - i always just put it in the middle so that i can get that snug feeling so we're just gon na go ahead and put our wig on alright. So we have the wig on now and it's time for literally my least favorite part, which is cutting out the ear tabs. So what i'm gon na do is put my thumb right behind here and i'm just gon na feel like where the top of my ear is here and i'm gon na part out the hair. Just like that, and then once i part that out, i'm just gon na literally clip this side of my hair back and then i'm gon na take my little scissors and i'm gon na do the same thing. Just put my thumb back here just so, i know where my ear is and i'm gon na poke a hole through just like that and then now, i'm literally just gon na cut where the ear is and just cut down. Just like that, you know we cut some hair, but it's fine. So now that i did that i'm gon na go ahead, just kind of move that hair back and then i'm gon na cut, and then i'm just gon na cut that excess lace all the way down. It really doesn't have to be perfect, but yeah. So once i do that, i basically have my ear tabs. So i'm just going to go back and just like cut a little bit more because, like the ear tab is still kind of like on my ear here and i'm just gon na cut a little bit more all right. So just like that and then now we have sideburns so that side's pretty much done. I'M just gon na take this excess right here. I'M just gon na cut it off, because i don't want that showing because why would we want that? And i'm just gon na go in. Oh, i lied okay, so i'm just gon na go in with that and just cut that off all right, so literally perfect. So now that we got that side done, i'm going to go ahead and literally do the exact same thing over to the other side. Okay, so now that the hard part is done, we can go ahead and just start gluing down our wig, i'm just going in and just brushing out the hair to get out any knots. This hair is so soft guys. I wish you could feel it okay. So i'm just gon na pull this down and what i'm gon na do is take my scissors and i'm just gon na cut twice one on this side and then another right on the side, not perfect. Clearly, but it's fine all that's going to get cut off anyway and of course, i'm going to be using my erica j hold me down: adhesive, listen y'all. I say this in every video. I love this glue. Okay and i'm always gon na say that. So what i'm gon na do is just kind of align where i want the hair to be okay, i think that's literally perfect and then i'm gon na go in and just fold this back and we're literally just going to start gluing. So i'm going to go ahead and just put the glue right along where my hairline is and where the wig cap is i'm gon na. Do that and i like to do it this way like in sections, because it just gives me so much more control. Like i don't know, i like having control, especially when i'm doing my hair, because i don't want to mess anything up, so i'm just going in and i'm just spreading out the glue making sure that there's an even amount spread out through out the hairline so that It dries evenly y'all. I'M sorry if i have like a really really like focused look on my face, but that's literally exactly what i'm trying to do is focus on this because y'all i'm going out this weekend - and this is the wig i'm wearing so listen. It has to look good okay, so i'm going ahead um i did my first layer, so i'm gon na go ahead. I'M gon na blow dry. It wait till it's clear and then i'm gon na do a second layer and literally we're gon na repeat the exact same thing on this side and on this side. Okay, so for the most part it is dry, so i'm just gon na go in with my second layer and we're gon na. Do the exact same thing all right so now that it's pretty much clear, i'm just going to pull down the front of the wig and i'm going to lay the hair right on top yeah? Okay. I think this is good and we're just gon na press that down and it's okay, like obviously, if you didn't exactly line up the glue with the front of the wig, because we're gon na go back and we're gon na put more glue at the end. So right now i'm just going in and as i'm brushing this back, i'm also putting pressure down so that it can really stick to the lace front. So i'm just repeating this y'all. This is like something that you literally have to just be patient with and trust. The process because it might look crazy now but listen once we do what we have to do and do all the steps, the necessary steps. Listen. This is going to look so good. So literally, i'm going to do the exact same thing over to this side and then i'm gon na. Do it to this side? Also, okay! So now that the wig is glued all around, we are gon na go ahead and we're gon na start cutting off that excess lace. Um, i'm just gon na go ahead and just start with the middle here, and i'm just gon na cut as close as possible. Right after i comb this back um, so as you can see, you can still kind of see the lace, but i'm going to show you guys how to fix that. So what i'm going ahead, i'm doing right now. I already put some glue right here on the front, so whenever you cut your lace and there's still spots that need glue, i just go ahead and i put the glue right at the tip of my um comb and i go back and i put it in The spots where i want the lace to be glued down just like that, so i already did the front here. So what i'm gon na do is start laying anyway, i'm gon na just start pressing that into my skin. Just like that, all right, so i'm gon na show you guys the trick to hiding your lace. So i'm just gon na go ahead and start parting out my baby hairs, i'm actually gon na go in with my other comb that has no glue on it. So we're going in and we're parting out our baby hairs and now we're going to take our same scissors and we're just going to go in and start cutting our edges. Okay, so i might go back and just like cut some pieces, a little shorter. It just depends how you want your baby hairs to be, but usually i like mine to be a little short all right now that we're looking crazy, i'm gon na go ahead and take my eco style gel and i'm actually gon na use my old edge brush. Not the new one that i got with the packaging and i always just go ahead, and i start with my baby hairs on my temple. Okay, so i went ahead and i finished my edges um. You can already see that, like the frontal is already like blending in more with my skin, so right now, i'm just going in and i'm creating my middle part and just making it flat. So there's no flyaways, i'm just going to keep doing that until it is completely flat and i feel like it's like perfectly in the middle okay, okay, so this is good enough. So this is literally the most important part out of the whole entire process, because i just feel like it melts everything together and it just makes it look so good and perfect. Literally so i'm going to go in with my got to be spray and i'm going to spray along my hairline, not too too much, i'm just gon na. Do that, just like that same thing. On the other side, all right, just like that, a little bit more and now i'm gon na go ahead and take my little silk like scarf thing and i'm gon na go ahead and just lay it right. On top of my edges and i'm gon na tie that back and i'm gon na tie this for about 10 minutes um, you should do like 10 to 15 minutes and y'all. I'M telling you after this, the lace issue is going to look different. Like i don't know why this like just works so good, but like never miss a step like if there's one step not to miss it's this one, so i'm just gon na go ahead and tie this, and i will be back in about 10 minutes. Okay, i completely lied. I'M actually gon na go ahead and just start straightening, my hair, while i'm actually waiting for this to you know melt into my skin or whatever. So we could kill some time. So i'm just gon na go ahead and do that just go over the hair. I mean like it's already straight, not perfectly obviously, so it's not gon na be too hard, but yeah. I'M just gon na. Do that and then honestly by then, i feel like this will be done all right y'all. So for the most part, this is pretty much straight, so i'm gon na go ahead and take our scarf off. This is really like my favorite part, all right like what what did i tell y'all? What what did i tell y'all? I just i can't, even i don't even have words right now like wow and imagine we're really not even i'm not done styling it yet like. I feel like we can make it a little bit more perfect, but y'all she's, cute she's, real cute, okay y'all. I really can't get over this hair and i wish y'all could feel how soft this hair is so soft. Oh, my goodness, i can't. Even so, i'm gon na go with my hot comb y'all. If you don't have a hot comb, i literally need you to go on amazon right now or go to your beauty supply store wherever okay and get you a hot comb because listen, i really don't even know how i did my hair without a hot comb, because The way it just like makes your hair so straight down to the scalp like you need one. If you don't have one, please i'm telling you it's going to change your life, i'm going to link below where this um hotcom is from. I literally got it from amazon, wasn't expensive at all. I think it was like 20, so yeah, it's not too expensive, and i know that um a lot of the beauty supply stores. Have it too around that same price so definitely invest in one, especially if you wear a lot of wigs all right. So, basically, now that we have this flat, i'm gon na go, i think i'm gon na you. Actually, i lied. I'M gon na go in with my pressed powder and then i'm gon na go in with a brush. I think we'll do this one and i'm just gon na go right into my middle part. Just so, you can like see that it's a little bit more defined. Just like that, all right, so i'm gon na go with my got to be spray. You know what i really need to invest in, since i fake be doing wigs all the time um. I need to get me a wax. Stick like the ones like. If you don't know what that is, it's like literally a wax stick, and then you like put it on your hair. I know y'all know what it is, but i don't know why i haven't gotten one yet, but i'm gon na order. Oh this is hot. I'M gon na order me some real soon and then my hair is really gon na be late, so i'm gon na take my spray and just spray that down so there's no flyaways, oh y'all. I am actually in love all right. I think it just needs a little bit more. Oh i'll, be trying not to get that in my eye. Oh, i know y'all see it. Oh my god, i'm so excited this came out so cute wow. I can't wait to beat my face whoa. That was a lot. I don't want no flyaways at all right. I think that we are good wow y'all y'all like i just let me just like, do a little spin for you guys, so you can really like get the full look, but this is flawless. Oh, my goodness, this came out really really cute. This is actually very easy to install. I didn't even bleach the knots like which i love, because a lot of times i'd be lazy, but um yeah. This came out flawless. I am extremely happy. I love this color. I love the length the hair, so soft, like i just only have good things to say about this hair seriously. So
Comments
One More Hair: So happy you like the hair and show it so wonderful, hope your fans can enjoy it as you, thanks for sharing #onemorehair
Oh Ok: Beautiful install