Half-Up Half-Down Quickweave W. Side Bang | Browneyedbeaute
- Posted on 16 September, 2022
- Bangs
- By Anonymous
I tried a half up half down quickweave for my birthday this year and I think I did pretty good. If I do say so myself... I hope you all enjoy today's video. Make sure you subscribe and turn your post notifications on so you don't miss future uploads #HalfUpHalfDown #QuickWeave
Proverbs 16:9 - "We can make our plans, but the lord determines our steps."
in this video...
KISS Edge Fixer https://amzn.to/3RM0ubz
Got2b Freeze Spray https://amzn.to/3qIAguK
fav. moisturizing hair products...
My African Pride Aloe & Coconut Water Pre-Poo https://bit.ly/3cjIS7p
SM Curl Enhancing Smoothie https://bit.ly/3OcT6Dy
Shea Butter Shampoo https://bit.ly/3vtFiOC
Shea Butter Conditioner https://bit.ly/3Bs29xX
my daily skincare products...
Fresh Rose Deep Hydration Toner https://bit.ly/3akz8sG
Ponds Dry Skin Cream https://bit.ly/3uQoAcw
Naturium Cleanser https://bit.ly/3EjN5BP
Vitamin C Serum https://bit.ly/3EnvrwQ
Neutrogena HydroBoost Mask https://bit.ly/3kJlktn
for business inquiries...
follow me...
Instagram: @browneyed_beaute
TikTok: browneyedbeaute
This video is NOT sponsored. However, when you click on the links it helps me see what you guys are liking from me
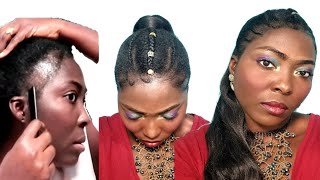
Hey girls, so today i'm showing you how i've achieved this half up, half down quick weave now a little disclaimer. I do not do this if you've been watching my channel, you already know you girl, normally just styles, her own natural hair, so working with extensions and glue and wig caps gel. It was a whole new universe, but i wanted to try my hand at it, because i really wanted my hair cute something different for my birthday, so i'm starting off with freshly washed hair here, i'm just detangling it, because i need to go ahead in with my Blow dryer and blow my hair out so that i can braid it down. Do all that good stuff is! Oh so once i finish blow drying everything i'm just going in and taking the back section detangling it through once again because now it's time to get ready to braid it down - and i guess that's gon na act as my base for my cap. So i'm just doing that. Look how long my hair is my hair looks so good, but i separated the back from the front because again this is a half a half down and now i'm just separating the back into two sections and then i'm going to separate both sides. The two sections into two more sections, so i'm going to end up with four braids in the back. I kept watching tutorials and stuff of other people doing half up half downs and they said that the braids in the back don't need to be super small, which was good for me because one i have really really thick hair and it's hard for me to really Get braids, you know small and do it in the quickest amount of time as possible and two i just ain't, feel like it like. I just did not feel like it. I was running short for time. So the fact that i could just go in and do these four braids really was great um, so yeah, that's what i did four braids in the back and then i put the cap on, but i'll be back once we get to that part. Oh is once those braids are done. I just took some oil because my scalp was kind of dry, so i just put oil in those parts, um yeah, to keep that scalp hold up and i did end up pinning the back. So i just took bobby pins and pinned the braids into one another to you know, get them off my neck. Now. Moving on to the front, i am just detangling this front section. This is going to be my sleek ponytail part, so i want to make sure it's tangle, free and you know ready to be smoothed up into a ponytail, but before i put any product on it, i'm just going to put it in place because i'm going to Take my cap and put my cap on my entire head, which i'm getting to in a moment, but i'm going to have my ponytail about this high, so i just put it in place just so. You know i could get used to that place or whatever, and then i twisted the ends wrapped it around each other and then i'm putting the cap on now. I did use two caps. I seen a video, i think, two videos where the girl used two caps and they did that to protect their hair from the glue. And since i was really nervous about getting glue on my actual hair, i made sure to use two caps as well, and also i took my got to be spray and sprayed that on my hair, this acts as a protective barrier. So i did that. Let that dry down a bit and then i took this other stuff. I forget what it's called, but it's another adhesive barrier. I believe so that glue doesn't get stuck to your actual hair. Like i said i was nervous about that. So i wanted to make sure i took all the precautionary measures before putting glue on my hair. Oh and all the videos i watched said to make sure that the got to be um spray and this protective stuff make sure it dries before gluing your tracks on. So i made sure to make sure it was dry y'all. It took me a good, probably 20 minutes to get everything dry and now i'm just taking some powder foundation and marking the line where the back separates from the front. That way, i know where to stop the tracks, so i hope that makes sense. But that's you know that's what the girls did. So that's what i did and now here i'm just putting glue on my tracks they're already like pre-measured. This is old hair. I had this hair in for my wedding, so it was cut already, but i did make sure to fit it to my head before applying the glue, and this is me trying to figure out how to do it. I took this one off and put it back on. I think, like three times before, actually getting the placement - and you know feeling like i knew what i was doing - girl um, but eventually i got it and then i just moved on until i was finished, the entire back half and i made sure to go in A u-shape because you know all the professionals they said to do it in a u-shape so that it creates like an invisible heart type of thing, for when you go to take the um excess cap off and pull your half up so it'll create like this invisible Part, i believe, that's what it's called, if that's not what it's called, i'm so sorry, but i believe that's what they call it uh. So this is the backyard i was super impressed it was. It was coming right on along um once i got up to this point. I just started putting them straight across because um yeah the? U was kind of getting real tight, so i just started putting them across, but so far so good, and i was feeling good at this point. I was feeling good. This is what it looks like with the back all completed. Every piece of hair is in place that one on top y'all don't mind it. I did have to go back and kind of lift it because it was too far up, but i'm just going to put this in a ponytail and now it's time to cut the cap, i was so nervous to cut this cap. I have never done this before y'all and i just knew i was going to cut my hair underneath, but it turned out to be okay later on. I did realize that i did not put some of the tracks like all the way to the edge, and so you can see some of the cap, but you'll see it later on. You can see it, but not when my hair is down like my hair covers it, but it's still a little bit showing. But now, since i do want to bang i'm just parting, my bang out um, you know trying to get that in place and everything before i go in and sleek that top ponytail on so to sleep. My hair up, i use this edge fixer by kiss, and this is in cherry blossom. First of all, it's a 10 out of 10. the hold it was amazing. Look at it, you can see it right here. You can see it just forming. The hole was superb and the smell of it smells so good. I absolutely love it all the videos or not all, but a lot of videos i watch they use this edge fixer to slip their hair up as well as well as some other things, but this really did my hair well. Y'All know my hair is thick okay. I have super thick super dense, hair, and so for this to be the only product i use and it just slipped my hair on up it really 10 out of 10. Okay, definitely we'll be using this a lot more often for sleek styles, but i just go in put it everywhere, girl, i put it everywhere. I even parted, through the middle, put it on up in the middle, because i was trying to get this as sleek as i possibly could, and that was the look i was going for and that's what i was gon na get. So that's what i did and um yeah i just kind of work it in mold it and get my ponytail to my liking. It'S really the edges. For me, i mean look at that. It'S wow! So after i get my ponytail all sleek and in place, i wrap my scarf around it just so it can help set the hair, get that to dry in and get everything nice and smooth and slick down. Then i moved on to flat ironing the back now. This is where i kind of messed up, because the hair is curly, it's curly hair, so i was going for that straight kind of pin, curled body wave type of look, and it just wasn't given that. I didn't know that at this point, obviously, but later on, we'll see it just wasn't, given that okay wasn't giving it so i did flat iron it and i was doing, pin curls. You know to achieve that. Look but yeah later on, y'all gon na see what i ended up doing. However, now it's time to move on to this top ponytail. As you can see, the hair has set beautifully. It looks really really good and this ponytail girl i had to redo this ponytail. So many times so this that y'all see in the video, this isn't even the final, like ponytail situation that i ended up with. I had to redo the ponytail like four to five times, because what i was doing right here is not correct. Do not do it like this, because i was not doing it right at all um. I ended up with too much hair and then i don't know if you can tell, but in the middle you can see my hair like the bun i did. I did not cover that up at all so yeah. This was all wrong, but you know trial and error. You live. You learn um, so yeah, i'm just you know i'm gon na. Let you finish looking at this, even though it's all types of wrong, but i'ma. Let you finish looking at it so now onto the bang, so i knew i wanted a bang. I knew i wanted it to swoop. I felt like so i added some hair to the bang piece just to make it a bit more full and to make it um kind of like the same texture as everywhere else. So i did glue the hair into my bang piece. I did it, i glued it onto my scalp, because that's what everyone was saying you know they said: do not put it on your hair glue it on your scalp. So that's what i did and then i went in with my flat iron and just kind of did little swoops pressed it out or whatever, and i do later on - pin curl that so that you know what i thought i wanted. It would turn out that way, but you won't see. This is not at all how i ended up wearing my hair, but this is what i did and i'm pretty sure you could do it this way, but you might want to get straight hair so that it comes out the way you want it to look. However, i feel like overall, like i'd, have a good foundation down like the basics. Were there you know, and i was able to build from it, which we'll see in the next few clips once i show you guys the final result. So this is how my hair turned out y'all, i decided to just wet my hair and twist it up and wear it curly, since this is curly hair, it was just not getting as straight as i wanted to. The pink curls did not turn out right. It just no, it was too soft, it just wasn't getting as straight as i wanted to, but i made it work, and this was my birthday hair. I think it turned out pretty well now, of course, i'm not a professional. This is not what i do. This is my first time ever doing a quick weave, let alone doing a quick week on myself, so yeah. What do y'all think i think it turned out cute my birthday was nice. I looked good my birthday. I felt pretty one birthday. This style was really pretty. So yeah hope you guys enjoyed this video drop down in the comments, how you think i did and if you have any tips for me. Let me know the tips down in the comments as well. Also, don't forget to subscribe to my channel if you have not already girl and that's a lot of you guys in this video, so i'll catch you in my next one bye takes me.
Comments
krenae: Very purty sis