Valentine'S Day Hair Inspo ! Easy Heart Swoop Bang Tutorial Beginner Friendly
- Posted on 08 February, 2022
- Bangs
- By Anonymous
Heyyyy Girlfriends ! I’m Meech, welcome to my channel! In this video I am showing you all how to do this #ValentinesDay Heart swoop bang on this #FrontalWig ! I tried to be as detailed as possible to make this tutorial #BeginnerFriendly ! Thanks so much for watching !
Hair from BlaqRoseHair.com
CONNECT WITH ME!
Business Inquiries: [email protected]
INSTAGRAM: @MeechNicole
TWITTER: @MochaMeech
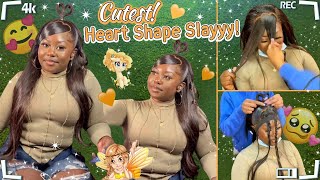
Okay, y'all i'm going to do a voiceover on this because um i'm watching forensic files right now and i don't want to get copyrighted so so i'm gon na do a voice over okay y'all, even though i miss y'all - and i really do want to just like Talk y'all through this, i'm out of breath, y'all, i'm out of breath just so y'all, but anyways. Let'S just go ahead and get right into this video. Okay. So obviously i am going to do this style on this y'all. I didn't even introduce myself or nothing, i'm so rude, hey y'all, if you've never been here before, i'm meech girl, hey girl, um, sorry, but uh. I'M just going to do this on a wig that i already have installed and the lace was looking a little crusty. So i'm just going to go in with my black rose hair, stuck on your lace, glue and just touch that up real, quick and then i'm going to get right into this style. Okay, so this wig that i'm using is a 13 by 6 frontal wig from black rose hair. You do not have to use a 13x6 wig to achieve this style. You can use a 13x4 um. You could really even use a five by five closure y'all for real, i'm, not really sure on the four by four somebody keep me posted on that um i mean you could really pretty much do anything with anything, but i just feel like it would be easier If you would at least use a five by five closure, so yeah, i'm just going in i'm touching that up going across my hairline, making sure that this all looks: okay, okay, y'all! So now i'm just going to get right into making the heart. For my swoop, bang - and this part it's going to take you a second - it might have taken me, 15 or 20 minutes to really get it defined. How i wanted to remember, depending on what you're doing this week, you want to make sure your tracks and everything are covered, so make sure you leave enough hair out for that. But the way that i did this is basically i just made two c's like i just parted, as if i was drawing out two c's and i obviously just connected them, but yeah. This took me a minute because you know you have to decide how big you want it. You have to make sure that it's flowing to where it's going to fall nicely into the spool, bang and so on and so forth. So just take your time on this part. There'S no need to rush. You want to make sure that your heart looks exactly how you want it. It doesn't have to be as big as mine, um, so yeah. So, throughout this video, like even before i finish, the heart you'll see me continuously like comb, the hair down and tuck it behind my ear and the reason why i'm doing that is because i want to make sure that i'm not putting so much hair in this Swoop that it doesn't fit behind my ear, so my ears are pretty small and that's the way that i determine how much hair that i want in my swoop. Bang, because i want my ear to hold it perfectly without having to use pins or clips or anything like that now, if you still have to that's perfectly fine, that's okay, um, but that's just my personal preference, so yeah! That'S the reason why i'm just going to continue to like swoop it over and just make sure that everything is looking how i want another thing that i would recommend is taking your hot comb throughout this parting process and kind of laying things in a general direction Of where you want them to be, it doesn't have to be like perfect, like you, don't have to add a bunch of product or anything to make it like stay there, because again, it's just kind of like a guide, but that's going to also help. You see like what you're doing and kind of keep the hair in place. So i just wanted to leave some of these clips in here of me just parting and re-parting, and just continuously stopping to like really look at this heart, so that you guys can see that i really did have to keep reparting until i got it exactly how I want so just so y'all know if it takes you a little while that's okay, just kind of keep playing around with it. So now that i have my heart parted out exactly how i want. I got me a little clip and i've kind of parted it in half and i'm going in and i'm pretty much laying the swoop how i want it to go. I'M just using this as a guide. I haven't added any products or anything, i'm just again using it as a guide for exactly how i want it to look now. I'M also going to go in with my hot comb and i'm going to really define that part just so that i can make sure that you know everything is all clean and it looks exactly how i want so. I'M going to use the wax stick and i am going to just lay that down and make sure that all the flyaways and everything are out of the way so that i can really see what i am doing as far as my part is concerned. So again, that's the only product. I'Ve added here i haven't started molding the heart or anything. Yet i'm just pretty much laying everything as flat as possible in the direction. I want it to go. So i do want to point out something here as i'm pressing this heart down notice how the hot comb is going straight down towards my face and not necessarily like off to the side like you would think, because i was making a swoop that i would be Pressing it kind of like sideways, but i'm not i'm pressing it straight down, because i noticed like when i went sideways. It started to take away from the actual part, so i'm just going to press it straight down and then once i mold it, i'm going to swoop it over. So there you guys can actually see that um. The part is really defined and you can see how i am pressing it down and straight back and then i'm going to swoop it over with the comb instead of instead of combing it or pressing it sideways. So this is me, showing you guys again how that is turning out. So this is my part with all the flyaways and everything out of the way. Again i haven't added any product except the wax stick. So now i'm just going to go in and i'm going to start parting this out to mold it down into place. So i'm just going to take this section by section and i am just going to pin the other hair back out of the way just to make sure that this is going to lay as smooth as possible. And now i'm just going to start to mold. My swoop down so on the side where my swoop bang, is, i really don't too much care about the baby hair because it's going to get covered up anyways, i did want to leave the one out by my ear. Obviously that's completely optional. You don't have to leave as much or you don't have to leave that at all, but that's just my personal preference now i'm just going to go in with my wax stick and i am going to lay this as flat as possible. Now i feel, like people do not um they. They skip this step a lot whenever it comes to like laying your wig, but it's super important that on your swoops, especially that everything is super super flat. So if you do have a hot comb, please try not to skip this step. I know that nobody likes the hot comb, but this is what's gon na get that super flat and help you to hold it behind your ear without using a bunch of pins and all kind of stuff. So, as you guys can see, i'm just kind of molding that into place, and i'm just tucking it behind my ear as i go and then i'm just gon na go and continue to keep going in the sections between the sections i do go in with my Blow dryer and again, this is something that there's no need to rush. Take your time go in and you know lay it as flat as possible, then use your blow dryer to mold it into place. So on to the next section, i'm just going to again split that and i am going to pin the rest back and then i'm going to take that got to be spray again. Y'All i'm going to spray underneath it i'm going to spray on top of it, and then i'm going to use my comb to mold it into place prior to using my um blow dryer, to set it now when i'm combing. This i'm not like really like digging into the all the way through to the bottom layer, like the first layer that i did, i'm really kind of just combing it over the top, because once you set that layer underneath it with the blow dryer, then that's pretty Much it so, that's why you don't want to use a blow dryer until you're, absolutely sure that it's laying exactly how you want it to lay so just keep that in mind um, just you want to kind of like just smooth it over the top and just Comb it in the same direction, but you don't have to like dig all the way through with the comb to you know, try to lay it um. Excuse me y'all. My allergies was on 10 in this video, so um, but nevertheless yeah just kind of smooth. It right over the top until you get it exactly how you want it and then go in with your blow dryer and set it into place. Okay y'all, so we have finally made it to the last section and i am going to go ahead and mold this into place now um. I want again you guys to pay attention to how i'm combing it down towards my face exactly how i pressed it with that hot comb and then i'm gon na swoop it over. So, just again keep that in mind and again the reason why i'm doing that is because i want that heart to be as defined as possible, because if i comb it over to the side, then you know it's gon na start losing some of the curve on The other side, i hope you guys really understand what i'm saying um. I just use this clip from my reel that i posted on instagram, so you guys can actually see me combing it through because i, for whatever reason, don't have it for my youtube: video but yeah, i'm combing it down and then i'm swooping it over. So again, that heart can be as defined as possible and as i'm combing this swoop into place, i'm just using my fingers to kind of hold it. You can use a pen or a bobby pin or whatever you need, as you guys can see, you don't want to pull too hard because you don't want it to start. You know kind of moving out the way, but i'm just swooping it right over the top and then once i get it to where i want it, then i'm just going to go in with my blow dryer here, i'm just doing the very front of the bang. You don't want to forget that, because you don't want that area to start lifting either so yeah again, i can't reiterate the importance of that hot comb enough you guys, because once you get that hot comb to lay as flat as possible with that wax stick molding. It into place is the easy part, but if it's not like super flat and you're trying to go in and you're trying to get this to lay how you want it to lay, it could kind of be pretty difficult. Okay. So this is the last time we're just gon na go in with this blow dryer, just to make sure that everything is exactly where we want it to go, and now i'm just going to go ahead and clip that into place here, just so that it can Really kind of dry, where i want it to go, and now i'm going to go in with some concealer and really define my part, and this is what's going to really help that heart stand out so yeah this is optional. You don't have to do this. If you don't mind like a thinner part or if your part is already perfect, then you don't have to do this step, but i decided to do it because i just again wanted my heart to be very defined. So now i'm just going to comb this out and i'm just going to go in really quickly and define my curls with my flat iron. This is pretty much self-explanatory. You can actually wear your hair straight or you can wear it curled, but i'm going to go in with my camera's dry oil, spray and spray that throughout my hair and i'm gon na hit it with my flat irons really quickly. If you don't know how to curl with flat irons - and you would like a tutorial on that - please let me know: okay, because i know a lot of people struggle with curling with a flat iron. I know a lot of people struggle curling with barrel irons and it's a lot of people that just can't curl at all, but if you would like a tutorial on that, let me know this is the final. Look. You guys i'm gon na try to get a couple more valentine's day. Inspired looks out just to give you guys some ideas of how you want to wear your hair happy valentine's day. I love y'all, god willing. I will see y'all in the next video bye. You


Comments
reallyKensingtonPhilly: The fact that I been doing the swoop for years and never did a heart thanks for showing this so I can do it myself as well
Cia Joseph: I’ve been searching for a tutorial on this! You did so good!
Eve: Stunning girl and I’m excited for this
Monelisa: First of all, you’re GORGEOUS ✨ this style is super cute too, can’t wait to try!
Lexy: Needed this. Thanks!
shakeria edwards: I watched this video last night because I was considering doing a heart swoop but I did a regular swoop instead your tip about making sure it’s flat and making sure the hair fits behind your ear really help me when I did my swoop it looks so nice, neat and flat ,its not to much hair behind my ear it’s fit perfectly
P.S Dominique: So cute !
Amani & Nayeli D: Your beautiful have a blessed day
Davida Miller: Good job I enjoyed this and have learnt much
Debbie Topeze: Glowing fits you
Nika Gere': So cuteeeeee!!!
emommy: Yes tutorial on curling with both flat n curling iron ty
Kriss Dwyer: how do i do this for a sew-in?
Monique Jackson: This is super cute ❤️
Lola Bunny: Aweee the baby bump
RAJEEKA: Hey guys Jesus loves you He wants you to come as you are He died for your sins past,present,and future. He was buried then rose again on the third day so you can be saved,so that you can have the free gift of Salvation.If you want God in your life just seek Him truly put your faith in Him and accept Him as your Lord and savior.It is by God’s grace you can be saved❤️‼️
Giseimi Garcia: .