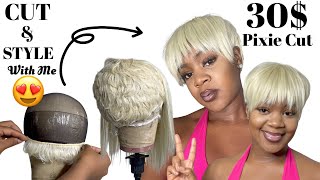
Swoop Bang Weave Install | Finger Wave Pixie || Short Hair Tutorial || Kim Naeema
Products Used to Achieve This Look:
OUTRE GEM 8 INCH YAKI STRAIGHT WEAVING HAIR
COLOR: 1B/30
30 SECOND HAIR GLUE
FLAT IRON
Cream of Nature Sulfate Free Shampoo
Shea Moisture Conditioner
Olive Oil Foam Wrap Lotion
Kemi Oyl
Marcel Ampro Wax
Pump it Up Medium Hold Spritz
Olive Oil Sheen Spray
Fine Tooth Comb
Instagram: @KimNaeema
John 14:6 “I am the way and the truth and the life.
No one comes to the Father except through me.
❣ To God Be All The Glory! ✞
✞♫❣ Imagine, Dream, & Inspire ❣♫✞
LOVE YOU, KIM NAEEMA
Like mommy's here, yes, hey, let go one Prezi, oh he's so cute, so I'm starting this process to freshly washed and conditioned hair, and I'm molding my hair with the olive oil foaming wrap. The mold is key when preparing your hair to lay tracks and molding it. In the right direction, this will result in your style being laid properly and for you to have a more flawless and complete hairstyle. So, as you can see, I'm just adding some finger wave actions to the side. Just to give this look a little bit more of a design touch to it and I'm just adding a little bit more of the foam wrap just to create more of the wave action that I'm trying to create for this look so once the tracks are installed, The hair should be swing from my right, which is your left and that's due to having the right mold so for this first track. I'Ve already pre-cut and pre parted my hair into a curved parting. As you can see now, I'm gon na go ahead and lay this track down from one side of my head to the opposite side of my head and laying it down onto my scalp and then from this point. I'M gon na lift that track a little bit upwards to give that swing effect, and you should have the track fall right in the center of your ear. I'Ve used a 30 second glue to install these extensions, and I've left a little bit of leave out from the sides of my head and also in the front of my head, and one little trick I like to do is to pass the extension here through with A flat iron which helps with the cutting process later on and for the second track. I'M gon na go ahead and lay this track down a little bit past the first track. Using that curve parting, you swing in the track around to the opposite side of my head, laying it just a little bit past the first track. The track should be laying this way and you should definitely be getting that swing effect repeating this process on the third track. I'M going to go ahead and lay this track a little bit past the previous track in that same curved parting and I'm gon na swing. It around and dropping it a little bit past my ear this time for the fourth track. I want to show you my parting. The lines are gon na, be going a little bit longer and a little bit deeper. If you could see that - and it has a dip right in the center, that means I'm going to go up with the track when I'm laying the fourth one in order to create that swing effect. So laying this fourth track, I'm going to lay it a little bit past the previous and then I'm going to be swinging that around and as you can see, I'm going to now drop. This fourth track a little bit past my ear. So now I'm laying track number five and, as a side note I'm installing. I believe this is a 8 inch length hair in a Yaqui Strait, which is closest to my hair, texture and color 1b 30. Adding track number 6. I just want to show you the close-up of the horizontal line that I have going across and I'm just showing you the swing effect and also another close-up of how it would look once it's laid down for track number 6 and right now. I have a little bit of hair left remaining. That'S how much I have left and I have a bit of coverage on the sides. That'S going to be covering the tracks. That'S just a little bit of my leave out and towards the front. I have a little bit of that leave out and that's also to cover the tracks, and I can actually flip my hair going up or to the side. Here'S a close-up of the parting, that's going straight across in the crown area, which is preparing me for the final closure piece, which is track 7. Here'S a little bit of my leave out that will cover that track and everything is covered and once molded it should swing nicely off to the side. Hmm, I wonder if I should leave it like this or cut it now, I'm gon na cut it I'll, be using a razor to cut the hair and the razor allows me the control not to over cut the hair and also to see what I'm doing and As you can see, I'm just bumping it a little bit and flipping it to the side. Only because I want to see how the hair is falling and also to go back into it and to determine how much hair I wanted to trim away to kind of get the style that I'm desiring. And this takes a lot of playing around with, and things like that, just to kind of get the feel of how you want your style to look, I'm going to be cutting the sides a little bit more off-camera and then I'll be back with my finished results.


Comments
Tameka Johnson: Love it.. Exactly what I was looking for and the way u installed the hair created the style I wanted.. Thank u.. About to do it now
jalajay: Great video, just what I was looking for and you made it seem so easy to do, Thanks
lee lovely: This is absolutely beautiful. I recently did the big chop on my hair and I am definitely loving this style
Queen Tea: love the style! I have been trying to do this style myself but wasn't able to get that curve effect...ur explanation was clear and easy to follow. thanks so much for sharing!
L Bowser: very pretty, I love your style. You did an awesome job.
Lynnell Herbert Blessed: Love this hair style just what ima try for my hair thank you
Jennifer Cole: Loving your videos!! Keep them coming. I am learning a lot from you. Thanks
Shalonda H.: Fierce! I love short hair, it's so sassy ad you wear it so well! You've earned a new subscriber!
kristina anderson: I'm definitely going to try this style
Jenn Chamberlain: So pretty..love the long bangs
Shanae Thompson: I like how you explain your self I dont think you leave out any thing thank you and going a head now to try it out
Rose: That is beautiful
Juleen Forbes: Really nice, I luv the highlights as well
Carolyn Smith: just what im looking for thanks
Jewelsheen Brown: Very cute
Celia King: Awesome,
Theresa Blanton: BEA-U-TI-FUL.
Nathaniel Santos: Where I can buy that and the glue... Please help me indeed that
Haya Ibrahim: how long stay this glue and where i can buy this
Pynk Bella: Girlllllll dat is beautifulllllllllll
Natural Beauty: Are there videos to show how to cut tracks 1-7? Is it just simply cut to fit? Thanks never did this.