First Time Cutting Bangs In A Lace Front Wig | Curly To Straight Ft. Ishow Hair
WATCH IN HD
HEY BABES IM SO HAPPY TO BE BACK
PRODUCTS IN THIS VIDEO
Lace front wig 24 inches wavy Indian http://bit.ly/2tYGPQ5
Bio silk
Gots 2 b Spray
Bling flat Iron & double reversible bonnet
Clairol 40 volume developer & bw2 bleach
Shimmer lights shampoo & conditioner
My 8% off discount code: "ISCG8"
#Ishowbeauty hair official store: http://bit.ly/3aTzhPx
Get same 24in loose deep wig: http://bit.ly/2tYGPQ5
Flash sale cheap wig(start from $47.01): http://bit.ly/2tMUEkQ
Get your own wig from Ishowbeauty.com: http://bit.ly/2U2IMFL
Ishow hair hot selling items: http://bit.ly/2O7lLhf
Ishow hair 3 bundles: http://bit.ly/37A6xcr
Ishow hair 3 bundles with 4x4 closure: http://bit.ly/2U3Sqbe
Ishow hair 3 bundles with 13x4 frontal: http://bit.ly/2t7OsDA
Ishow blonde hair weaves: http://bit.ly/2RTIZbH
Ishow #Aliexpresshair store: http://bit.ly/2m1mA05
Contact #Ishowhair: Email: [email protected]
Whatsapp: +86 182 3684 8017
Follow Ishowbeauty on social media:
YouTube (@Ishowhair): http://bit.ly/2RTJ1QR
Instagram (@officialishowhair): http://bit.ly/2U4TI5U
Facebook (@Ishowbeauty): http://bit.ly/37tXv0t
Twitter (@IshowBeautyHair): http://bit.ly/38IuSge
#cheapwig #cheaphair #loosedeep #loosedeepwig #frontalwig #hairtransformation #ishowhairreview #wiginstall #humanhairwigs #blackgirl #hairtutorial #lacewig #bombwig #ishowbeautywig
Instagram: @curlyxgem
Business instagram: @cgzextensions
For COLLABS/PR: [email protected]
Camera Used: Sony a6400
xoxo,
CurlyGem
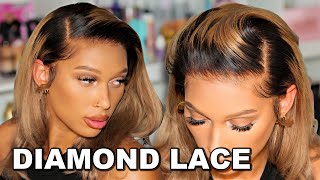
Hey my beautiful hey, my beautiful gyms, the sugar Alexis aka curly gem on YouTube. So in today's video I will be reviewing a wig that was sent to me from a company called I show hair and before we get started. I just wanted to say that these are my bonnets, they're double layered and they are reversible they're on sell for $ 12. Okay, I will be launching a business, but that's not gon na be in this video. That'S gon na be in a whole, separate video, because this is dedicated to I show here so stay tuned for that. But all you have to do is DM me. If you want to bond it on instagram at curly, extreme know their own, so for $ 12, and when I launched the website, the original price will be back to $ 20. So y'all better get your 1 okay. There are $ 12. That'S the end! That'S all! Anyway, so I show hair sent me a wig that came in this box, you guys can see. I show hair, that's how it's spelled and I love the back of the box because of literally like, if you guys, don't know anything about wigs. It literally tells you the haircare instructions on the back of the box and I think that's really cool, because not a lot of companies do this, like, especially in the box. So that's cute packaging is so pretty it's like gold and pink. So this is what comes in the box. They gave me a wig cap that looks like this, so this is their loose Indian, deep, wave, curly wig, and this is 24 inches. I think it ranges from about Lake. It ranges from 10 to 26 inches and this is 24, so you know I had to get like a long inch. The 24 inches that I received is actually on sale right now. The original price is 228 dollars and seventy eight cents, but right now it is a hundred and sixty dollars and 15 cents. So it's a big difference. I'M gon na tweet this out first impressions, it's already like in like a hairnet to keep the hair protected. I'M sorry my dog is making noise comes with like cute baby hairs. I can already see the baby hairs on this wig. Oh, my god, this wave is beautiful. Like can y'all see that it's super beautiful it has like. It doesn't really have like a strong smell. Just smells like it's been like like washed a little bit, but it's not like a crazy smell, so that is the wave. How beautiful is this? So it also comes like styrofoam under it. Oh wow. This is a lace front, so it is like a front tool. I can leave my baby hairs down and in the inside. This wig is like literally lit because I'm gon na count how many clips there is in here there's one two three four there's four clips in here: y'all. So if it is too big for your head, there's four clips: there isn't a spandex band in there, but there is these adjustable straps. So you can, you know, fix these to just your head and I think all their cap sizes are a medium. If I'm not mistaken, so that's pretty good. If it does happen to fit a little too big on your head, you can sew a spandex band in here and you can get a spandex band at like a hair store and it's so beautiful and it's super soft. I'M gon na run my hands through it, I'm not getting any shutting at all either no shedding no shedding, as of yet at all. It'S so soft, like I'm telling y'all like this, feels so soft, so I'm gon na put it on my head. Oh okay! It'S about to get real, so this is the wig just straight on my head. Without anything done to it, um, as you guys can see what I'm try to zoom in with my camera, this is the hairline, so you guys can see like the baby. Hairs are right here and the hairline kind of starts a little further back like back there and then the baby hairs are like kind of down here and I will be bleaching these not so it can look a little more natural, so yeah. So I can also tell you guys that the cap is not too tight on my head. It is not suffocating at all, and that's really good. This front tool will need a lot of work. You know with plucking and all that, so I will show you guys how I pluck and how I bleach my knots in this video and hopefully how I style this hair, because I kind of want to like do something really cute we're gon na do something so Cute with this hair cuz, the cur - I don't even want to mess these curls up, they're, so beautiful, like literally so beautiful, so, let's get into it. Okay. So, to start off by bleaching my knots, I use the brand Clairol, so I use the 40 volume developer and I use the BW to bleach and I also have a hair dyeing brush and a bowl and some foil. And then you are also going to need. Your wig or your clothes, your frontal, so before I start icon, I'm just setting up right here I got all of this stuff from Sally's. You can also get it from your local beauty supply store. So I used about three scoops for a frontal and I'm also pouring in my developer and I'm trying to make the consistency of it almost like oatmeal. So I want it to be really thick because you don't want it to be too runny, because it will sleep through the knots and you're gon na have to go in and die. You know the hair cuz, the roots will get blonde and stuff. So you see it's kind of thick and I'm just going over the front tool with my hair dyeing brush and I'm just like kind of patting it on. As you can see, I'm doing this a little sloppily, but you know is work it out and you guys don't have to pat so hard, because that'll also make the bleach seep through the knots. And then you know you're gon na get over bleach hair and then you're gon na have to go in and read I the roots. You know that term blonde back to the original color, so you guys can pet very lightly. I know it's kind of zoomed up, but I'm not patting it so hard. It just looks like that: excuse the quality very ear, but I'm using shimmer lights, conditioner and shimmer light shampoo after I bleached my knots, and I do this to get like the brassiness out of you know the knots because it does turn kind of like blonde. So I just wanted to look natural and you know that's why I do this, so I can get the brassiness out of it and it'll look like a scalp okay and before I shampoo the knots I just washed the bleached out. First, so you'll be surprised at how many people get that confused. So please watch the bleach out, okay, you so I was trying to find a way to fill me plucking, my frontal, but I could not find the right angle. So I was like you know what just forget it. So there was just a little short clip of me and now I'm taking my foundation and I'm just using a brush to put it on my lace, and this is so my scalp can look natural it'll. Look more like my scalp and I'm using a liquid foundation here. You can also use a powder if you want, whatever your preference is. Lord Jesus knew that I looked a hot mess, but it's okay, but anyways. This is the wig at a Snatcher estate. That was like the natural curls, like just washed, and now I'm taking my guts to be spray and just going around my edges, and I'm just spraying this so my wig can lay down. I would actually recommend a Goss to be glue. I feel like it would have held better, but this is kind of like a temporary wig. It wasn't nothing of me laying my edges down, because I wanted to wear bangs anyway, so it was like whatever so now, I'm just blow-drying the wig, so it can lay down. So here I was just parting, my hair in the middle, so I could get ready to cut me a bang girl. So that's what I started off with doing. First, just doing a middle part, and I stuck it apart so kind of took me a little bit, but I got there so the next thing that I did was parted diagonally like towards the front of my hair, as you guys can see - and this is so - I could you know, try to see where I wanted my bang and how much hair I wanted out. So I was just playing around with that a little bit at the moment. I didn't have any clips. So if I were you, I would clip your hair back. Definitely you know so: hair won't get in your way and here I'm just kind of cleaning up my part. That was just like, I guess for me to see how much hair I wanted out, but now I'm actually going in and cleaning that part up in the front. So I didn't want my bangs to be too thick or too thin. So I was just trying to find the perfect amount of hair for it to look full enough to look nice. You get what I'm saying so I felt like that was kind of fine, because it would have showed that I had a bang with it. Looking kind of fool, so you guys can play around a little bit with it before you cut anything, and so now is time to cut your bang. So I would recommend, if y'all cut your hair long before you cut it short. So, as you can see, I cut this bang kind of long. That'S on purpose. It'S not gon na. Look like that and then, as you can see, I'm just twisting it and I'm taking my scissors and just like sniffing the ends, I'm going in back and forth forth and back to make those ends kind of look like natural and not so cutty. Looking, I thought I'll not explain it and I kinda wanted my bang to be like longer towards the ends. So I guess it can look a little more like not so straight across but like Larry looking, so I did it kind of like chop the ends off. That'S what I'm kind of doing and I'm going in a diagonal direction, because I want those ends to be a little longer, so I'm just twisting the hair over again and I'm going back to cut the ends and any long pieces of hair. That I see. I just took and cut it and now I'm going over my bangs with the straightener, as you guys can see, and I took the other side and I'm going to straighten that as well kind of like bumped it out. So I couldn't look more banging, I'm making. No sense after like so now that the bang is bumped out. I just take it and clean it up, as you guys can see, and you want to bend forward because the hair was getting in my eye and I'm also going towards those ends and trying to like cut that and I'm just fixing the middle part in the Middle as you guys can see so I'm taking my bio silk and I use this as a heat protectant and I guess like it, makes my hair shiny. So I just put that at the top of my hair and I'm using a hot comb to press out. My middle part, so I won't look so bumpy looking and now, I'm just going in and straightening this hair and I use that biosilk oil and this is actually the straightener that I'm selling. So if you guys are interested in it, you will be able to purchase it on my website soon make sure you follow my instagram at cgz extension, so you can see and get you a flat, and since this hair is curly, you guys can see me brushing It first before I straighten it just so it can be easier to press out and you guys see these ends definitely need to be cut, and this is probably because this hair was like wavy or curly. So and I straightened it so that's why I needed to be cut at the ends, and you guys can see me doing that and I just feel like cutting the ends just makes it look healthier, hey guys - and this is the final results of this look. This hair is super beautiful, super silky. I would recommend straightening it if you like, um almost like it's, not even like a blowout sort of straight it's like, and it does have like some volume and thickness to it. It'S not super super straight, but at the same time you guys can pretty much see like it's so like I I wish I can tell you guys how soft it is. I didn't get that much shedding either when I was straightening the hair um. Now I dig it a little scissor crazy, so this is the final result. I hope you like it vapes give me a thumbs up. If you like this video, you can thumbs down. If you don't like it, that's okay! This was like my first time doing a bang on a pretzel. Oh god, I have a booger, I'm so so happy it came out like really nice. I think this is the perfect fall, look and all of that good stuff. So what I recommend this hair? I would definitely recommend this hair, so thank you so much. I show hair for sending me this hair. This wig is definitely going to be like one of my favorites. I can already see it now. I will leave everything below, so you guys can check it out. I do want to see, however, you know this hair curled because it did come curly, so I will update you guys in another video of how this hair can hold a curl, alright, bye, babes, and thank you so much for watching


Comments
NessacxBeauty: You’re back! I love the bangs!! I really liked it waved though!! It’s beautiful
Mariah Shantiece: Awww yay! You’re back and beautiful as ever, I love you with bangs. Giving me America’s next top model vibes
ONLY.FIRECRACKER: You did a good job on this unit
ONLY.FIRECRACKER: Yass I’m in love with this wig