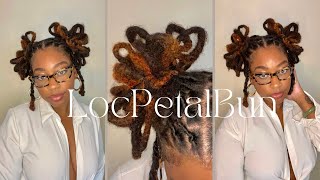
Crochet Goddess Locs On A Yaki Hd Lace Front Wig! Braid Less Crochets How To Full Tutorial Wowebony
- Posted on 06 July, 2022
- HD Lace Wig
- By Anonymous
No cornrows, no braids, no flat twists! FULL TUTORIAL on how to install crochets on a wig! EASY, beginner friendly and BRAID-LESS! Summer #Locs hairstyle! Add locs to your wig #DIYGoddessLocs
●▬▬▬▬▬▬▬▬▬ ◆ #WoWEbony ◆▬▬▬▬▬▬▬▬●
❤All the hair can be paid in 4 installments via Affirm or PayPal pay later
❤Use the Special Code get EXTRA $10 OFF: S10
———————————————————————————
☆ ★WoWEbony Indian Remy Human Hair Yaki Straight Lace Front Wigs [DLFW02] ☆ ★
https://www.wowebony.com/wowebony-indi...
★ Wig Code: DLFW02
★13x6 HD lace frontal wig, 20inches, 150% density, M size
★Pre-bleached
★Pre-plucked
★Pre-installed removable, adjustable elastic band
▶ Shop #beginnerfriendly #bob style wigs by this link:
https://www.wowebony.com/lace-front-wi...
▶#WoWEbony Other #pre-styled #readytogo wigs:
https://www.wowebony.com/ombre-blonde-...
▶ #WoWEbony #HD invisiable lace wigs:
https://www.wowebony.com/lace-front-wi...
▶ #WoWEbony Hot 360 Lace Wig( natural in ponytails)
https://www.wowebony.com/360-lace-wigs...
▶ #WoWEbony Restock luxury #fulllacewigs :
https://www.wowebony.com/full-lace-wig...
▶Free Shipping over $89◀
Email us: [email protected]
Follow WOW EBONY:
Facebook: https://www.facebook.com/Wowebony/
Instagram: https://www.instagram.com/wowebonyhair...
Pinterest: https://www.pinterest.com/Wowebony/
YouTube: https://www.youtube.com/WowEbony
Twitter: https://twitter.com/wowebonyhair
TikTok:https://www.tiktok.com/@wowebonyoffici...
-------------------------------------------------
Hey loves! ♥ Become a Beige-ian by SUBSCRIBING here ▼
https://www.youtube.com/user/Mahoghany...
NEW VIDEOS POSTED EVERY WEEK!
TURN ON POST NOTIFICATIONS
**I do not own the rights to any of the background music being played in this video. The background music is for entertainment purposes only. Here's the music playlist, check out the amazing Artists below ▼
1.) Deyminbrown - Know - https://thmatc.co/?l=AD223A96
2.) VirgoZilla Beatz - Euphoria - https://thmatc.co/?l=C2130638
Thanks for Watching!
Contact me: ▼
https://beigemedia.wixsite.com/beigeoj...
http://www.TheBeigeCollection.com L E T S B E F R I E N D S: ▼ INSTAGRAM: BEIGE OJAI TIKTOK: BEIGE OJAI TWITTER: BEIGE OJAI FACEBOOK: BEIGE OJAI SNAPCHAT: BEIGE OJAI BEIGE OJAI P.O. BOX 520 LANHAM, MARYLAND 20703
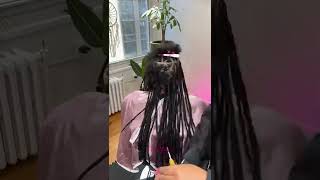
No hey guys welcome back to my channel. My name is beige. If you're new here welcome, don't forget to give this video a huge thumbs up and comment down below before you leave. So today's video is going to be a tutorial on this wig sent to me from wow ebony i'll have all of their information the promo codes and direct links down below in the description box. The wig that i received is a 13x6 hd lace, yaki straight wig. The skew number is dlfw02. This is a 20 inch. Indian remy, hair, wig cap size, medium hair density 150. The cap construction includes four combs, an adjustable, strap and a removable elastic band. The knots have been deep, bleached and the hairline has been pre-plucked. The hairline did come pre-plucked, but i do want the hairline to be a little bit more natural looking, especially for the style that i'm going for today. So to get rid of some of that extra density surrounding the hairline i'll be doing the beige method of zigzag. Plucking and parting, this step is always optional. You do not have to pluck away any extra hairs from your hairline, however, to make the wig look so much more natural. It'S always worth the extra effort is the post notification bell turned on for my channel. If it isn't make sure you hit that down below before, you leave all right so now that we have the perfect hairline, it is now time to tint the lace i'll be grabbing two different colors of lace tint. The first one is the color of my foundation and i'll be spraying that, along the hairline portion of this lace, frontal the next one is the color of my scalp and i'll be spraying that, on the inner portion of that lace frontal, i am doing two different Layers of each color of lace, tint and then blow drying after each layer. So now that the scalp is a perfect color match for me, i am going to get started with styling. Today i am going for a goddess lox hairstyle for the distressed, lock. Look. I picked up a couple packages of butterfly distressed, lock, crochets in 20 inches by zuri. I also grabbed a needle and thread and some lock accessories. So i am going to get started by sectioning off the hair in each section that i have i'm going to decide how many locks i want to have so once i decide the placement of the locks, i'm going to basically start sewing those crochets to the top Of the tracks, as you can see, so i'm basically just going to sew the crochet onto the top of the tracks, and then i am going to cut that extra thread and then tie it of course tie it a couple of times and then cut off the Extra thread, and now our crochets are fully secure onto our wig. So if you decide to do this hairstyle you are in complete control of how the final result is going to come out. If you want to add more locks to your wig, you can absolutely do that. If you want to add less locks to your wig, you can absolutely do that. You have complete creative control over this hairstyle. I think the final look came out so so so cute. So so so so dope i got so so so so so many compliments on this wig and i am completely obsessed with it. Let'S continue this process until we get to the top of the head and then i'll come right back. Of course you have the option of adding crochets to the lace frontal portion of the wig, but i chose not to do that. That step is always optional. You can do braidless crochets on the frontal, though, if you choose to go with that type of look. Instead, i chose to go with two space buns or two bantu knots at the top. I think that it blends in perfectly - and i did not have to add any extra distressed locks to the lace frontal. So i was basically just sectioning off where i want my two space buns or my two bantu knots to be, and now i'm just sectioning off. Where i want my baby hairs to be because the rest of that hair is going to go into a bun or a rubber band, so i'm just taking that hair out now, so that it can be nice and smooth and sleek. I'M using my pressing comb and a hair wax stick to go over my parting spaces, just to make sure that everything is nice and sleek and neat. So now i am just going to grab a thin section of hair. I am going to remove those crochets out of the way detangle that section, of course, and then i will be grabbing my crimper to crimp this hair. I am going for a mermaid distress, type of look and in order to do that, i need to have this hair in a more distressed state, and i chose the yaki texture because i feel like that's, going to be perfect in combination with the distress locks. So, as i was styling this wig, i had the idea of having two curls in the front of my face, so i'm just going to grab my comb and section off where i want those two curls to be, and then i'm just going to grab a very Small barreled curling iron and i am going to grab random pieces of hair throughout the wig and i'm going to use that curling iron as a wand, curling iron by basically grabbing that piece of hair and wrapping it around and around and around and around that barrel. Until it curls so now, i'm just going to grab some firm hold hairspray and apply that to the hair to add even more personality and character to this hairstyle i'll just be grabbing some random hair accessories and applying them to the distressed locks. And here is how all of our hard work is going so far, i'm obsessed now moving on to cutting away that extra lace from the hairline, because it is now time to install this wig grabbing a pair of zigzag scissors. I'M going to carefully follow that hairline following the natural curvature of it and just going right in front of the hairline to remove that extra lace. Make sure when you're doing this step, that all of the hair is pushed backwards. So that you have a very clear view of the hairline, you want to make sure that you're not cutting off any hairs, cutting off any extra knots, but you're cutting right in front of it. It is officially time for install i'm going to grab some alcohol and clean off my forehead and then i'll, be grabbing scalp protector from walker tape and applying that to my scalp. So now that my skin and scalp are prepped for install i'm going to grab wonder lace bond from even new york and i'm going to spray a thin layer of that to the hairline edge portion of the lace frontal, i'm going to blow dry for a few Seconds until it is tacky and then i am going to install it, which i did off-camera and here is the finished look. Thank you so much for watching. Look at this hairline. You guys. Does this not look like it is growing out of my scalp. This does not look like it is my scalp. It is so flawless so undetectable. I am so obsessed with this hairstyle. I will have all of the information about this wig and the direct link for you guys to get your hands on this beautiful wig from wow ebony down below in the description box. If you're new here, don't forget to hit that subscribe button down below give this video a huge thumbs up and comment down below, so that i know you stopped by if you are a returning subscriber, hey girl. Thank you so much for watching and don't forget to comment down below so that i know you stopped by what do you think i should name this wig? What is your favorite part about this wig? Let'S chat all things this wig down below in the comment section. I can't wait to see you all in my next video bye, guys


Comments
Beige Ojai: **The customized Goddess locs wig worn in this video is for sale, Email if interested: [email protected]
lillustpotion: this is SO pretty omg
Jasmine W: Very nice ,love the add on locs-, I would like nice with blonde accents too
Cynthia Patton: Really pretty!! can you add link for the Zury Distressed Locs please? Thank you!
Mkupartistamber: Where did you get your curlers from?
Suki Bratz: