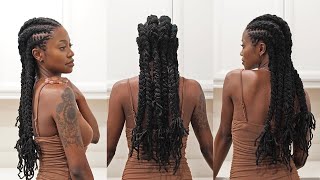
Diy Cornrows With Extensions For Thick Natural Hair | Braided Side Bangs And Beads
- Posted on 20 October, 2020
- Bangs
- By Anonymous
Hello everyone, welcome back to my channel!
For today's video, I'll be showing you how to archive the Super Flat Feed-in Braids On Thick Natural Hair | DIY Feeder Braids With Bangs And Beads
I archive this beautiful braids style using my old hair extensions.
Thanks for watching and, please don't forget to give this video a big thumbs up if you find it helpful.
https://instagram.com/vivianbeautyands...
My second channel https://youtube.com/c/StylebyViv ( Sewing channel )
Hey hello, everyone welcome back to my channel if you're new here you're welcome, and i hope you all are doing well, so i'm back with another hair tutorial so for today's video i'm going to be doing a super flat fit in braids on my natural, thick hair. So this hairstyle is great for thick hair all right, so i've already went ahead and sectioned off my hair off camera. So, as you can see right here, so i'm going to move on to the next step, which is making a session for the first braid. So, in order to get the braids to be like really flat, i'm going to hate to make a small session of hair. So next i'm going to take my hair band and put the rest of the hair away. So next i'm going in with my oil-based hair cream and i'm going to be applying that on the body of the hair and also applying i'm going to be applying that on the tip of the hair before going ahead to brush it through. Okay. So now that that is done, the next step now is to go straight into the braiding part. So before you start, you want to make sure that you've already arranged your hair. So that way, all you have to do is to pick the hair and add it to your braid, i'm starting with my own natural hair. First, i'm going to make sure that i have a firm grip on the roots of the hair and before going ahead. To add in the first piece of hair, so again i'm trying to make this braid as flat as i can, so i'm going to be adding little hair at a time. Okay! So right now, i'm going in with the first piece of hair and i'm going in with a really super tiny piece of hair, because i want this again. I want this braid to be like super flat, so i'm going to be using a really tiny hair for the feed in braids, so to get the braids to be like super flat. Well, after adding the first piece of hair, you want to give a little bit of gap before going ahead to add the second piece of hair and also when adding the second piece of hair. You want to make sure it's also tiny, okay, so and also when braiding the hair. You want to make sure that the braid is firm and not loose, so we're doing a bit of a tight braid so tight not to the extent of pulling on your scalp. So we just want the bra the main braid to be firm. Okay, so right now, i'm going in with the second piece of braiding hair. As you can see, the hair, i'm adding also is tiny, so you want to make sure to give it gap like this. In order to maintain the same size of braid all the way to the back, so it so, you want to add tiny, tiny amount of hair, while also giving it a gap. So again just go ahead and continue braiding until you feel the need to add a little bit more hair. So next, i'm going in with a tall piece of hair. As you can see, the hair is also tiny. So i'm going to add that and also then i'm going to continue braiding braid a little bit more before going ahead to add the fourth piece of hair. So right now, i'm going in with a false face with the fourth piece of braiding hair and also making sure to use a little bit of hair bondo. The fourth one is a bit bigger and then the third piece of hair. I added just a tiny bit bigger than okay, so i'm gon na braid a little bit more again before going ahead to add the fifth one, the fifth braiding hair, i'm adding, is a bit bigger than the fourth one, so yeah as you can see, i increased The amount of hair out to getting close to the end of the braid so again for the last one, i'm going in with a really tiny piece of hair to kind of balance out the the size of the braid. So now that that is done, i'm just gon na go ahead and finish off this braid. So okay move on to the next one, so we're making the session for the braid. So at the back you want to make sure that the line is really uh tiny. So that way, when you add the braiding hair extension, it will balance out the size of the braid, as you can see right there. Okay, so again to start i'm going to be starting with my own natural hair first before going ahead to add the braiding hair extension, okay. So for the braiding hair i'm using today, i don't have a link for the braiding hair. That'S because i'm using an old braiding hair, so i use this braiding hair uh two years ago and only had the hairstyle on for like a week. So i took down the protective style, then washed the hair and nest. I pulled the hair away, so i decided to take them out now to use it for this hairstyle. So what i did, i just use a shampoo to wash the hair and let it air dry overnight. Okay, all right! So right now, i'm going ahead to add the first piece of braiding hair, also doing the same thing: adding a tiny amount of braiding hair and also i'm going to be braiding a little bit before going ahead to add the second piece of hair. So i'm trying to maintain the same um braiding the same size for the braiding hair, so also i'm making sure that the braid is firm, tight and firm, but not to the extent of it pulling on my scalp all right. So next, i'm going in with a second piece of braiding hair and also a tiny amount of braiding hair. So doing the same thing, i added that to the to the braid and i'm gon na braid a little bit more before going ahead to add in the top piece of braiding hair. Okay. So right now i'm going in with a top piece of braiding hair and i'm using the same amount i used for the second piece of braiding hair. So i'm going to go ahead and braid a little bit more before going ahead to add in the fourth piece of braiding hair, as you can see, i'm giving it gap in between adding the braiding hair extensions. You can see you see, i give it a lot of gap, so i'm trying to maintain the same size of braid all throughout the whole hairstyle. So right now, i'm going in with the fourth one, but the fourth one is also the same size. I use for the third one, so my hair is thick, so i don't want to add too much braid in here, so i'm going in with the fifth one and though the fifth one is a bit bigger than the fourth piece of braiding hair. I added so braid that a little bit more just at the end, i'm going to go ahead and add a little bit bigger, braiding hair, as you can see right here, so that will be the last piece of braiding hair. I add to this very um braid. So now that that is done, i'm going to go ahead and finish braiding. This finish, braiding this very one off camera. So actually i didn't braid the hair all the way to the end i just braided halfway. So that way i can move on to the next braid. So at the end of the video i'm going to be braiding the bottom part of the braid okay, so i'm going to go ahead and repeat the same process on this very session too. So again, you want to make sure to give it gap when adding the braiding hair extension and also you want to start off with a really tiny amount of braiding hair. So for the first third piece of hair you're going to be adding to your braid, you want to make sure that the hair is tiny and also the same size of braiding, hair extension. So, starting from the fourth piece of braiding hair, you can start increasing the the amount of hair braiding hair extension. You add to your braid and also making sure to kind of space it out to give it a give it gap between adding the braiding hair extension. So that will help you to maintain the same size of braid, starting from the front to the back. Okay. Okay, now just a quick reminder on the brainy hair instruction, i'm using in today's video. I don't have a link for the braiding hair extension. That'S because i'm using an old braiding hair, okay, so for this braid right here, i'm going to go ahead and add in the second piece of braiding hair. So after adding the second piece of braiding hair, i'm going to stop adding braiding hair, because the length of this braid is long. So, as you can see, starting from the front all the way to the back. The length is long and i don't want to keep adding braiding hair extensions, so i'm going to be working with my own natural hair till i get close to the end of this very session right here. So getting to the end, i'm going to start increasing the amount of braiding hair. I add to it so the third one right here that i'm adding is a bit bigger in that the second piece of hair i added so i'm still maintaining the same tiny amount of braiding hair extension. I adds to the braid so just gon na again braid. It a little bit give it a little bit of gap and also making sure that the braid is firm and not loose so getting to the end, i'm going to have to increase the amount of braiding hair. I add to it so this will help to balance out the size of the braid, so i'm making sure to have the same size of braid all the way through. So i don't want one to be too thick or too thin, so you can tell i feel it with your fingers and see if it's too thick or two things so doing that we help you to decide on when to start adding the braiding hair extension or When to start increasing the braiding hair extension, you add to your braid, so i'm almost done with the back section. So on the other side, i just did a basic uh braid, nothing, fancy! That'S, because the bangs are going to be covering the other side. So i didn't want to do too much if it's not going to be showing so on the side that you're going to be seeing that people are going to be saying a lot and make sure to do something: a bit cool yeah. So all right, i'm just going to go ahead and break this last one off camera, all done so. Moving on to the bangs, oh boy, can you see how long my hair is? Oh, my goodness, okay, so i just went ahead and comb my hair to make sure it's tangle free before moving on to the next steps. Well, i've already went ahead and session off my hair for the braid, so i'm just going to ahead to apply hair cream before going ahead to braid the hair. So for the braiding hair extension, i went ahead and cut a short just a little bit close to the length of my natural hair. So also doing the same thing: i'm going to be starting with my own natural hair first before going ahead to add braiding, hair extension, okay. So right now, i'm going ahead to add in the first piece of braiding hair, also making sure to start with a tiny piece of braiding hair and also making sure that the braid is also firm, not loose. So you want to make it a bit tight, but not too tight to the instinct of it pulling on your scalp. Okay, i'm almost done i'm just going ahead to work on the last braid so also doing the same thing, i'm starting with my own natural hair. First, before going ahead to add in the braiding hair extension, so i'm also going to be giving this one also a lot of gap because of the size of the last braid and also the length of the session. So also making sure the braid is firm and not loose. Okay, so once you're done braiding your hair. The next step is to dip the braids in hot water, but don't dip the banks in hot water. You can place a warm towel on top to kind of help the banks to relax okay, so i already went ahead and add most of the baits off camera, so i'm just going to go ahead and show you the last one. So so here is the final result, okay guys, so we have come to the end of this video. I hope you enjoyed this video. I hope you find it helpful. If you do, please don't forget to give it a big thumbs up and also, if you're new to my channel, please don't forget to hit the subscribe button down below if you already subscribed. Thank you so much for subscribing. Thank you so much for popping by today, and thank you all for watching today's video and i'll see you all in my next one.

Comments
Selina Oluyi: Gorgeous Hair Style The beads were a beautiful touch❣️
Nasa Emerald: Just discovered your channel and am in love with your videos I have seen. Off course you got a new subscriber.
Jmac: Vivian you have “ Beautiful Heathy Thick Hair”‼️
NEGHES TV SHOW: Great job sis.you are beautiful. Nice braids
Vivian beauty tv: Beautiful hairstyle
Qilis.secret: I love the hair style Please can you tell us how you grow your beautiful natural hair
Jennifer Laignel: Very nice and beautiful
Roberta Drummond: Blessing my queen