Diy Easy Curly Wig With Bangs No Sew ! | Ali Julia Hair
- Posted on 20 September, 2017
- Bangs
- By Anonymous
hey beauties
hope you enjoy this quick and easy diy curly wig with bangs
super cute for the fall season !
New Products Sales Week
$ 8 Off, Per $99+Discount+Coupon (18th Sep-24th Sep)
hair information: Brazilian curly16" 16" 18"
link to the hair: https://goo.gl/Ir6Xxn
link to the store: https://goo.gl/6iIdCm
hot selling:
Brazilian bodywave: https://goo.gl/LwwjY2
Brazilian Straight: https://goo.gl/4oZ8E4
julia hair youtube: https://goo.gl/yJdKwG
ali_julia_hair instagram: https://goo.gl/yVTv59
all products used:
Natty weave Bond Glue
Spandex Dome Cap
LETS BE FRIENDS !
snapchat lesleymarie1213
instagram lesleymarie1213
business inquiries email me
til next time xo
#PrimadonnaNation
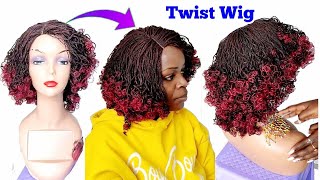
Madonna'S back again today with another video of you guys, we're gon na be making this wig. This is the most easiest way that I've ever made. You guys so super simple: it's no closure, and it only took me about 30 minutes. So it's I think this is such a really really cute pop and ass for hairstyle love is giving me like scissor realness like oh. No, she got the curly bang going on. I don't know I just wanted, like a big curly fro for the longest, you guys and the fact that I even added a bang was like a major, a major leap for me. Okay, I was not sure how I was gon na end up liking. It. It still is something that has to grow on me, but I still think that is super cute yeah um. If you guys want to see this really cute DIY, frou hairstyle, then definitely make sure that I subscribe before you go, but you guys until next time here. So, let's get this book should pop in and stop bootcut food with Becky and I'm gon na show you guys how to make my DIY mannequin head. So the first thing you want to go ahead and take is one of these things that whole paper towels. I got my from the dollar store and then I got my mannequin head from the Beauty Supply. There'S a full mannequin head of the paper towel holder. I got in metals and yeah. You just stick it right through the hole and it's heavy enough to weigh down the foam head that way. It'S not gon na move. The supplies you're gon na need are some weaving glue. My favorite brand is from natty um. I got that for my beauty. Supply store and then you're gon na need a spandex dome cap which looks like this. It'S just gon na fit your head like a glove. You guys - and this is what we're gon na be making our wig on and most importantly, you're gon na need some scissors. Of course, two choppy choppy and the most important this is ramen is some weave. Okay, I'm using the Ali Julia Brazilian curly for this lift. Today, this is in the inches 18 inch, but I'm only going in with one bundle of eighteen and two bundles of sixteen inch and as you can see, the bundle of the 16 inch is a lot shorter. This is what's gon na give us some layers and some dimension. So the first thing we're gon na do is take a plastic bag and we gon na suffocate this okay. We gon na wrap that around hand like the are enemy and make sure the cannot breathe. Okay, no I'm just kidding but yeah. We want to lay down a plastic bag. So that way the glue does not get arms to our foam head, but I felt bad so just make sure that bet you can breathe. No, I'm just kidding we're home. I wanted to make sure that I break the bag underneath so that way you can see the face of the mannequin head. It'S just gon na help a lot with the placement of the tracks so make sure you expose the face so starting from the back of the neck. I'M just going to measure out a piece of the track from side to side. It doesn't have to be super long, I'm just doing from the nape of the neck, and you just want to go ahead and cut after you measure out your piece now me taking some of that. We'S, blue and I'm just gon na be doing this right onto the track. Now the good thing about ally Julia tracks is that they're pretty thick so that way, they're really easy to work with or to Sol. Well, today, we're gon na be doing the no sew method. Cuz a bit, don't got time for that. I cannot be sitting here so long. These charts - I just can't blue house, has always worked for me and it's just the easiest and fastest way cause you guys see. I grew up a little bit blow dryer and then I keep going in with the glue. I don't try to do it all at once. I don't know that I'll just find myself struggling cuz. It does take a little while for the glue to dry. This is why I speed up the process with my blow dryer. Oh yeah, you guys you have successfully laid down your first track so now. I just want to keep repeating the same steps measuring from side to side, making sure that you cover the track that you just laid down, cutting gluing pasting it blow drying it out. Okay, you stop yelling little girl see ya. Now you can see. I have my first little piece laid down now, I'm going in with more gloom like you, don't want to do it all at one time, because then you could get glue everywhere. I'M telling you! This is super messy you guys, but it's fun so yeah now you just want to keep repeating that process all the way until your 18 inch bundle is completely used up. You always want to use your longest length at the bottom and the shortest length at the top. So that way it looks like it's gradually fading and it has a natural layered. Look as you see, I'm gon na continue to keep cutting away pieces of that plastic bag. Just so now way. Becky'S face is fully exposed. You guys, I want to see your face just that I'm Erica help me out with the placement of the track. From this point, I'm going kind of like from Temple to Temple - I don't want to go too much in like the front of the face, because I want to see where we're gon na be able to place our bags. At this point, I completely used up my first bundle, which was the longest, which was the 18 inch so now we're just gon na move on to our second bundle, which is now the 16 inch, and now I'm just gon na cut a small piece and I'm Gon na lay it right in the front, this is gon na, be our first track and our first guide to our bangs below no AMG c63 break it down. Now that we have that first piece, nice and secure now we're gon na now do our 360 tracking methods. So what you're gon na do now is just start on the side or in the back. You want to glue down a piece of the track and at this point we're just going in a 360 circle, so we're not cutting from side to side anymore, we're literally gon na glue that track from one end all the way to the other end. So it goes into a full circle, so this is exactly what I'm talking about gluing the track into a 360 circle, and I just want to keep repeating that step all the way until your second bundle of hair is completely used up, and this is what the Wig looks like, with the second bundle completely on it's almost done, and it's nice and full of access so now you're moving on to our third bundle, and this is as well a 16 inch all I'm doing at this point, I wasn't even cutting the tracks anymore. I was just gluing in small sections and placing it down with my fingers using the blow dryer to speed up the process, but I'm still going in a full circle. You guys you just want to keep on going until that circle is small as hell like tiny, tiny, you better get the hang of it. It'S super easy, as you guys see, I'm gon na be using my fingers. I use like my thumb and my index. I'M a middle finger just to like hold down that charge just to make sure that it's properly going in the shape that I wanted to, which is like you know the circle and make sure you're pressing, really really firm. So that way you have you know no air bubbles and your tracks are nice and tight and you guys can see, there's a small hole at the top, so I'm gon na show you guys how I do my DIY closure. So this is the amount of hair that I had left over from my third bundle, which is pretty much a lot of hair /. So I'm just gon na take a small section and you want to go ahead and put some glue on that and I'm gon na begin to sandwich the track. But I'm going to begin to roll it up into like a little donut. It'S so hard to explain. But I hope you guys can just see what I'm doing, but it was hard to film as well. Okay, so I appreciate this well yeah, I'm gon na keep rolling it all the way into like it's like a little donut, and you want to wait for that. To just dry a bit and then what I'm gon na do is section that piece right into two and then I'm gon na grab my flat iron and I'm going to smush the hell out of that center piece like make sure it is nice and flat. You just want to hold you and your flat iron on it for like a good 20 seconds, 30 seconds, um and then you're gon na see it's gon na become like a really really nice flat closure piece for the top of our wig. So it should look something like that and now I'm just gon na place a little bit of glue and then just pop that right on to that little circle, part and now you're, not gon na be able to see any of the tracks. Okay. So that's a quick tip if you're doing straight or curly, hair and you're doing a wig with bangs. This is kind of like a DIY closure. So just close up the top see I press down your flat iron. Just so, you know finish up the wig and then you just want to go ahead and remove that plastic bag from underneath, and you guys you've got yourself a curly lid. This word was so easy to make. Like I said one of my easiest wig that I've ever made, so I wanted to start off my wig making series with this one. First, I'm not sure what I want to call her so far, she's giving me like still survive or maybe later from loving hip-hop. I don't know, but I do want to say that when you pop it on your head, you are gon na look a little crate. It'S gon na take some customizing to your face shape. So if you guys want to see how I transformed it from looking like this to this, then definitely you guys stay tuned for my next video, which will be a styling video on this week. So stay tuned to Madonna
Comments
luvnyaalwayz: I watched this video at least 6 times and I Loooooovvvveeeeee the look. I started creating a wig last night, I ran outta hair and finished it tonight. I tried the closure hack but the glue melted when I pressed it with a flat iron. So I cut another piece of hair for the closure, curled it, sewed it with three and c-needle and the put the glue on the tip, pressed it down til it stuck and then used three t-pins to hold it down overnight to set it in place.
CynnCity: Loved this! Very helpful, I plan on doing a curly wig also.Thanks for sharing ✌
Jessica Renae: slay Leslie!! You made it look so so easy, I'm definitely guna try to make this with ombré black to blonde hair
Alien Wolf: girl you are one in a Million - you only deserve all the best - I hope u get it all ✨
Clara Salas: Omg. So cute. I really wanna try this out. U look great with it
9 vidas: Quick question, when you purchase the hair how long does it take to arrive?
lacretia Cheree: Yasss leslie, I always loved you in curly hair! #premadonnanation #snapchatfam
Crystal Kelela: That hair looks so damn cute.
andrea adriana: Love it supppeeerrr cute ❤️
Beverly Hillz: YASSSSSSS!!!!! Love it!
Alysee Nicolee: Yess boo you slayyed the fuck outta this
andrea adriana: gonna definitely try
Fefe Choxo: so cute
Amber Hernandez: Damn that intro ❤️❤️
Shelita Marieee: ❤️❤️❤️
Adrylovee Martz: SLAYYYYYYYYYY GIRL!!
Jada Alexandria: I love your voice and humor. Sooo funny
Aidan R: I followed this video and did my own wig using the AliJulia hair and it came out great!! xx Did you ever make the styling video for this wig? I want to style it the way you did :)
ᗰᖇᔕ. ᖴᗩᖇᗰEᖇ:
9 vidas: Girlllllllllllll...you killed tf out of this. I cannot!
Nicholas Gonzales: Your so fkn creative boo!!!! Ne ways hook it up w a tutorial w a look from the tarte tastiest pro palette like a everyday wine look something pppllllzzzzz love u biiiotcch
rachel valentin: Snap fam you're so bomb ❤️
Kanelis Nala: I love you!!! Go NY!!! Remind me if back home, NY girls always got style lol go primadonna! That style is fly! Can I buy one?!?!
DeeDee_Against_All_Odds: why are you SO PRETTY!
Myeisha Clemons: Omg! First of all this unit is so bomb! Now I need someone to tell me what music is playin in the background.... im sitting here watchin and twerkin at the same damn time! Lol this video is all the way lit!!
ELO: ❤
R V: ❤
Kusyta_14 Sotomayor: Beautifulllll Sexyyy ...❤️ I miss your make up videos ... Can u do a look with fenty beauty or any new make up palettes
Kiana Cooper: Love the commentary
Syanna Diaz: I love you Lesley
simpthegachax.x: #socialfam slayyyyyyyyyy
Candice Sanders: Please get back to this. Came out so good
MsYaya:
Keke Love: Gurlllllll! You are Jlo'esk....
Sheez: ❤️❤️
Anahi Anabella: Anyone know what this remix is called in the intro ?
MONIQUE REID: SHABA!
semira: all my girls from tiktok know the song from the intro montage lmaooo
raina beaugris: I died when she said she gon suffocate this bitch
Daisy Torres:
Lurdes Marchbanks: Snapchat fam ❤️
Kitcia Aguilar:
Beautiful_ Michole: I think I would really like it if it had a different curl pattern. I just think Rick James with that one. But you fucking slay it anyway so whatever
Kyndall Horton: ♀️♀️♀️♀️♀️♀️
Ivette Hernandez-Martinez: Fuck it upppp
kay cando: snap fam
Rebecca shiner: awee u named ur foam head after me..lol
JESUS CHILD: Jesus loves you
sparkle baby: who else thought it was a black or mixed girl with her natural hair