How To Cut A Curly Bob Haircut - Short Shag Haircut Tutorial
- Posted on 21 September, 2019
- Bob Hairstyles
- By Anonymous
How to cut a Curly Bob Haircut step by step
Short Shag haircut Tutorial
*Giving is hold forever*
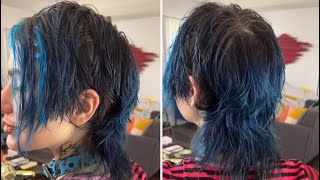
Hi guys welcome to Sassoon Academy, in Los Angeles. My name is Colton, I'm here with the fabulous Allison Lyle she's. Our creative director here in the Academy did a really cool 70s. Can shag haircut, which is great. I will be answering questions behalf, so please ask away and we're also joined by a couple of our cosmos students as well, so these fans will be watching and asking so I hope you enjoy you guys. Thank you to hairbrained for having me today. It'S great to share hair on this platform. This is my beautiful model. Brooke and we're gon na be doing as Colton's had kind of a 70s inspired. Curly look poor Brooke! This is sort of her look she's, a photographer she's, a creative person, and she really wears this look really well. I think it goes great with her style. So what I've done so far in the interest of time is to work through the back and cut a little bit of that for you and I'd like to show you what we've done so far so being inspired by our latest collection. We'Ve been working on a technique called reverse layering, which i think is an amazing technique, because it's super salon friendly. It'S a great way to put texture into the hair as soon as we really believe in you know, technique and working with technique to texturize the hair. It'S much easier to find what you've done before and we're clean when you have that type of technique happening in the hair, so you have each section: that's been cut a little bit longer than the one before so I started by establishing the length and then I Worked through using a graduated elevation, just letting the hair slip out from the fingers, so it's one fingers length longer than the hair before and, as you can see my section here, I have a fingers length section so that helps give you consistency. So each one I've worked up in that same manner, fingers length sections right up to the crown so I'll be finishing, my last section and then we'll get into the front and I'll show you the sectioning pattern from there watching you thanks for joining. I think this technique could be great done on dry hair as well. It'S a great technique for straight hair, really any length of hair. I love the way it looks on curly hair because it gives this expanded kind of texture to the hair and if you guys are familiar with any of our streaming, we show our our looks of our collections and our classic techniques on the streaming. You can see these looks done from the collections. They'Ve evolved kind of each one a little bit into these different panels of layers, and this one is one that they've actually done on dry hair there and when you do it with dry hair, you can really see how the hair slips out from your fingers. When I work with curly hair, I do like to kind of just check each time I go that I've got the length where I want it yeah, so we'll let this kind of dry off in the back, so that you can see what that shape is doing. The brooks hair, so I wanted to talk a little bit. I invited these lovely cosmetology students here today. Some very special students to us Kathleen and sung they're gon na be graduating soon and they've gone through a ten-month program here in cosmetology. I love teaching all of the courses here, I find being a teacher. You know so inspiring at every level, but what I really love is to see how they grow from the beginning of not really knowing much about hair oftentimes, so we're having a cosmetology open house tomorrow. So if anybody is in the area in the Los Angeles area or I could get here quickly, we are going to be doing our best cosmetology open house. I think that we've ever had we're gon na do some exciting new things, and so people can come and check out what we offer in that program. We also do something really special doesn't know a lot of you guys. Probably most of you guys are all hair stylists. We offer education, Sassoon education. If you ever know anyone that wants to come and be a cosmetologist, because most of the people that we get are referred by hair stylist. So we do a thousand Sassoon dollars of education when you refer someone to our cosmetology program, so this is gon na, be my next sectioning here for Brooke. So what I'm working with is a bone structure. Looking at the density of the hair and thinking about the length, that's gon na be suitable for her, so my plan for these next three panels is to work in the same manner with the reverse layering, starting with the fringe. Her laying in the fringe is kind of where it should be we're gon na bring it up just a little bit shorter and then each we'll be a fingers length longer question. It'S a combination of both and I think, when you're working a little bit more creatively. Like this, with this connection, you really want to think about just why you're doing it and what you want the look to be so through the back. I worked with graduation elevation so that I kept a little bit of weight to the hair each of those sections. I just lifted up slightly just to soften it, so it was kind of a mix of the elevation of graduation and layer. I hope that answers your question great questions. Thank you. So I worked at horizontal sections through the back just to kind of keep it simple and fit into the head shape, maybe with a tiny bit of an angle just to follow the curvature of the head. So I want this: to that. Have a rounded look so holding the fingers square will give you a rounded shape, following the shape of the hairline, I'm just standing in the front for this part, just to make sure that I get the weight to the hair, because she has finer density around the Fringe area, and then I'm going to lift up to soften that and keeping my fingers flat here also will retain that rounded shape. So we're gon na continue in the manner of fingers with sections. So we should get probably about three or four sections: their fingers or thumbs are good for that yeah I mean fingers the size changes right, use a pinky if your fingers are aren't depending on the hair. So then we can see here that the hair is falling away. So sometimes I'll just do a little pass over what I think just to see that I'm ensuring that that length is dropping away and then just lifting straight. Do you typically work fringes in a similar manner, or do you texturizing techniques and hairs dry yeah? I do I love a bit of texturizing in hair, but what I find is is good is to use a technique for it, because it's sometimes easier to find that and recreate that again, you can give it structure also and then deconstruct it. I think so. I do like to work fringes from behind like this, because I find that it gives it a nice soft kind of graduated or a diffused look and it's easier to stand behind and lift it up and away. And then that way - and you don't get kind of in the way of the legs and the face you're just free to lift higher and higher so Gina has done some nice color here Brook was wishing to go lighter this time, so she's going to come she's One of our fabulous color instructors here at the Academy, she's gon na, come and join us in a little while and talk about the technique that she did and the formulation for Brooke. So it gives you these little almost steps in the hair, but because of the elevation, you don't see it, it just lays and softly. So it gives it that look of texturizing and it can work well on fine hair or thick hair. But thick hair can really make it just kind of hug the head shape more where you don't really have to feel like you have to do so. Much texture eyes need to take the bulk away straight hair versus wavy hair for this kind of a technique. I think it's great for both if you take a peek at our streaming of our DVDs. You'Ll see them do this on straight hair, and that way you can really see the hair slipping away, but the effect of it is similar. It gives texture to the hair and a lightness to the hair so from here we're going to work into these side panels, and so I'm going to establish the length looking at the length that I have here and then each one will become longer towards the crown. So the intersection getting longer the amount of space you put in between each section. Is that always the same, because that change there's a great question. Thank you. I think it would depend on the density of here in the amount of texture that you want really. So I would keep them about that length so that they kind of meld in and are more invisible looking, but you can certainly play around with the difference in the size of the section. You can also do this just on you know a little part of a haircut so last week, Peregrin was lovely being here with us, and Tracy did a great little look on Shorthair, where she worked this technique from the back to the front, creating more length towards The front - and I was kind of she said inspired by something that I had done on a barbering, so you know you can do it on the whole head. They can also do it in just little areas of the head. So it's giving you that texture with maybe a more classic technique as the base of the haircut or on the underneath. We have a great question about this technique for Slayer technique. Would the look be very different if you didn't work for Slayers and he painted everything? No, I don't think it would be too much different. This is something that's inspired by kind of a shag haircut or if you guys are going to Sunnis out there. Many of you know about a classic technique from our heritage called the shake. So you could do this technically work in a round shape and working with layers and graduation, but this will give it a little bit of lightness and airiness and a little bit more of a texturized kind of feel, which I think sometimes with curly hair curly hair. Doesn'T really support the texturizing so much so working with something technical, I think, can be really good to give that effect. So I had the pleasure of colouring Brookes hair. Today we did a full head of highlights and we used a very classic Sassoon technique. We use slices around the perimeter to give her a little bit of a lighter hazelnutty kind of golden brown pop off of her natural, dark, brunette and then, through the top. We utilize, some really soft, leaves and kept everything a little bit softer through the crown area. So for the formulation for anyone who is interested, we didn't use any bleach on Brooke. Today we did a high lip with 40 volumes where our lighter tone and then wow, I'm winded. I just went up the stairs watching you guys, so we did a high lift and then we also, I used a level 10 natural tone in aluminum well aluminum, which gives a really soft, beautiful, sheer final look and then, through the crown area, reason 9 and a 10, so we kept the same 10 and then just exchanged the high lift for a level 9 violet tone, keeping it in the a family just nice and natural color, and I can't wait to see it. So. Thank you, alright, guys so just finishing up this side, then we'll work into the other side in the same manner and I'll just show you the effect that we've created here. Okay, so now into the other side, I'll find those sections again with my fingers width. I Nicholas from France what time is it in France? Thank you so much guys for watching. So if anyone is just joining us, we're doing a little layered kind of look here on Brook using disconnected panels of layers which, through our of evolution of collections, this one is a reverse layering technique, so working with fingers with sections and then about a fingers length. Difference between the links, so it gives you a look of texturizing without texturizing the hair and gives a lightness and airiness to their gon na be done on many different lengths of hair. Another thing: that's gon na be pretty cool. That'S coming up in the new year, we'll be putting out some stuff about it in the near future. We have our big show here on the west coast in Long Beach, the Issy show, so we just had a really exciting month here in November, where we had our master class, where we introduced the collection to North America, and so now we're going to be bringing That there and then pretty soon, we'll have another collection coming right after that, so that would be our final show of the Odyssey collection, which is a super-fun collection, definitely really 70s disco inspired. So how this is perfect for this look that Brooke was desiring yeah, so Brooke sent me some photos for inspiration which I've put up here. So brandy gets a chance to show you guys a formula or anything. You can kind of see what we were working from and posted it in my story on Instagram. Also, it's great to work yeah, I love to see photos. I don't know about you guys out there watching. Are you guys, but I think a photo is really helpful. You know just talking to the person getting to know the person, but I think that you want to really think about suitability as a look. That'S right for the person, maybe not so much. You know the shape of the face, you know or different proportions. Those things are all important, but I think just really at the style of the person and how they're gon na wear there. The question so deciding the proportions, I think, really depends on the overall length, the bone structure, the texture of the hair and the desired look. So I think for Brooke what what I really wanted to do was she looks great with she's always that kind of something different since I've known her some different lengths and looks like this, and I think she can wear all of those, but I think for her. What'S nice is to keep the texture of her hair to not go too short and to kind of fill in this area for her? So then working with the length of the fringe that I think suits her face. We worked with that kind of length overall in mind. It'S something! That'S gon na really showcase the texture in her hair and accentuate it is so beautiful. So I have about one more section here I think just to check in through the crown and then I'll check her length through the front because that hasn't been touched. Yet I want to keep this more of a rounded shape all around and right now I was kind of falling a little bit long towards the front. I really wanted to let the hair dry off as I'm working them. I use a little bit more water as I'm working in most cases, but I would like you guys to kind of see how her curl is developing, how the shape is developing and then we'll post. The final look sure we got curly hair right here and I think it's gon na be great for her. It can be any length and kind of curl. It could be great for that very, very curly hair, that's quite thick because you break it up and give it a lighter, airier kind of feel we just wet it a little bit so that we can work with the legs in the front and then we'll apply Some product I'll show you how I apply that before diffusing, and yet the people are just doing that. This work go straight. There yeah thanks for joining guys, yeah for sure I think any kind of hair texture. This can be great for what you're gon na get and what you're gon na see more with straight hair as a looser kind of shaggy, ER kind of look and with the curly hair. It just gives it a lighter, more airy sort of vibe. Have you guys got to practice all these looks from the collection so far we really start with foundation right in cosmetology, that's so important, and then you take those foundations and and push those boundaries into working more creatively. So they get a really great. I think, and a very experience throughout the cosmetology program here, they're coming out to their their graduation soon, all right so we're gon na wasn't product for Brook, and I would like to work with the product on more dry hair because I'd like to not really water Down the product too much with the water, so I'll apply it through with these curved sections that work around the hairline just really working with the rounded shape of the haircut, and I have a product that I really like. That is a soft kind of moisturizing green yeah. That'S one of our favorite products here I think so applying the product and then combing it through and do a couple of things when working like this, you can take the hair and you can twist it like a ribboning look. You can also take this and just comb it and push it into place and work with the natural curl pattern and the more lift that you want, the more you can comb up away from the roots and the less combing down yeah I mean there's millions of Kinds of curly hair out there we were talking Brooke used to straighten her hair. All the time, she's embraced it now she's very low-maintenance. It doesn't do any blow-drying, really or anything, and her hair looks great when it's naturally dried, but the preparation is really key. I think in applying the right product, patience, patience is pretty hard. I think when, when working with curly hair and there's millions of kinds of hair, that's wavy curly, and how people like to wear it as well, which actually brings me to a thought of a cool course that we have coming up. And I'm not sure exactly the date right now in my mind, but Tracy sak assists who's. Our North American creative director is going to be doing for the first time a texture course. So it's gon na be really cool. All different kinds of texture, Colten, you're teaching at pool of course, next week, right yeah next week we have a trilogy course, which kind of I call it like a drive-by too soon cutting technique recover women's classic cutting men's yeah. We'Re kind of breaking that class up in two days right: yeah, yeah, Day collection day classic Women's Day. You can just five days if that doesn't suit your schedule, you can just come in for one day last last minute, one day course before the holidays, yeah. It'S super cool just get a little bit of a taste cruise, that's a great idea. I think, because you know it's hard sometimes to commit to you know a week-long course. I think those are so beneficial because you really get to experience a lot of different things, but to come in for a day or two, it's amazing. So I just work around in those curved sections working into the back. Then I have been lifting it. Just a little bit so they get a little bit of volume, Joey curls yeah. For sure I mean I don't work with brawlers very often I don't have so much experience with that, but I think that you could totally do that. You just get a little bit of movement to the hair with the different panels of layers. As far as the other question, I find that I, like kind of a moisturizing type of product, a lot for curly hair, so something that you depends on the type of hair that you have. You may want something with a little bit more hold, but this whipped cream is an amazing product that works on all different textures and densities, a pear and different types of curl. You can actually use this to blow-dry hair straight to it's great yeah. I think oil is good. A little bit of a mixture of a cocktail of products can be good. It depends on what color services may have and again you know the porosity of hair and density of hair type of curl that you're working on it's like like a little bit of a serum or something like that. Sometimes so. What we're gon na do with Brooks Harris after we defuse it, I think, is maybe use a pick and kind of give it a little bit more of an editorial sort of feel so we'll play around with it in the in the photos and try to take A couple different looks: there's like also the same there's so many kinds of curly hair and the way that people like to see their hair. For me, I love big curly hair, but not everybody with curly hair likes that. So I think it depends on the tendency to frizz. Usually what we teach is to start out with good preparation, good product and then starting out with a high heat and low speed on the dryer and really not touching the hair. But the more that you want to have hair bigger the more you can touch. I think we kind of go with maybe like a 80 % dry sort of rule and then start touching the hair. But I think if you want it to have a more editorial look and depending on the type of hair, you can start touching it right away. I think you guys have great questions a lot of curly hair, good questions, all right. Just coming into my last sections. Here, a little dot more product will be finished, setting the hair. I actually do use that whipped cream at home, and sometimes I put like a sea salt spray yeah, but usually my hair, like Alison, said I'm pretty low-maintenance pretty lucky that I don't have to play around with it a lot to get like that fullness but yeah. I love that product, it's great, all right, guys so I'll be in diffusing, diffuse, diffusing, Brookes, hair and then taking some photos and posting it in the comments. I really want to thank you guys for watching today. Thank you to hairbrained for letting us share hair at the academy. Thanks halted,
Comments
Thúy Trần: