How To Cut Round Graduation Haircut | Short Layered Bob Haircut Tutorial
- Posted on 13 May, 2020
- Bob Hairstyles
- By Anonymous
How to cut round graduation haircut
Short Layered Bob Haircut Tutorial
BOB HAIRCUT with graduation
*Giving is hold forever*
*********************************
Thanks for Watching!!
Please like, comment and share!
#GraduationHaircut #LayeredBob #ShortLayered #GraduatedBob
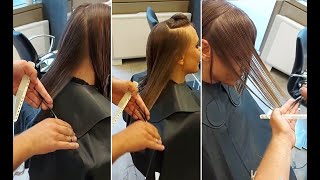
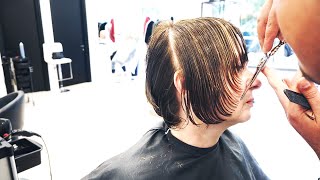
Hey guys, I might be bitten today's indifference way ahead of Education where the beautiful session speaker he recycles the distributors protect America, medical products, you see behind me what a blacksmith leave us today is a lovely little ahead of time. My mother today she's coming all the way for those special. This is going to be a bit of an interesting one. It'S going to be a combination, look we're going to be done for some triangular graduation in the back, so some shoulder on your graduation. You know that's basically going to extend a little bit longer on the sides, after that, what we're doing is bringing in a round line afterwards that connects to the graduation in the back and then afterwards, I'm going to be better in the top. So it's going to be very soft for you there as well. So thank you so much for tuning in. If you have any questions, please don't hesitate to ask. We have the beautiful george behind the camera say. Hi george will be here to answer any questions you have so let's get right into it. Well, I think first, as I've separated the top from the bottom from the occipital bone. Just a little bit above. I'Ve separated this section which comes from the top and arches a little bit down, so it comes higher in the middle and it just arches down towards the corners on the sides. I'Ve taken a triangular section through the middle here. So just a nice little triangle section. It goes cool in the top and inside the rider at the bottom, and what we're going to be doing is we're going to be creating the graduation in this first area. It'S going to give us our baseline for this hugging shape. So it's going to come in a nice little head hug here and then be soft and round all the way around. So first thing I'm going to do is start by plugging the graduation, I'm going to start from the top and work my way down now. The important thing here is that lengthen I'm going to create in the top. I want this to be long enough that we're going to have a nice graduation to it. So it's not going to sit too flat because what we're going to do after it it's going to layer into the top. So I want to make sure this is a nice slightly heavier version of graduation, so I'm taking the section out and I'm holding the head down from the roots and finding the angle that I would like to create with my fingers in the length I want, and I'M going to start to cut so we're just first working from the top and then we're going to work our way down. So if you have any questions, don't hesitate to ask if you like the video, please like and share it. We always appreciate it a lot. So what I'll just buy my first section now and I'm gon na carve I'm just going to check that section again to make sure I'm happy with it. So I'm going to pull the hair out and again coming this time for my fingers over the top and I'm just looking for any kind of inconsistencies just to make sure it would smooth all the way from the top to the bottom. Okay. So I'm happy with that first section of mine. What I'm going to be doing now is I'm gon na be taking sections which pitted from the center towards the Sun. So the first section was a triangle and we're going to be pivoting from that center point. Just going to turn the head down a little bit and we're going to be taking our section to the sides so each time we work were pivoting from that center point and working to the sides. So it's very important that we don't take more hair from the center Center remains a stationary guide. So if we pull the hair here, what you can see, as you can see, there's no hair to cut from the top. What this tells me is, it tells me I haven't changed my guide line, so my guide line stays the same throughout the back of this haircut and so by pivoting. What we're doing is we're allowing us to maintain the weight in the top, so this top section remains the same throughout the pivoting technique. So each time I take a section, I don't recut the top and make sure I maintain it, because I've already decided the graduation. I want so I don't want to end up going shorter than what I've already decided. Let us know that you're trading from George we'll be happy. We have people already from Canada from Greece from Malta, Netherlands, Vietnam, thanks so much for tuning in. We really appreciate it. So much this will be our 25th harebrained lives on our 2015 life. So thanks so much for tuning in everyone. We really appreciate it. We appreciate all the love, so what we're doing is we're still maintaining the same thing, we're starting from the top we've done a triangle section: we've created our graduation and we're just spinning around now with our pivoting techniques. So, each time we're moving up we're taking a little bit more hair and we're working around the section. So don't forget, if you have any questions, feel free to ask George we'll be more than happy to ask me them as we work. So what I've done now is I've started from the bottom, and I've worked my way up. That does my question so yeah, so we're basically what we did before was we started from the top and we worked our way down each time and now, once we've gotten to where there's a hole here, where there's no hair, we start to work from down up The reason is, if you start from top down, have a tendency to pull their hair too high and then you're going to go too short in the corner. So by starting in the corner. It'S a much safer approach to make sure that your graduation doesn't end up to short behind the ears, a mistake. A lot of people make when they're doing graduated bugs. Is they end up too short here behind the ears? So what we try and do is we start from the corner of the ear as a safety precaution to make sure that we're not going to short behind linear. So I think that's a really good tip. Now we can start to see the graduation building and I'm going to do my last section on this side before I move on to the second side. But what we can see is the center. We still haven't cut it again. So the center is a maintain guideline. Throughout the back of the haircut, we don't change it so again, starting from the corner of the ear, because it's much safer, I like to pull with quite a lot of tension, because tension helps graduation blend better. So we'll go to one question from Christina Barrett: this is said: I'm division or triangle. So the back is a triangle graduation, because the center is shorter and the sides are longer. So if we look at it on the head, you can see when I pull the head down, can you see that the back ends up higher and the front ends up lower? So this is triangle graduation in the back. But what's going to happen is when we cut the front and we cut everything in the front shoulder it's going to have the feeling of rounder graduation. So it's almost a mix of triangle, graduation in the back and then round graduation on the sides, but for technical purposes we say that the back is fine, graduation and then what will make it round is when we cut the front shorter. So I've done one side for you and I'm going to show you the second side. So we have the center as I guide line, and what we're going to be doing is we're going to start taking these pivoting triangle sections and start working in the second side. As well thanks so much for that question that I hope that answered it. If it didn't just let us know, and if you have any other questions buyers, please don't hesitate to ask so we can see again here we have like a clean guideline from the top. So there's no hair to cut in the top. This is very important. If you see that you have had to cut in the top, it means you've taken too much hair from the sides. It means that your sections are not pivoting from the same point that they kind of come in parallel, so we don't want parallel sections. We want something which maintains from the sensor and pivots, not working parallel. That way, you have this really nice consistent guideline on the mill that you don't cut and you can work from that point down maintaining your guideline. So it's a very, very important trick to doing graduation in your pivoting to make sure that there's no guideline in the middle that you're cutting beautiful so the same thing again. Just taking a nice triangle section that pivots from the center and working through to the sides. So we always have a tendency when we're right-handed our shoulder on the left normally because I'm matters like to come right up so because of that just try and maintain a little bit more length than you think on the left side, when the right handed it will Help you just to make sure they're not going to short a really good things to obviously check, as you were once you're happy with that. Are you ready for the cities of tuning in for all the cities at the attorney Dallas, Ohio, Washington, Northern Ireland, Ireland, with consuming person PA, I don't know which year which cities a PA? Yes, Indiana Hongkong Florida, California, a New York big, thank you to the community for having us. So again. If you have any technical questions, let us know we'd love to hear them. So what I'm doing is again, as I'm pivoting around I'm just having a little check to make sure I feel, like I'm consistent with my lens, that we're the same on both sides. This is my long section of my triangle. Beautiful and one of them is I'm going to now connect that in and then we can work from here and start doing the front after I show I've got a non-technical question, hello which distribution you choose. I think it's about the products. Actually, we have the level which is a lovely brand from Australia. You know very soft mass products, Kevin Murphy, which is really beautiful session, with products as well very easy to use, and then we also have olaplex here. So we work with these three different products. When you work with HP headquarters here in Cyprus, so what they do is I'm going to show you a little bit how I cross-checked. So what I'm doing here is I'm coming from the sensor, so I won my first bid, which is my triangle, so I had my first little triangle section, which I created my graduation. I then took these activity so each time I worked round the head, I pivoted each time in order to create this graduation, so working from Mama to shoulder the governor will talk shorter on the bottom. Now want a cross-check. So what I'm doing is I'm coming from the sensor, I'm just making sure that the sensor is the same on both sides and what we're going to do here is we just want to make sure that the sensor is the same on both sides, so, rather than Checking the corners it's very hard to check your balance. So it's much easier to check the sensor. First, make sure that the sensor is balanced and then, when you check the corners either side, you can check you into the middle and make sure they're correct. If you don't check the sensor first, you have a chance of anything to have a question of what kind of jacket is that we're gon na take so the flats going to suit much shorter and connect into this graduation. So you'll. Have this really soft feel for that it's gon na be a big kind of long to the mouth and the bit soft. So as you work through this, we'll see for now we're just doing what we would call a classic drama, graduation in the back. What'S gon na make this more of an abstract haircut is when we actually mix the front. So what I'm doing now is I'm just checking from the center to the corners, so I just want to make sure that there's no bumps or lumps anywhere so I'm just again coming around and making sure I've got two questions that are the same. The size of your scissor and the reason of the size of the scissor intricate graduation, if I'm trying to cut the hair here at the bottom with very large, is always you because I've got two more questions. First, an from margarita Ciriaco. Can you use the same concept of code and why do you choose pivot over vertical sections? What would be the difference? Is you can have a stationary guide and every time you pivot, you decide how short you want the front of me, the more you pull back when you pivot the longer the front is going to be if you stay on the base, as you worked you'll end Up with something rounded so really a pivoting section allows you to create a curve and then decide whether you want this curve to be more triangular or something that's more rounded. So pivoting is a great thing when you want to create a curved vertical sections are very good when you want to create something more flat, more square than say. So, it's really up to you how long you can control or over direction. So for us, when we pivot, it's very easy, because we never cut the first section again, so we're always maintaining that first section as we work our way around, so that it allows you to secure this really smooth graduation. It'S really smooth graduation when you pivot, but again you can use any technique. It'S just going to be how easy this we need a controller. So what I think was just a quick recap for those of you just tuning in I just finished it back. We did something which was more classic triangle. Graduation, in the back, we cycle in the center took a triangle created our graduation. We then took the pivoting sections which worked around the head and we moved our fingers around. We didn't pull it high up because we wanted to maintain that from the corners we actually pulled it more down at the end to maintain the length behind their ears and after that we cross-checked. So this is the start of a triangle graduation, but what we're going to do now, they're going to mix it when we cut the front end, so you can see the length that we have we'll remember the create is round line in the beginning. That'S going to connect from the five into the back once I finish the line, I'm then going to work on connecting the graduation as well cool, so don't forget to let us know where you're tuning in from what time is it? Thank you so much if you have any questions, we'd love to hear them as well. So what I'm doing is I'm taking a curve section from the front to the back, so this is a from the front this section we can see in the back the graduation. I'Ve got more for you. What is the difference between a diagonal section in the vertical section in the graduation from high to low? What I'm doing is I'm encouraging their heads are pushed back. If I take my section because you want to and if your intern said, where are you going to put this video, when you finish, I can watch it again? That'S rate education, Facebook, page and all the videos are there. You could also just search on Facebook. Go into the top when you search and right Heather, brain slave, her education and you'll find about funny videos there with our lives. So yeah, please guys go check them out. Let us know what you think and we're currently rebuilding our website, which will have all of the live videos we've ever done on there about thirty five of them, so please guys feel free to tune in them any of the above. So what I found is I've done my graduation in the back for those of you that are just tuning in did my triangle, graduation, in the back, I took a triangle section and we did the graduation in the back first. We then pivoted round all the way until we cut the limbs behind the ears, so that was our first step. This triangle graduation. We then took a curve section from the front to the back and created the length in the line we want to see and do the same thing on the second side. So the reason why I'm doing this now vibrator is because I want to have consistency in my balance, so I find balance to be something quite hard. You know to create perfectly balanced. Haircut is not easy, and so by doing the lens first, you just make sure that you have an equal balance before you even start. So it's a good way of getting rid of the hard part. First, get your balance and quick and then move on with the rest of the haircut. If you do the outline now, you have a really nice envisioning of what you're trying to achieve so once I've put in this line, the haircut speaks to you and can tell me now how much how much variation, I suppose I have so again very important. I'M starting from the back and I'm working my way forwards now. There is a reason why I'm doing that there's a reason why I'm starting from the back from the front, if I start from the front, there's a chance that by the time I get to the back, I may be cutting my guideline and so just from a Safety perspective, what I'm going to be doing is I'm going to be cutting in first, the outline from the back and then I'll have much more safety that I'm not going to be cutting the front of so we'll do this now so we'll start to bring the Head down we're just creating a line technique, I don't care about the hair overhanging. Yet I care about my guide line from the back, so I make sure that I'm not coming like I love from the back. I keep my fingers against the skin and I start to create this round line, so my scissors are pointing up towards the front of the face and we just the position of the hip to you. I always client, because I find it easier to see the battles now other dull and when you're teaching in front of the video, it's always much that they had and it tilted away from you. But at this point we're creating a line with graduation because we're using it out of fingers, so I'm not too worried about creating graduation by having the head to the side. So what I'm going to do now is I've got one section on either side. I now have to check my balance, so I'm just breathing that head down and I'm going to check either side to make sure it's nice and equal on either side and once I'm sure that I'm nice and balanced on either side. I can then continue. So just a quick recap for those of you that are just tuning in what we did was we created sections. We then took the curve section from the front to the back and we connected it by creating the round one. So it's got graduation it's by the line and the line and the graduation, so we've got the back. The back and the front line doesn't connect yet. But I don't care about that, because I'm not working just I've done the front line and now we're going to be continuing on. I really have that one length. So, by doing this, what I'm doing is I'm just getting rid of the excess hair and making sure I have a strong shape to cut them, so I can visually see my shape form it now, the we pullers de catch it later later. So for those of you that do follow sleep, you know that we always post head sheets off for the haircut and so I'll be going live and sleep. Our education face book page if you're watching the video, the link above then slave her education. If you tap on that and then click folder will be very live about ten minutes after we finish this to be showing you the head sheet, so for those parents out there that want technical, heavy sheets drawings will do one afterwards. So what I'm doing is I'm just getting rid of all that excess hair, so the back doesn't actually connected, I'm just getting rid of all the hair, so I'm just trying to get rid of any excess. So this way it's easier for me to visualize. So I think now it's much easier for me to visualize and see what I'm doing than before when I have too much hair to deal with, so I'm just getting rid of extra hair connecting it in so we've got that nice soft rounded shape coming in now. We'Re going to do the same on the second style once we've connected the line on both sides. What we're going to be doing is we're going to be then working to connect the graduation in the back so right now, I'm not connecting the graduation back. I'M just getting rid of the Nexus and connecting my ground environment cool. So if you have any questions, let us know - and that was my way of treating in fact we always love together. If you are enjoying the video, please don't forget to Like share and appreciated it says Hermes Vittorio that it's just like your haircut. It'S also a surfer graduated Bob for curly hair Church parabola says I love the sheets explanation. Afterwards. First-Class education based on this whole haircut so for those of you that are just tuning in our micro pizza leaders, force labor education thanks so much for tuning in so firstly, this was separated the front from the back. We created this nice head hugging, graduation in the back by using pivoting sections, so we took our sections and we pivoted around the head as we worked each time and what we then did was. We came from the front and we created so we used curved sections around the bed and we came in and we connected it to the graduation window, then that actually technically it's not connected to the graduation, the back is not connected. So we have a very slightly lower in the back if you can see that I've taken the firm out, because this is my guideline as well from the front. So I don't want to create a hole here. So what I'm doing is I'm trying to maintain the length here as our work alright to do this, so I'm just going to show you where this happens. So, if you see here we can see the back is not connected close. You can see that the back is not connected, yet what we're looking to do now is we're looking to connect it to the front and the back, and we do this by using an awful lot of elevation, so we're going very high up. I could see the outline and I start to come in and I start to cut it, so I can hold the head very high up and when I hold the head very high up, I could see the underneath that I'm not cutting my outline. That is the most important thing here then I lift the hair up and I can see that I'm not cutting my outline so now. What we're doing is we're connecting that front to the back with that soft graduation. Okay, what we're going to do is we're going to keep doing this across, so we created the graduation in the back. We created the line on the front, and now what we're doing is we're taking these slightly diagnosed sections and we're elevating it in order to connect from the front to the back hope. This makes sense guys, let me know, and down the road we're also going to do some head sheets after this, for the heads up beautiful so we're just starting to connect the graduation from the back to the front, elevating quite high up as we work. So we can start to see that shape coming in where it's really got that last bit of graduation with the softness in the front as well, and so that blends in really nicely beautiful. So we're just going to continue. So all I'm doing now is I'm continuing working from the front to the back. Connecting it in every time you do is, is going to be more hair to cut, because there's going to be more to connect from the back every time you work so expect that there's going to be quite a lot of hair coming off right now, don't be Scared you're not going to ever cut your outline amount because you're too hard so you're maintaining results of you you're going to see them, I'm going to come back and check it vertically, but not until I've done the second side. So this is just one side. So doing coming in connecting the graduation from the back mask bit of elevation, not quite at ninety, you know just a little bit down so a little bit lower the roots. So if you look at the roots they're a little bit lower, I'm just connecting from the front to the back, so the good thing about this is you kind of the thing I like is I liked riding on I like to cut like a child like connect, The dots so by doing the back first and then doing the one in the front, although I have to do, is connect the dots between the two, and that makes it much easier for me. So I've got the two o'clock things. I'Ve done, the balance questions. Are you holding the hair 90 degrees from the scalp, so you can see that they're holding down so I'm not holding it up, I'm holding it down when the head is a little bit tilted away from me. So you can say it's it's not up! It'S just a little bit down from the roots and the Netta's are the other directing for this part, so this here we can put it over. So in reality I am, but I'm not thinking about it, because what I'm doing is I'm using my fingers fellows onto it, so I'm pulling it off the base, but it happens. Actually, as I pull my fingers to connect the roundness of this haircut, so my fingers are really what's creating the shoulders. So if my fingers now are pointing more towards the front, it means I'm rounding it. If my fingers are pointing away I'll, be making it more triangular, so really as your fingers come round, the head is what's creating the shape. The other direction is wherever you kind of pull the fingers to. So I think it's a nice kind of easy way of looking at it. There'S going to be more hair to cut from the back afterwards, but I'm going to show you that, with the secret in both sides, James says Harley sitting in quarantine somewhere in the UK. All right, so we've got that graduation in the back. We'Ve got the softness in the front which connects through and around and kind of, feel to it. What I'm going to be doing is I'm going to meet also making this even softer, I'm going to be layering. The top, but for now I want to do the graduation, the outline, and so I answered the questions she said things it means. So what we're doing now is we're continuing this form of elevation when we're putting it out and connecting of the back. So remember, if you didn't see the beginning, we create some triangular graduation in the back and we created a line and the fun now. What we're doing is responding to elevate this and connect it around graduation. So when I put it out, I have the back, which I have cut already. So if we see here George come from the top, you can see that the backs already been cut and the front has, and so this hair hasn't been cut yet and the back has what we're going to be doing now is connecting it in so we're connecting It in to what we've already cut before our fingers are curving around towards the front each time so we're creating this softness as we get towards the front. So in order to connect in the back from the back finding that connection point so elevating nice and high. Don'T be afraid, because the more higher you go ahead, the more you're going to find the cut so don't be afraid to find the hair to cut off at this point, because you should another question: will you check the sides to see if the graduation is the Same for each site, he cut the second side and you check you might find that it's too short, so then you're gon na have to check the first side again. I hope that make sense, and so what I like to do personally is I like to write so I've cut both sides check the balance and then, when I'm cross-checking, I can also refine any balance issues as well as any kind of inconsistencies in my technique. So I personally like to finish and then is: are you cutting with the side part or in the center? You can see. So it comes from the side and it curves towards the crown that we have and then the center back. So it comes from the side. Parting and then, when you have a corner where your triangle and round shapes meet, and if so, will you be keeping it when they can show that we connected in right now, so we're not looking to have a major corner. You do have too much left in the back and I'm going to have to come out and find that with my triangular graduation technique and say that pivoting technique that we spoke about in the minute giving. But for now I'm just getting rid of any excess hair and connecting the front. So we have this nice now kind of sleepy sloth, graduation image comes in and what we want to do is we want to connect the back in perfectly. So I'm going to be taking first, my triangle sectioning middle. Now. What I'm doing is I'm doing two things at once: I'm going to connect the graduation in the back and I'm going to be working on my triangle, graduation as well. So what we're doing is we've got this nice little triangle section from the crown and the bottom remember the first bit. We did our triangle graduation we're going to be doing the same on the top, but we're going to be working around a head. So, instead of doing that triangle over directly really back we're going to be working quite parallel in order to slim the sides and make sure that there's a really nice flow. So I work those on to the first. So now I'm coming in more vertically to connect the back, so that allows us to create that nice heavy graduation, so we're pivoting sections now again from the crown area we're pivoting around and we're making sure that we cut off any excess and we're connecting the graduation. So you can see the connection point from the top got a question. It was for the sights. Give me a good now lots of Christina. How do you keep both sides working on the same elevation, any tips with my fingers? So let me show you what I do I hold and then I actually feel with my fingers how far away from the head. I knew that the last side I wasn't actually touching, so I knew that I was further enough away. So as I'm pulling I'm feeling where the length is I'm feeling how far and my fingers are and then I feel comfortable come back around, and so I try and use my fingers. But you know you really have to see it and visualize it as you're working as well. You want to visualize how far away and the figures are, and that will give you the best indication of whether you have consistent elevation or not so we're looking at the roots, we're looking at the length that they are away from my fingers and remember you can Always cross-check, as you work so now that I've both sides of the back that I've connected it. What I'm going to be doing is I'm going to be just checking it to make sure there's enough inconsistencies in them. So as I'm just making sure that I'm happy that the legs on both sides are equal and I'm happy with that, I could cross check the back now, but then, but I'm not going to do that, I'm going to keep working through the sides first. So what I'm looking there to do now, because I'm looking to slim the sides more. So what this means is I'm taking more vertical sections just to make sure and I'm just looking to make sure that I'm connecting imaging nicely while still maintaining the length from the bottom. Okay - and this is really going to come to life in terms of movement when we lay on the top, so for now what we've done is we've done the graduation in the back. We'Ve done the graduation on the sides. We'Ve now connected the top with the graduation. In the back and just refined the graduation in slides and then we're going to be layering the top afterwards, so it's not this one. We would call it an abstract cutting slave language because it's a bit of a mix, it's a bit of a round by it's a bit of triangle. Graduation, it's a bit of round graduation, it's a real mix! So there's nothing left to cut. So you can see that there's a flow to it, a flow to it that connects the bottom and the top as well all right and we're going to now do the second side. So again, what we did was from the back and the top. We took these triangle sections and we pivoted round now that we've got a section to the side, we're just going to be taking vertical sections as we work, so we're just going to be going vertically and we're going to be pulling their hair back. The top is the guard, so you see the guide from the top and you just make sure that you connect the top downwards or the rest of the head. So what we're going to do now is we're going to make the whole thing soft we're going to make the whole thing flow mode. So what we want to do is if we want to actually start by layering, so I'm the dog and we're going to start now, if you layer the back there, what you're going to be doing is you're going to be flattening the graduation back. So if you don't want to flatten the graduation back, you better off not to cut the back too much, so we're going to be conscious of how much we're layering and layering this hair. So what I can do is, I can start from the back, make sure that I'm not losing the weight Levi, I'm maintaining the length that I want to see in the back the weight that I want to see and start to slim the haircut there afterwards. So what we're doing now is we're layering, the top in order to make it softer flutter better. So yeah we started from the back so that we maintained the weight in the back. We maintain the weight in the back. I didn't want to go shorter in the back and if we want to lose the graduation created, there would be quite sites that spent so much time doing is really nice graduation and then afterwards, what were they so I'm very conscious how my livers so taking these Vertical sections in front of about subdividing it elevating up and just cutting the header that we want to remove the way from well maintaining the weight in the back so that we're going to flatten the graduation we've already created. So I'm going to take one more section that she's already in headed to cut what I'm doing is I'm putting the head to the sentences, so I read through the hair to the middle. So what I'm going to do now is I'm going to start cross-checking horizontally. There'S always a bit of weight in the question seems you have a and other question is: are you basically just following the shape when you layer, rounded things on? Yes, I am following the head shape, looking to make sure that there's no weight on top. So I'm looking to make sure that there's a firm foam bottom all the way to the top anything that's going to end up being a corner is going to stop the haircut from flowing and sitting very beautiful, so we'll remove all wave lines and consistencies it'll just Allow it to be a soft shape, the fluid movement as well. So if I work for make sure that mark over directing the hair too far back or forwards, because you'll find that we have too much that's a toggle. So, by maintaining this more or less on the base, what you're doing is you're spotted yourself from over directing and when you're over director was encouraged to cut the hair off either from the fog or the back and right now we don't want to do that. We just want to maintain this beautiful created now, which flows very nicely to the haircut cool. So this is my last section on this slide and then what I'm going to do is over to the later the other side and then do the same thing where I connect it through the back. So just really so now I have the softness that comes in from this beautiful round of shape as well cool. So that's one side BAM. What we're going to do is we're going to do the second side for the first battle variant and then by connecting the layering to the sides that water, so just keeping it even even consistency. Why you decided feta to layer, then cross check and then layered at site this consistency, whether it was just finishing one style? Moving on to the second side, it's hard to maintain, let's say to maintain the correct length I would say, but the in terms of the flow: it's really good surgery. If you feel confident with your balance, then it's okay to do what I've done. If you feel a bit insecure, what you can do is you can layer both sides and then connect the science it's up to you, but I just felt like I was going to have a massive flow. If I finish the layer on the top, and then I connect the science, if it was only really one section there to layer the top now as the work comes when I'm going to now connect this by taking these vertical sections from the top to the bottom And I'm looking to now connect the bottom with the top nicely. Thanks for the question. I hope that was my question. Sorry so, working from the bottom towards the top, and as we said that, if you guys want to see the head sheets for this, will be going live on slate Harrow education, its Facebook page. So if you want to see the full on head sheets of how we did, this haircut feel free to treating about ten minutes after we finish the hair, braid lab and we'll be going live. We love the suede color interventions, Facebook page and doing an in-depth head sheet of the finish beautiful, so just continuing this round to the back styling, it's a slightly pivot and just make sure that there's no massive corner of the top here, mr. smart, the disc, a Take I've created the outline of the head very quickly and that's what were shaken quickly and you feel more confident to move on so I'll. Do a quick recap for you guys as well. What we did was we started with a side parting and we did from side parting to the center back. We then took a triangle section in the bottom, so what I mean by this is we took a curve section, full occipital burn down and what we did after that was. We started to take pivotal section, so we took that first sexually. We connected it. Second, section: pivot from the center from the occipital connected third one pivoted from the occipital bun. We connected it. So we did this first section, which credit is more grounded so in triangular, graduation of axons kind of curve. Graduation. What we did there afterwards was in order to create the shape quickly to see what we're doing. We then work from the front back so now we've got our graduation in the back and we started by taking care of sections from the front to the back and we then just created our line. So we just pulled all the head boundary of our line. We then actually get all that hair down and created a line, so we first created the outline of a full haircut first afterwards, what we did was we started to take these slightly diagonal sections and we started to elevate the hair up. So, as we picked the hair up, we started to elevate and connect the side. So as I'm showing you now we're just elevating out and connecting so again I'll show you the rest. We took these diagonal sections, we elevated the hair and we connected it from the back to the front. By doing this, what we have done is with action ourselves to maintain the graduation in the back, create a really nice outline where we want it, and then what we're doing is we're simply connecting the outline to the graduation year back so using this elevation each time We worked and just connecting from the back to the front, make you sure we're not leaving any weight on any corners anywhere and it starts you can see. It starts to take shape and starts the flow really nicely. So we just went all the way up, as we did it coming up higher and elevated in each time we worked until there was no hair left, so there was nothing left. We then took from the back. We took a pivoting section from the crown area and we connected that from the top all the way to the bottom, so that we have a really nice flowing graduation. We then pivot it from the top to the bottom, all the way around, so maintaining that graduation. All around from this point, what we did was we took parallel sections, so, instead of pivoting into parallel sections, we worked through the sides. We worked through the sides each time through what we then did was we came from the top we elevated high up. We kind of arrow from the top, and then we have only been connected that by taking curved sections and making sure that there's no corner in the connection from the sides to the top each time and that's it samer silence. So that was the hair color. One of the $ 50,000 - and we start to try it we're gon na use essentially two products in from another. So we're going to use the miracle of sprite first, which just gets a little bit of moisture to the softness. It'S a leave-in conditioner and we're going to use a little bit of the smooth side, and this is just going to add a little bit of shine to the head cover, make it a little bit easier to blood run as well. So you can see why we pulled this a bit of a rounded head cut, because it has that soft round feeling to it because the front is shorter and the opens about more beautiful. So I'm gon na get a little head right now and start to drive in this beautiful. That is not what you think guys thanks so much again for tuning. We really appreciate all the love and support you know service to the Hepburn community. It'S whether she is now we'd be doing hair and eyes when you take others. So thank you so so much cool. What I'm going to be doing now is I'm going to start to dry it. So I'm just gon na grab the brush so losing a little small best for us. I don't want to challenge the head of texture. I just want to smooth make sure you lost the quantity. Peeps are playing so we're just anything down now, so one good is under storage. I mean when they're cooler, along with the students natural pool working around the head shirt so again just keeping the air down. Thirdly, trying did that. Hairline is a lot when you're working the result we're trying to do ahead of us for us. So I've got one question: she hasn't side parting. How did you create the guide for the society, but actually the reality when you do that in the client? The trend that you find one one of these too much MJ's asking if Carrick using it I'm round brushes now James, is asking: how do you decide what we are going to do without lines? So this could you met quite smoothly but or it can be chopped easier. I know that quite soft. I think the choice is really big opportunity, so you are the master of your max. Are you not to decide whether you want to get strong assault, but it's very much a personality things? What kind of personality you see like saltiness, disree, much strength and I've got one question that is out of the out of hairdressing world? What is your favorite drink? We'Re in currently there is no bar. So concerning how whisk at home Jamarcus says, I will get you and when I see you he was the one asking for the drink and says he will join. He will be, there got a question. Will you make it softer if they will air dry and we are more natural? I'M asking the question is like: if it will make it softer is just they are dry and wet mud, natural done. We can so I'm just softening, and just where I can think about now is that nice, Japanese, whisky monitor debunking so there's no right or wrong here. There never is any way that really with the outlines is very personable. What we like, if you want to see something kotero and more question what, if the client words a little more hide in the can, so if you want to actually push this but from the person depends, you know when it comes to those things as well. It'S very much about the head. If the person has a flat head, you're gon na have to do a lot more. If the person has a head shape, it sticks out. What you can probably do is do something quite flat and it will naturally look like it. Sticks out otherwise, so it's really up to you what you want to do what you want to see. You know just always think about the head shape. The way I always say, there's a head shape is like the canvas you have arts it's on, so the head shake the head. Shake is like that canvas that your art sits on. You can decide really what kind of angle you want to tell you, but the truth is it doesn't matter if the head shape underneath is flat? It'S going to determine what kind of weight you get in the haircut, so you always have to look at the head, shape and decide. This is the head shape. This is the amount of right I'm gone. What I'd like? I have to do together. So it's almost like with years when you have a colorist job, I'm returning all right, so the head check is like the undetermined of your head o'clock. You have to think if I were going to do this shape. What am I going to have to do to get it there? I hope that makes sense. Let me know cool, so I'm just gon na soften ever so slightly. I feel like there's a little bit of right here, so I'm just gon na come up with slightly diagonal sections, I'm gon na elevate and I'm just gon na flatten it a little bit more. So again, I've just gone in visually. Seen where I feel like like a pretty piece, luckily, everyone's got. I did a big thumbs up for George holding that camera for so long she's been amazing. So, thank you so much so we're almost there we're just refining a little bit the white line, which I thought was a bit too heavy. So I'm just coming back in with mass horizontal section, and that's looking nice to me now, just elevating ever so slightly each time working through from the corner all the way to the back and yeah. What I'll do is I'll. Give you a little bit of a recap anomaly. So if you come to the front from you, George, yes, sir, I will come to the end honestly so much for watching. I really appreciate, if you didn't like it, don't forget to share so what we're going to do a little bit of a recap to do of the model I just finished. So what we did was we started in the back. We start in the back. We took a section and photo Superbird and incorrect balance was the systolic high chopper went down. We took our first triangular section in milk when we created the graduation event is from the middle. We pivot it over so to check the middle stationary and we pivoted over. As we worked through to the sides we created, what was technically trying the resurrection body. We then took diagnosed sections from the front all the way to the back and what we did was we connected this with a lion technique, so we actually, how about fingers a little bit of emulation and our fingers and we created the line so the back. We did this on both sides, actually we'll all put her down and connect it into the line technique. So both sides have this line technique. First, we then took slightly diagonal sections and we elevated the header so with the digital, slightly diagonal sections and we actually from the line, elevated and up and connected it to our graduation all the way through. We then took a triangle section in the back which connected the top and we pivoted around. So we go to the side and then we work vertically. We then did a layer through the top and then we come into connecting the sides across and that's it. I hope you guys liked it. It'S been a lot of fun we're deceiving next month for another hairbrained life. I believe it will be a header, a life with James, a chasm you can come up and that's a very, very exciting. I look forward to seeing you guys there lots of love from around the world thanks for tuning in see you next time guys


Comments
Roxana Velarde: I loved it!!!
Geraldine Kelly: Very creative of precision hair cut. Top class
Joseph Sudano: Hi George have him explain how he doesn't get a hole behind the ears
Dhia Hamidat: Good video I'm from Algier
Lori Hernandez: Why is the video so blurry or is it just on my phone
Maria Rodriguez: Watching from Dubai
moon light: Creator
Joseph Sudano: Fort Lee new Jersey