Back To School Protective Quick Weave Middle Part W/Curls
- Posted on 28 August, 2019
- Bob Hairstyles
- By Anonymous
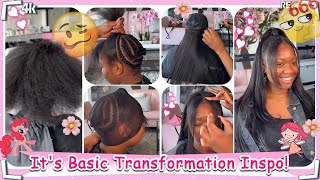
Hey you guys and welcome back to my channel today, I'm bringing you a back-to-school hair tutorial. I had another video, so if you didn't watch it I'll link it right here, but I had I'm doing back-to-school tutorials and just simple styles that that teenagers can wear a back to school. Of course, I'm doing my knees and we're gon na do just the middle part, quick weave or protective style. It is a Gillooly style, but I'm just gon na say protective style because we're using glue - and there is no glue getting on her hair, but anyway y'all. I am so happy our channel finally reached a 10k subscribers, I'm so excited yeah, I'm just so happy. I just went to all of my subscribers in viewers, whoever just thank you so much for the support and I'm just gon na keep on putting in work, making videos trying to get better at recording and making great content for you all to watch. As long as y'all stick with me so anyway back to the video, so I'm doing my niece, a Middle Fork, quick weave, and so now I'm just sitting the foundation, so I can start laying the tricks. So what I did was take a we already shampooed and blow-dry her hair. I think she just lady arrived, but anyway, I'm just now sectioning out the middle part, and now after I seen the video I wish I wouldn't lift as much hair, because her hair is just like super super thick, no matter what she does to it or what Happened to it, even if she has some breakage her hair is just like extremely thick, so I wish I would have left just a little thin piece out, but I didn't so anyway. There'S water under the bridge, so we're moving on. So what I did was just put a braid down the middle of her hair, where I'm have her leave out and then I left two little thin pieces out on the side in case she wants to pull the hair back, and so now, I'm just doing two Inside or French braids, I think that's what it's called and I'm just gon na do those going to the back. So you'll see me doing that one both sides. So if you can't do French braids, you can just do regular, cornrows, two-bit, cornrows or you can do a full head of cornrows or you can just slick your back and put Morning Glory on. It is totally up to you. Do whatever works best for you, so I'm just doing the two french braids and I'm gon na do one on the other side. Okay, so once you finish with your French braise, it should look something like that. If you can, I'm not a great brighter, I can just braid to get installs done, but if you are a great braided you probably can get it a little flatter than that, but that's good enough. So anyway, I just got about three black wrapping strips and I cut them in half and I usually hate to ask my client to do any work while I'm putting installing their hair or doing anything to their hair. But since these were cut in half, I just asked her to hold them. For me, real quick while I got the strip's laid down and it's only gon na take pride a list in a minute and then I'm just gon na go in with a stocking cap. On top yep, once I get it laid down and so she's holding it, so I'm just gon na go in with a stocking cap. Really quick, just a black one or whatever color you have available is fine and so yeah, I'm just pushing that the excess cap back so that it exposes the part in between the leave out in where her braid started. So I'm just gon na cut the ears. I kind of like, if you were doing the frontal just so I can hold the cap in place. While I track the hair in so I'm just gon na do that on both sides, and you just want to cut the ear out on both sides and then I'm just taking some guys to be free spray. You can use the morning glory like I said, or you can go in with some bonding glue and just like outline the area where you're gon na be laying your tracks down this time. I did not do that because I want to give her is minimal glue as possible, so the the got to be is really strong, so we held it down so anyway she got some bundles from Beauty Supply and they were really inexpensive. I think they paid less than $ 50, maybe like 40, something dollars for three bundles, and so I'm just putting those in I'm using some thirty-second glue and I'm doubling the tracks. The first two bundles I'm gon na double the tracks, just to make sure that it's thick enough and fully lookers. Like I said, her hair is super super thick and then I'm just going in with my hunter pearl blow dryer and then I'm gon na store it glue in again. So y'all see that hump that she has back there in the back. It'S just because I didn't make those braids connect really really tight, but once I put these tracks in, you will not see that um dead hump. My braids are not super tight because I'm not a really great grader, like I wouldn't be able to braid some hair for just braids by themselves, but I can get the hair braided good enough for install my hands are just getting old cuz. I used. I started out doing braids years and years ago about 20 years ago, so I just can't break that tight anymore. So anyway, you just want to start bringing those the second bag of hair. You just gon na start tracking it and you gon na start bringing it up to the port so that the hair falls towards the face so you're, just gon na glue it down and just bring it up toward the port, lay it down blow-dry it, and so That the hair can fall towards the face and you can see that right there that that's what it's doing so I'm doing this method that I learned from 53 stresses, and I usually do that on the inside of the click weeds and it's just a flip over Method on the quick weave is, it makes the quickly process go much much faster, so I just put the glue down on the cap in the wrapping strip, since it's not gon na go through, and I just lay the tracks on top of it go in with My blow dryer and make sure it's completely dry, and I do that all the way up until I need to change direction of the the way I'm laying my track. So here I'm just laying the tracks across the back to make sure that is full in the back and I'm just gon na keep doing that until I get to right around the leave out area and then I'm just gon na take a track and just wrap. It right around the leave that area once I get to there so now, I'm just kind of going it like they, you shape or a horseshoe shape and land and trace them, and then I'm just gon na continue doing that until I've run out of space and There'S nothing but to leave out left so in between each track. You just wan na you can spread with the got to be free spray and then below the right. If you like, if you don't have the free spray, you can just blow dry it, especially if you had a 30 second glue, little dry really really fast, so you really don't need it. So here I'm at the last track right before the leave out and you just want to make sure you press and hold it, and that is laying down really really well, then take your got to be free spray or you can use some pump it up or Any type of fish your head is just gon na reinforce the hold of the glue and then go in with your blow dryer. Okay, once you get to tracking all your hair, you gon na spray, some more free spray, blow-dryer and then put it back so that you can cut that excess cap off when you're cutting that extra cap off. You want to be careful not to click your your owner, your clients, hair, because it's very easy to cut to tech, the clients head or whoever's hair. Are you doing so? You just want to like lift the cap up and cut it at the same time and make sure that you're not cutting the actual hair okay. So I'm just born with some duckbill clips and kind of pulled the hair back a little bit he's crazy girl. I don't know why she's covering up phase anyway she's. I think she was saying her. Eyebrows wouldn't wake store, something she is a Miss, so yeah, I'm just pulling the hair back y'all she's going to the ninth grade, so she is just like acting really vain. So I guess they have to have their everything done on the first day of school, so yeah so anyway, I'm just gon na flatten her and leave out on both sides. I'M just learning my 1 and 1/4 inch tool: science Flatirons, my favorite Flatirons cuz. They really get the job done, and so now I'm just gon na undo her leave out. Okay yeah. Looking back, I didn't purchase to her. Her mom went to the store and purchase the hair, so usually bundle her. It comes pretty brown and her hair is usually pretty naturally brown, so we thought that the hair was gon na match now. Looking back, I should have probably you could put a rinse on her hair to darken it or enlightened that hair just a little bit, but I didn't so you're gon na see me go in later on and add some like hair that matches her exactly on top Of that hair, so it'll look time like it's two-tone or two different colors or something like that. But it's gon na match her hair on the top and then Fedora on the bottom. So yeah just straighten up all of her leave out and, as I can tell her, hair is just like super super thick I mean her. Hair is just like a really really big. I don't know why all those people keep walking me, and I know my nephew. I keep seeing him, but I think that's my coworker, using the refrigerator or the microwave or something but anyway yeah. So this is just the hair once its installed and it looks like pretty good hair, okay yeah. This is a curling iron from Sally's. I'M telling you our sellers need to give me a hookup, I've already emailed them and they haven't emailed me back, because I was trying to do a TK giveaway and they haven't said anything back to me. It so we're just waiting, but anyway, those are the iron. The one it's like one and a half inch curling irons. Those are the gold ones. I have the purple ones and another pair in, and they really I mean ills, they get hot and they make really cute curls. So I'm just taking sections and I'm just curling. It frozen the hair going back away from the face and just like some big barrel curls, and I'm just gon na continue to do that on both sides. I'Ve already curled the back. We just didn't show that in this video, this portion of video - but you have already curled the bank, so I'm just doing the four pieces now: okay yeah, I don't know if y'all can tell I've already added that brown hair to match for her ends to the Quick weave, she has some sandy part, some blonde, looking pores and some is just really really Brown. So I had already added that brown hair on top just to kind of make it blend in with her hair, because that a hair that she bought the bundle hair. She bought it was really really black and usually that hair is more Brown, but this time it was really really black. So we just made it work anyway, but, like you can see, she has some really really light pieces and some it's just really Brown, but I just had to go ahead and make it blend in with that hair. Of course she got a quick week, so it's only gon na last about two weeks anyway, so she'll be back eating. Something else done to her hair. Does she say she's gon na keep her hair up for school. She gon na keep our hair done this year for school. So of course, she'll be back in like two weeks to get it done again. Okay, so I'm just taking my little rat tail comb and smoothing over her top part, making sure that the part is straight and then now I'm gon na go in with some edge control. I just used the shining Jam you can use whatever ish control. You have one hand I wouldn't like run out and buy no shine a jam or specific edge control, but I'm just using a shot and jam and I'm just making her like some glow scoops in the front one in the middle and front up the middle. For it and then I'm gon na do like two on the side and then a sideburn so yeah. Okay, now I grab her edge is done so I'm just one back, even putting their little curl right there on the side where I combed it out it and but yeah her edges are done and I'm just kind of smoothing it over and making sure everything is Laying down no flyaways or anything I'm just using my curling iron and doing that you can use a pressing Tong or your flat iron or you can even use a buxom holding spray and a blow dryer to make sure that the leave that area is really flat. So here I'm just gon na go in now with the middle rat, tail comb and some high beams black spray and I'm just gon na spray a horse. So I can give her a crispy, clean middle part and it just kind of help everything blend into it, because their hair was so dark. So at least the roots will town the door in the end that brown color sitting on top so yeah, I'm just taking my shampoo comb and I'm just calming all the girls to the back and then pushed them to to the front. So you just want to do that on both sides and y'all know I'm a perfectionist, so I'm gon na keep on combing and primping and just trying to make sure everything is looking good until I feel like it's looking good so anyway, here's her finished look. This was a goalless, quick weave. She used use of inexpensive hair that she purchased from the Beauty Supplies just the middle part, quick weave, and she really loves it. It came out really really cute if you liked my video like coming and subscribe click that notification bill. So you'll be notified whenever I upload a new video. Thank you for watching
Comments
Toya McKnight: Good job, it’s gorgeous and so is she, ❤️
Chantel N: Thank you so much for this my daughter what's weave but everything was too grown for her
Alexis G: You are so talented, I love watching your videos
Brittany Madison: Im a new subscriber keep going you got this!
LaToya Bell: Awesome Job !!
B. B Beauty: She has some thick pretty hair
Jennifer S: Looks good. Good job
Nicole Francis: Yes I luv all ur videos goin for 20k
Renee Upson: Cute
Francine Sanders: Good job girlfriend ❤
MekhahBoo Hunter: Love it
Sheila Terrell: Very pretty,Neice tooHave a great and safe school year..
Ina Goodwin: ❤️
Mrs.RED'VON 77: Just beautiful congratulations sis may God continue to bless you #keepsupportingsmallchannels like mine God bless
Michele Lockett: Where u do hair at? I'll love for you to do my DAUGHTER hair. Your work is BEAUTIFUL!!!
beautifulonekg: Pretty
Karen Brown: She izzzzz Beautiful.......Beautiful Job
Aakeria Harbor: Name of hair?