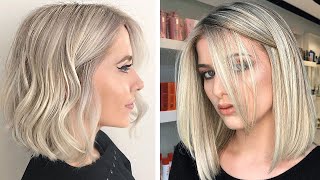
Basic Layered Bob Haircut How To Cut A Layered Bob Haircut Tutorial
- Posted on 19 September, 2022
- Bob Hairstyles
- By Anonymous
Basic layered Bob Haircut how to cut a layered bob haircut tutorial.
This tutorial is a simple step by step guide to cutting a beautiful commercial salon friendly Bob haircut.
This Layered Bob Haircut Tutorial will teach you how to combine layers with a line. You will learn how to connect the layers with the line and also how to disconnect the layers in the line.
// Binge Watch: 1 Doll 6 Looks (Tutorials)
https://youtube.com/playlist?list=PLoK...
// If you would like to watch my previous:
Basic layered Bob Haircut how to cut a layered bob haircut tutorial
// Watch Next :
face framing highlights application: https://youtu.be/PEcAyikhquU
Half head foils application tutorial: https://youtu.be/GSNd3xHaDo4
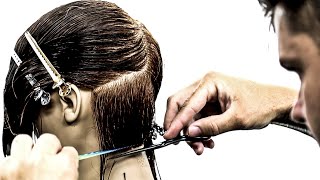
Start with zoning, the top working from the recession along the parietal Ridge to a point in the crown through to the recession on the opposite side, we now determine the length and the shape for our bob haircut. I'Ve decided to cut a concave shape. We take a center profile section and a slight diagonal forward, cutting section. We now Elevate our clients head forward. This will help to prevent graduation in our line. I'M using my comb and scissors to control my section before cutting. We now cut a square line. You will notice the hair texture, I'm cutting is jumpy and slightly wavy. This could be best cut between the fingers or under the hand, with high tension, I'm using the width of my comb as a guide for my sectioning size. You could take larger sections as long as you can control the hair and clearly see your guide. My body position is square to every cutting section and my eye level is directly in front of my cutting line. It'S important to maintain and check your balance throughout the haircut. We continue to take slight diagonal forward sections with our client's head, directed and elevated forward. This will help us to maintain balance throughout our haircut when cutting wavy or jumpy hair textures like this, and you want to create a strong, solid line. It'S really important to cut with low minimal tension through the comb. If you'd like to add graduation or a bevel to your line, you can stretch the hair between your fingers or under your hand, the more you stretch, the More Bounce and more bevel or graduation you'll. Get in your line once I reach the occipital bone, I changed my cutting method to between the fingers. I also change from club cutting to point cutting, as this will continue to add more softness and texture into the line when cutting layered Bobs. I aim to maintain strength in the line to create Edge in the haircut that when I incorporate the layers, that's the component. That brings the softness, the texture and the lived in movement to the haircut blending. These two combinations together gives us a strong, but beautiful haircut, shape, step back and assess your haircut take a moment to see the work that you've created with your body position standing Square to the side of your client's head. We now take our first section from the occipital bone through to the front. We continue the same process directing our new section down to our guide and point cutting a square line, we're now over direct the front side section back to our guide in the back. We continue to point cut a square line. Maintaining the corners. This process creates a subtle concave shape, working from Square line into a triangular line in through to the front. I recommend cutting one side at a time because it's easier to maintain your your body position and distribution, stepping from behind your client to the side and then back again, once you complete this side, we repeat exactly the same process on the opposite side: foreign, to maintain Balance in your haircut, it's important to rehydrate every new Zone that you take down before cutting this haircut can be cut at any length from shoulder medium length to super long or a short bob. It'S a really fantastic Universal shape. If you find it difficult to point cut your line, you can always Club cut. These are just tools that are optional, that tweak our hair cut and create slightly different effects. If you preferred shorter length in the front, you could cut this exact haircut using a square line instead of a concave triangular line. Once we finish this side, it's important to check out balance and make sure we have an even haircut foreign, the top crown Zone by taking a radial section. We section the top Zone through the natural parting. Take a second to assess the natural fall of the crown Zone. Remember to rehydrate even tension and hydration will help you to maintain an even haircut. We take our guide from the top of the previous Zone. We now choose our cutting angle. I have chosen to cut with a triangular cutting line, as it will maintain maximum length and connect seamlessly into the previous line. We start with taking a center profile section directing and elevating our hair straight out from the head shape. We continue to cut with the Triangular cutting angle. This shape will help us to maintain length in the crown and direct weight into the Zone underneath creating a beautiful seamless, well-connected kicker. It'S important to assess your first section in case. You need to make any adjustments throughout the crown Zone. We continue with taking pivoting sections when you pivot your sections, you seamlessly move control of your vertical to your horizontal shape, using our first section as our guide. We continue to cut every new section on base. We continue this exact process until we finish this side, you'll notice, my body position remains in a stationary position on the side of the client's head, you'll also notice. My elbow is elevated, hide to mirror my cutting line. We now check the texture and movement from our triangular line, checking to see how the layer seamlessly connects into the line underneath once we reach the side Zone, we use our guide from the back Zone as our stationary guide. We direct every section in the side Zone back to the stationary guide. My body position is now facing back towards my client's face. This is to be able to maintain the appropriate cutting angle, you'll notice. On the opposite side, my body position will remain at the back of the head shape in the back Zone. Our distribution was round cutting on base working with the head shape in the side zones. Our distribution is triangular, creating an increase of length and weight in the front of our haircut I'll continue the same process on the opposite side, maintaining the same elevation cutting on base with a triangular cutting angle. The LIE is, in the crown Zone Connect into our line using the guide from the nape Zone in the side zones. The hair above the parietal Ridge on the top of the head is disconnected from the line underneath it's really important to maintain consistency and balance throughout your haircut if you've learned something new or you value. My work show me some love and hit the Subscribe and like icons. I do appreciate all your feedback and support. Let me know in the comments below, if you'd like me, to create a tutorial with this haircut showcasing different ways. This haircut can be styled and made suitable for all age groups. We now check out balance before flat, wrap blow drying, preparing the hair for the refining and personalizing process. I have directed my clients head to the side and placed a sectioning clip to control the hair and using a club cutting method to reduce any unwanted length. Point cutting into the section will help to collapse the line and soften the shape. You can use your fingers to elevate the hair out to clean the line, even though the top layered Zone and the side line are disconnected. You can still see how these two still blend together. We continue the exact process on the opposite side and in the back Zone. This tutorial is a remake of one of my oldest haircuts. It'S a basic layered haircut. Definitely one of my most successful tutorials on YouTube. I'D love to know! If you think this one is an improvement on my original I'll link, it in the description below whenever you're, cutting or refining a haircut make sure your eye level is in line with your line. We complete the haircut with refining the layers, I'm simply elevating the exact same way. I cut the layers gently Point cutting to soften. If you'd, like more texture point cut deeper. This haircut would look amazing with a curtain bang a strong Fringe, soft layering. However, I want to keep the exaggerated strength and length in the front. Thank you can see how the layers seamlessly blend into the line in the back. This is a disconnected layered. Bob haircut that has strength and looks edgy straight can look boho beachy. It can look glamorous, it's such a universal haircut for all age groups. If you love this color, you have to watch my face frame money piece tutorial. Thank you.

Comments
Sandie: Straightforward and practical It's a beautiful yet complicated-looking cut and I appreciate how you break it down into easy-to-follow steps. Thank you!
Katie Albert: Thank you so much for streamlining this tutorial! I walked away with more confidence & knowledge in 12 minutes than I have from school in months. Love your clear and concise approach to teaching. Thank you
Amanda Atkinson: I'm not even a hairdressing student and this video was absolutely fascinating to watch, the end result was beautiful.
How To Hair Tutorials : Amazing in depth tutorial. I learnt so much. Thank you so much. Stunning haircut
Praphasri Sukhilak: Thank you James. It is awesome tutorial, really nicely done with your voice. I love the Sassoon cutting comb!!! Can't wait to see your next tutorial.
Free Hair Education: Love this bob! Incredible work. I love how this haircut is so versatile
Keyla Vazquez: Me encantan tus tutoriales, el mejor maestro saludos desde México
Chacha 29: J’adoooore ❤️❤️ Vous expliquez très bien Merci
T Lannan: Beautiful work ❤
Любаня Карнаухова: That' s marvelous! Adore your explanations! You love your jobThanks much for help.
Rosalie Flores: You never disappoint. Your tutorials are very clear and easy to follow. Thank you for taking such care in your explanations. This tutorial along with your previous basic layered bob tutorial are magnificent. I prefer this new tutorial which establishes bob length first. You are amazingly gifted.
Live Life Nutrition Pty Ltd: Stunning haircut and amazing tutorial. Love your work and thanks for sharing
Наталья Винокурова: Отлично, спасибо большое. Хорошая работа.
Алёна Гайдук: Большое СПАСИБО за урок Очень красивая работа Всё понятно и доступно показали!
Karen Warner: Great instruction!! Beautiful cut!
TheFarkhondeh: Hello James, another wonderful class and haircut thank you . When you moved to side for layering , where was your stationary design line on the side . Thank you so much for all your great work
Melissa Cleaver: I am a cosmetology student and really appreciate how well you described and cut each section. This particular cut now makes more sense to me. Thank you!!
Melita Novak: I learn a lot of new thing....this is the best tutorial about layering....for me....thank you....
Peanut Butter TV: Amazing work. Love this haircut
Agata Sula: This is beautiful haircut, all hair flow together. I love your description, thanks
Flower Power: Sencillo y eficaz; like y directo a favoritos :-)
Corine Gonzales: Très jolie coupe, comme toujours vous faites des merveilles merci pour ❤️
Marcela Constanza Bernal Peña: Q lindo corte... gracias por enseñarnos
Donna Hartzman: So beautiful!! Thank you for sharing.
Jackie Waddle: Thanks. Beautiful work!,
TheFarkhondeh: Yes James ,I have seen this video many times And told others about.(they were appreciating me ) For telling them about this video . I have given you Liked . Thank you so much for resending to me I enjoy and love your greathair cutting videos . ❤thank you again for taking time and answering your My question
loganavenue1: Like it very much, however a lot easier to watch on a blonde, like your earlier version. This new video is the way I would’ve done this haircut, perimeter first then layer it. Nice.
Je Zus: yes love this hairstyle...you cut beautiful hairstyles...❤️
Amal Al: Thank you for letting us know I really appreciate it
paula smith: I love this ❤
Maria Cristina Paula Machado Cris: Vc é um expert
Фания Нуриева: Классная стрижка,классный мастер. Привет из России ❤️
Polina Sh: Stunning!! I Send all my love to you ❤️
Asaif 💈: Thank you
Susie Nguyen: Always love your job, you are professional
Shyama Priyangika: Woow...Nice.. clear n nice voice..
Maryline Berniard: Superbe coupe bravo à vous, dommage que je ne trouve un coiffeur avec un tel savoir faire.
rosaelena Molina Mauriola: Excelente ! Un corte muy elegante!
UN UNIQUE: ❤️❤️❤️
So so:
Robin Shepard: Beautiful, Cut and color
Dana Weyers: ❤❤❤
Sana Siddiqui: Hey James, can you please share a hair cut for thin short frizzy hair wavy? I am losing my hair rapidly, and want you to please share hair style for short thin frizzy hair wavy hair
Irina Schneider:
Eleonora Vignali: Molto bravo
ARNIE SUAREZ: Beautiful haircut..
imi sweety: Thank you
🇩🇪Yorgogam_يورغوغام: oh my god you are amazing
Milena Bernar: I prefer even shorter on the head-back, I mean the more sharper angle between the front and the behind hair-pieces...
How To Hair Tutorials : stunning
Jiwan Sunuwar: Nice video tnq bro
Pam Naylor: Fabulous!!
atlal ahmed: I didn’t go to hair cutting school , but my wish is to learn cutting, can i learn cutting from your channel ?
ahlam ali: تحمست و قصيت شعري الله يسامحكم
Shiny Star: واااوwoooow
pimpmyride: Club cut?
Naima Esbar: vu