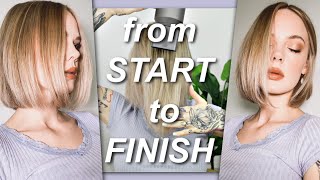
Styling A Curtain Bang/Styling A Bob Cut/Bob Haircut Styling
- Posted on 24 April, 2020
- Bob Hairstyles
- By Anonymous
This is the Styling video that goes along with the Modern Bob Haircut
I decided to do 2 separate videos so I can give adequate explanation of the techniques without making a 20 minute video.
I also have a shorter video dedicated to the curtain bang if you are looking for a shorter time commitment.
I used a Harry Josh Pro Tools 1.25” Marcel Iron and used R&CO Sand Castle and Virtue Labs Finale Spray to finish.
Instagram: https://www.google.com/url?sa=t&rct=j&...
Website: https://www.rayvoltagebeauty.com/
https://www.dermstore.com/product_2in1...
That vlogging has definitely been a challenge being motivated this past month. It'S just like I don't love creating on mannequins, don't tell her that, but in the grand scheme of things I want to create, so I'm going to teach you guys a few things using this mannequin today, we'll jump into that here. In a second, oh, you said. I you said I thought I didn't like creating on mannequins. No, I I didn't say that I didn't say that no, I said I love creating on mannequins, it's like my favorite, so you, okay with doing this video today, okay, great she's, she's cool with it she's good. Don'T worry, okay, so we're gon na get your all section out to kind of show you guys the style that is really really on track right now. I feel like it's really kind of a cool hip to trend. Is this really really messy texture, but those kind of like flipped out sort of bangs that are kind of winking to the 70s, but they're more modern in their shape and their finish so they're, not as puffy and fluffy as those kind of sign of those swoosh Back bangs in the 70s they've got that sort of that sort of flip down. Look to it, but it's going to have a little bit more of that modern, finish and you're kind of seen that everywhere on Instagram right now and in Pinterest, and I just think it's a really cool. Look honestly - and I want to show you guys kind of how I would approach that and we're gon na have some fun all right, so I gave her a cut just a couple days ago. I posted that up on YouTube, so make sure you go check out that video to see how I cut this, and this is good more of like the style, video, and so you can see. I'Ve got her sectioned out just above the corner of the brow on each side, and we are going to start with this bottom portion, adding some texture and we're going to use one of my favorite tools. We'Re gon na use. The Harry Josh 1.25 inch this up here. This is a Marcel iron and we're gon na be kind of going through and just adding in some texture to this style. With this one tool and keeping it simple, alright, so we're gon na start in front of the ear we're gon na, do sort of a positive- wave or a flip down and then flip in or a flip up. Then a flip in. So you can see on that first time how I flipped it up, and then I flipped it down we're gon na do the same thing on this one starting in front of the ear grab your section grab the whole thing flip it upward and then you're gon Na flip it down and it kind of creates that cool-looking subtle, wave texture, thereby the face. So that's how that looks as we've gone around the head they're doing that all around that section, the very bottom below the occipital bone. I left out now we're gon na get into the top. Take down your top section, I'm gon na kind of comb. Everything forward. This top section goes all the way to sort of the the crest of the head there. So I'm a section out the bangs just get those clipped away, we're gon na start in the bank section it's got section: we've got. I did a haircut on this too. Here we go so we're gon na grab our section and we're gon na slide. The curling iron in there and we're gon na flip up, but we're not gon na fully rotate so flip it up, but don't fully rotate the iron, and you can see. Look at that awesome. Little curvature. You just created it's just kind of more of a flip or a flick whatever you want to call it we're gon na do the same thing. On the other side. Here there we go just grabbing flipping upward, not fully rotating. You can see I'm kind of like not even fully clamping down the the Tong looking pretty awesome so far, it's exactly what we're looking for and so you're just letting this cool in that position. So the longer it cools, that's stronger that that flip-out is gon na, be so it'll last longer, so we're getting in the next section right behind it. We'Re gon na do pretty much the same thing this one we might start fully twisting, but you can see I'm pulling it forward. Pull this section forward, grab it and again I'm pulling forward with the iron kind of wrapping, but not fully, and then just let me got slide off place it. We want it maybe touch off those ends a little bit there we go, then we do same thing on this side. Pulling that section forward. You could say I'm rolling and pushing it forward and then I'm not wrapping fully, I'm just kind of wrapping and then dragging the iron out a little bit. Then I might just touch up those ends. A little bit get a little bit more of a flip there. That'S the great thing about the Marcel. I like the way that you can use it and work with it in the hair. It'S a super fun tool. I love this Harry Josh brand, the colors kind of fun. So that's just what I'm doing with the top section. Just every section, I'm grabbing it and kind of pushing it forward a little bit and then wrapping the iron that one and wrapping work pretty much all the way around on now and letting those ends kick out. It'S the same thing on this other side as the last section. I think it might have one more after this. There we go yeah, that's it so then we're gon na get in here and kind of brush it through push it forward, basically just kind of marrying all of our sections that we curled together and just creating more texture, rather than like a curl pattern or a Wave, it's just it's just giving us texture movement, I'm just playing with it molding. It don't be afraid to do that. Just really so, you can set your shape in and set setup how you want it to look and then you get in there with some styling products and really mold it into place there we go. We need a couple touch-ups to with the iron just to kind of make those kicks and flicks look how we want them to look. That'S a great thing about playing with it. First, before we put our product in, you can just kind of do a little touch-up. I'M really liking how that's looking now yeah do a little touch-up and then you're gon na get your product, I'm using a couple. Different things aren't coast and Castle. The dry texture paste just get some texture into the hair, some grip and grit, and then we're also gon na spray. In some virtual labs, create the finale spray. It'S kind of a finishing spray, very lightweight, though it's a really great product smells amazing, just be playing around with that. Lately, all right now we're just molding again we're just kind of molding our bang into place, and this is really what the key is here. This is what it's all about that front section, and this is like the money piece of styling. You know that bang section, how are you placing it finishing off? I'M just getting ready to take a couple photos for you guys here at the end, but I always have to have my wide tooth comb and a hairspray can nearby. When I'm doing my finishing touches before I do some photos thanks for watching guys who's. The finished look make sure you grab onto one of my other videos and check out what else I have to offer. We'Ll see you next time.
Comments
Amanda Ring: Thank you! I just got pretty much this exact cut and this was super helpful looks simple to style, but really helps to see exactly how you’re positioning the iron, placing pieces, etc
iman Essalihi: That's pretty cool!! I love the end result!
Rachel Caullay: Amazing hair style. Just how I want mine
Tanja Groen: Love iT