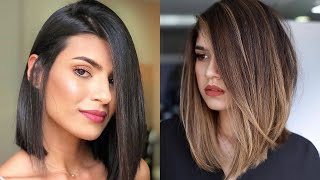
Long Layered Bob With Side Bangs Full Tutorial!
- Posted on 22 November, 2017
- Bob Hairstyles
- By Anonymous
Learn how to cut a modern long layered bob with this full step by step tutorial! You will learn how to cut an A-line, layers and over-direction to maintain length for the perfect beautiful long bob haircut.
Music by: www.bensound.com
Hey guys johnathan here from my higher education, so we're gon na be a refreshing and also creating a long bob, versatile haircut. Why a long bob long bob are very easy maintenance for your guests at home. You could have some layers and that are not too intense, that maintain length, so I'm gon na do some diagonal layers and maintaining most of the length to the front around the the outline are probably gon na go just above her collarbone and I'm going to be Doing the separation in the three segments, so I'm gon na have a horseshoe section. I'M gon na have a middle section and from the nape area, and I'm gon na be over directing pretty much everything throughout behind the ear to maintain that lands and create a kind of a a line concave bob so around the outline. I will be also cutting a bit shorter, going from short to long, create like an a-line and we'll be finishing with a nice side, fringe layered fringe, so stay tuned from the front to the back, including the crowned area, and you pick it up and also the Middle section - and I created my nape area to create my concave - take a diagonal forward section and about a half an inch long y diagonal forward, because I want my wine to be created and a diagonal forward matters. So that's why I'm taking this type of section. So I'm gon na clip it out so basically when you're cutting that line, you're really want to respect how the hair is growing. I don't want to push it to the left, neither to the right. I really just want to respect how the hair is growing, and so I'm gon na go through, and I'm gon na create this kind of a line, I'm short to long. So as you can see, I'm putting tension at zero degrees, no elevation. You could also use your fingers, but for this haircut I'm gon na use my comb through control. So I'm gon na take my other section diagonal forward comb it out of the way so I'm gon na comb it down. So we can see our guide and when I said with your finger so meaning you could also cut it this way. Okay, so what I create is short and longer and remember when you cut a straight line, sometimes gon na round up so you're, better off cutting it a bit more longer. So when it dries, it's gon na go a bit. I'M gon na comb, the hair down, call me down respect the hair growth. Your scissors are angling comb where the hair grows. The great hair grows over here and I maintain this magical down and same thing all right, so you got our a line shape our concave. Look and it's pretty well the guy right over here for my from our perimeter line here and I'm gon na cut it straight, so it's taking off some weight, but I'm still keeping a bit of my line. So what I'm gon na do is I'm gon na? Take a diagonal forward section: why? Because I'm over directing to the previous section and maintaining some weight in the corner, so so you can see that I don't want to take too much weight off over here. I don't want to take weight so basically, I'm cutting the layers and leaving some of the hair out. Oh yeah go forward. Basically I'm pivoting my sections, I'm gon na over direct to the previous section. I'M just gon na move this out of the way so come under over and see your guideline right over here. Okay, pivot, diagonal forward, no matter, I'm just gon na put this out of the way here, and so I'm going to bring it to my previous section. Cut it okay, so behind the ear because of the weakness of the hair, I'm going to over direct through the middle to maintain weight, so I'm going to continue through over the rector's into the middle to maintain my weight and length. So, as you can see, am I losing my length because if I cut it right over here and that would fall, it would weaken this side. So so I took my section out of the way and so I'm gon na follow through with my guy. Okay, take my other section diagonal forward over directing to the previous section I'll, be afraid to use clips, because it helps you with your work. Do it when I come under an over diagonal section previous guide over directing to my previous guide and cutting it? Okay, it's over director yeah, so when I get to behind the ear again, I'm gon na over the right to the middle, because I want to maintain weight and length as much as I can. I don't want to lose the hair behind the ear. I'M gon na push it through to the middle, so I'm moving through my second section, so I'm gon na put my the right side down. So basically, this is what we're gon na start, creating our triangular layers. So I'm gon na do a short two longer and I'm gon na start. When I get in front of the ear, I'm gon na start over directing everything behind I'm gon na. Stop it right here. So I'm gon na maintain my weight and length throughout the front to create to create the long bomb, because if you start layering over here, you'll have too much layers. Sometimes you could create holes if she has thinner hair and you lose this. The goal of the haircut the goal is to do a long bob with some layers, so I'm gon na take my next section, so I will not connect it to this guy. I'M gon na leave maybe an inch and I'm in Korea like a triangle there, because if I go like this, it's not it's more parallel. So I'm just going to take this here. This is the guy and I'm gon na leave a bit of an inch yeah. I'M gon na cut, so they hang go forward over directed to my last section see my guideline same thing: push this here, push that out of out of the way clip it, so I'm just going to comb. So now I'm going to start bringing everything right here to maintain my length previous haircuts and because, when you maintain lent in weight well, obviously by over directing you have less and less hair to cut okay, I move forward. Bring you back right behind the ear, see your guideline: let's cut it straight, move through: okay, I'm just gon na get all this hair here on the back. It'S your guide! You cut it you're guests at the salon when your mannequin heads when you're learning, so we could see not much to cut anymore. So throughout the left side, I'm gon na do a diagonal forward. I'M gon na grab my guide on the other section from the other section and remember I'm not connecting it to this guy in the bottom, keeping more length cutting it triangle. So here we go. I found my guide and I'm cutting comb it through when I go forward over direct to the previous section, see your guide and create your layer diagonal forward over the wrecked, create the triangular layer through bring it to the back really come from the roots back. It'S your guide and okay, so you want to check if you want to check your work, you could just pull it up, see if you're on the right track. As you can see, we are on the right track, good, so I'm going to pass through the front. The top pardon I'm gon na take the crowd, so I said I have much to work on, but just to refresh and we over directed this is your guide, diagonal diagonal forward. I'Ll make sure I got everything you okay, so now I'm going to start really pushing everything back, as you can see to maintain my length. So I'm going to continue on the other side of the crown right over here over the erection you. So what I'm gon na do is I'm gon na comb, the hair back and push it forward to see her natural parting and what I'm gon na do? Is I'm gon na start taking my sections and over directing right behind the year to maintain her length same thing? Diagonal forward push it back right behind the ear, my last section and take diagonal forward sections, I'm gon na over direct. It go check your other guideline on the other side and right over here, so I'm also going behind the ear so diagonal forward and pushing it back behind the ear. I see my guideline cutting through goodbye, maintain length. It'S your guy, I'm right behind the ear and may take my next section over directed and over direct the last section over here. Okay, and just I cut it short he's here - guy I'm gon na follow through come over under and see my guideline last section you work my outline and do some point cutting from where I layered the hair. So I do some point cutting to remove some weight and when you point cut, you want to close your knuckles a bit and cut through, so that you don't know that you don't take off length, just wait and give it texture from the bottom layers. And I kept about an inch, so I'm just going to refine over here over direct refine same thing over here over there a we're fine. I push the hair back same thing, as my haircut bring all the hair back. I'M gon na move through the left side that point cut in and out so you're closing in coming out, so I'm over directing. So I'm really doing the same elevation. As my haircut now work around, the crown put it up point cut over the wreck to the back of the ear same thing to the back of the ear point cut and look how I closed my knuckle in order to maintain the length and takeoff texture and Weight go saw so you're cutting in and going out. I'M gon na cut this area here. I'M just gon na give it some point: cutting I'm just gon na connect it a bit through here just this corner here, because my goal is to really maintain as much length as they can the haircut. So this is the final look, a beautiful, long, layered Bob and to do a recap of this haircut. So I cut a diagonal forward line in the back from short to long to create a a line created. Some layers in the bottom left about an inch from the middle section layers and did not connect to the lower layer. So I could have more of a triangle shape and over directed the front to the back right behind the ear. To maintain my length same thing with the crown I connected the crown area to the middle layer and I over directed the top area to the back of the ear to maintain length and weight which still gave me some nice layers and some length for the long. Bob effect - and I over directed the fringe over this side, to cut it over here to have a short to long effect to have a nice side. Bang there you go. So thank you for watching my hair education. If you have any questions comments, let us know, and he likes on our videos and see you soon for our next women's hair cut. Thank you for watching


Comments
SerenaLoveL: Thank you for this video. I was trying to find a guide for cutting my own hair. Although I don’t think I can pull this off by myself , I finally learned some useful techniques. Great tutorial.
Chelle West: Thank you for this tutorial. I especially appreciate the absence of incessant chatter just to fill silence. Far too many yt “tutors” apparently love the sound of their own voices because they never stop talking and repeat themselves unnecessarily. Sometimes quiet is needed/wanted. Thank you for not being one of them.
Irene Cvietkovich: I just got the angled bob hair cut several weeks ago I love it
Pierre Gravel: Awesome cut ! I particularly like how you graduated your middle section in order to get the triangular shape.
TheFarkhondeh: Hello, you are a great hair dresser ,a good teacher and not a greedy person About your knowledge to share with others. You are greatly appreciated.
Wendy: New subscriber absolutely stunning haircut this is my goal haircut but cannot find anyone that will leave the length in the front correctly, amazing beautiful technique
lizzycify: This is a very good explanation! Thank you!
Pooja Budhathoki: Very effective video
Самира Искандарова: