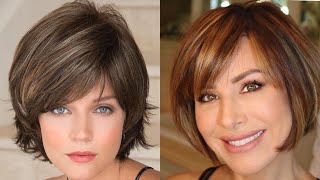
Layered Bob Haircut & Hairstyle For Women | Creative Bob Cut Tutorial | Best Hair Cutting Techniques
- Posted on 21 September, 2021
- Bob Hairstyles
- By Anonymous
Layered bob haircut & hairstyle for women
Creative Bob Cut Tutorial | Best hair cutting techniques
*Giving is hold forever*
So the look that i will be talking about today that i will be demonstrating is a mid-length shorter look um, i would say uh inspirated like like a bob something easy to do behind your chair. It doesn't always have to be complicated, so i really wanted to show you something simple, um and easy to do on your clients. So i will start by dividing that head into two allo, so from one ear to the other, so you can do it on damp hair on dry hair. It'S it really is up to you today. I wanted to do it on dry hair, so we could see the color better. Also, this is so very sick, so from one ear to the other. What lives in front of the ear and what lift behind the ear don't confirm um. So this look can be either you can. You can do it like from the airline or down to the shoulder, so it can be a shorter or a mid-length. Look it's up to you, hello, hello, so to establish the length i will divide it into three. She doesn't have a very thick head of hair, so you can divide it into more sections if you're working on thicker hair mode, so i will be starting with my delta straight blade. My five and a half inch straight blade featuring the 360 degree, swivel thumb so for more control, more comfort, so really is easy to work and to control this blade, natasha mcdonald. So to i want to start by establishing the length so with no tension or not too much tension. I will simply go and hold this hair with my comb out is avec, i'm simply holding the hair with my comb. So i'm giving it a slight angle towards the front to avoid this hair going up. You know now, oh so this way, i'm avoiding this kind of hole that could be created behind the ear. So this will be my visual guide so three to four sections behind, depending on the length and the thickness of this head of hair, that you're working on make sure that you can see your visual guide. So this can be really quick, especially when you're working on dry hair. Don'T forget this angle, hello? What do you think of the color uh la plante, so three parts of seven point: four, four level: seven, double copper and one part of seven point: six, six level: seven level: seven double red: i love twapa, the set cat gap. Nivo said quivray for this fall. Inspired so the starting level was a level 10, almost white, so these mannequin head have very, very light hair, so it can give me a very vibrant, color, daniel section. So for the last section again same thing, i can also go freehand like this. Creating that nice straight line shows the sukkot. This is what is so. You can see with the swivel thumb. What i can do really keep my elbow closer to my body and then i'm maintaining this comfortable position so again, maintaining this slightly angle, cleaning, baby hairs here and there over here. So three quarters of the head with the base color and then a block here. The front slightly in front of the ear, because i didn't want that - the these flashes of color going uh in the back section of so it's almost like she she's wearing a jewel right. So it's just like a nice punch of color. So what i did, i think you can see better. If i do it like this, so can you see the sections, so i worked with diagonal sections, so a yellow, orange, green merlot and then another orange. I i turn it the just diagonal panels section. According so in each one of my shades, i added a like a pea size of merlot to make them cut a bit less vibrant. You know just to make them a bit more uh a bit darker, so these colors are very much trendy right now. I love those. So i don't want to remove everything, so i will maintain this section longer and i will keep it for my dessert. I love it so we'll keep it for the end to maintain a bit of disconnection so going back to the back section, hello, foreign, so dividing this head into two again. I want to go back to my three previous sections. What color did you use? Please uh. You may have heard my formulas, but i can say the formula of the base color again, so the base color was three parts of 7.44, so level, 7, double copper and one part of 7.66 level, 7 double red with 10 volumes. And if you want in the comments after the presentation, i will write down my formulas, so you guys can see you guys can see it perfect. So going back to my previous sections, you want to isolate this section here, so i will say from the bottom of the ear on each side. So this will give you one section then three and then two and then three all right. So for this first section, what you want to create is more texture, remove this bulk, but without creating too much layers. A lot of effect is to sr so we're going to be creating some invisible layers from the interior and not much like uh. That will show on top of the head of so for the first section. What you want to do is use our lifting and rolling method. You know that, beyond the fringe method that you can do with your fingers, lifting and rolling, but you want to do it with your comb instead just to create some nice texture for this section, so you want to lift and then roll and work in the last Inch it's easier on an actual head of hair. The professor is so this hair here sticks out a bit um, you know very, very like stiff, but yeah you want to lift and then roll. So it's the same motion, the same movement that you are creating with the beyond the fringe, all right so you're, breaking that solid line, but still maintaining a straight line, but it'll be softer. So here i am working with my gamma blades. This one will give me more of a velvety finish, softer texture again with the 360 degrees swivel thumb all of our shears. Have this very nice feature, so it really is easy for you to control that blade and maintain nice comfortable natural positions. So this is the gamma blades. We have two more texturized two other texturizing blades. This is the alpha blade solution is so this one will remove chunkier pieces but leaving bigger pieces. So it's a very great tool for curly hair. If you want to define curls, but also to give more volume and support, because the larger pieces that you're leaving on the head will give support for the longer pieces, the third one is a mix of our two. So this one will remove a lot of hair. So it's a great tool for very thicker head of hair. It'S all also really good for scissor over comb, so it'll remove length and texturize. At the same time, this one is the bitter blade so going back to my gana blades, making sure not leaving lonely hair. So if i'm working on a thicker head of hair, this section here can go up because you want to remove bulk underneath. But if you're working on a thinner head of hair, you want to maintain as much density as possible on top. So this section has to be a bit lower in order to maintain hair to play with on top here all right. So this is my second section. What you want to do now here is you'll simply want to divide it into. Let'S say five equal sections, so one in the center here so an inch and a half wide so one in the center. And now you want to work well, we could use another blade. Let'S, let's use another one, to mix the textures a bit. So i love it, so i will be using my better blades. This one will remove a bit more density. So what you want to do here is hold this section straight out to really see where you need to go and add texture to so it's easy when you know where, when when you see where it's darker, this is where you have more density right. I love what so i'm traveling in my section, with my texturizing blade. So this is my length. I don't want to remove that. I simply want to go deep inside the section and add more texture, so where it's dark. This is where you need to add more texture. So when you hold the section like this, it gives you a very nice and clean word, so i did one in the center to on this side straight out of the profile, a so always moving my blade. It helps me not to create a solid line so because, if you're creating another solid line, you're going to create weight and this hair is going to be heavy for the top section you want to work with triangles. I love sonic 3, so five triangles one in the center two on each side, and now i want to go back to my gamma blades, so my triangle in the center and what you want to do now for the second section we hold this straight out for The third section you want to hold this straight up and obviously so the length is here. I don't want to remove it. I don't want to remove it. I simply want to create texture java, so you want to hold this straight up and i you want to start deeper to create more texture and where, because we are in at the wider part of the triangle, you want to go a bit deeper and then, when You'Re working towards the length you want to travel further towards the ends, so where it's thicker, you are removing more hair the volume. So when you comb it, it looks like you have a very blond straight line, but when you move it you have lots of texture and movement, and it's super light same thing for my last two triangles is a film. It can be easy to remove too much because it's so much fun to do so. You could easily go like crazy and then, but remember, you're, not peeling, potatoes, you're cutting hair. So you want to control that movement, but i get it it's fun to do and it's nice to see. You know this hair going all over the place, but you want to keep control. It'S super light could be also really good for wavy curly hair. It'S super fun to style, it's easy for her to style, let's say with a dry, shampoo or just a bit of uh clay or texture spray to create this nice uh very light. Look, i love that right, the fun the so for the top section, the front section. Sorry we're going to do the same thing as we just did for the back. I love it so deeper in the texture and then lighter. If you feel like it's a bit still heavy, you can simply grab that section and then start over this technique can also be used with straight blade to remove length and create layers. At the same time, i love it almost. I said earlier that i wanted to create this connection here, so maintaining a bit more length. Remember when you're creating this connection. It has to be at least two inches. You have to keep like at least two inches difference between the shorter and the longer pieces, because you really want them to look like they're they're there on purpose focusing m. I love this. This is my plastic. I'M so scheduled five piece from behind the ear divide. It into two and then i will start cutting to the shortest point where i have this section from behind the ear. Las vegas serve a section so in order to make this disconnection fluid, so this one was a bit too thick, so i can simply go free and really sculpt see a so. It is super easy. It can be very quick if you're not talking too much when you're doing it so nice layers from the interior with a fun twist with our disconnection here at the front and voila server now to add a bit more texture. I will be using some of my being primitive. This um foreign, hey, sir, you


Comments
Mary Mary: