How To: Goddess Braids For Beginners! (Step By Step)
- Posted on 01 April, 2017
- Braids Hairstyles
- By Anonymous
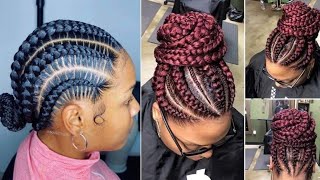
This beautiful protective hairstyle is called Goddess Braids! Breanna Rutter demonstrates how to do this amazing kanekalon braid hairstyle on her head in an hour! Traditional cornrow braids typically takes 4 to 8 hours depending on the size of your braids but doing this look on blown out or straightened hair makes doing this style fast and easy!
These are the products I used for my GODDESS BRAIDS FOR BEGINNERS! https://goo.gl/Nhbdaf
6 packs of Super Jumbo Kanekalon Braiding Hair http://amzn.to/2mvidVN
Red Braiding Hair http://amzn.to/2mvidVN
Hicks Edge Control http://amzn.to/2mnYQPi
Rat Tail Comb http://amzn.to/2iJlL6o
Hair Cutting Shears http://amzn.to/2hVVg09
Hair Brush http://amzn.to/2mOeB17
Butterfly Hair Clips http://amzn.to/2nleRse
Duck Bill Clips http://goo.gl/Jyxrkg
Wide Tooth Detangling Comb http://amzn.to/2mviyZ8
Hair Spray - Aussie Sprunch (Level 1) http://amzn.to/2npNL
CHECK OUT MY NEW HAIR TUTORIALS YOU MAY HAVE MISSED!
BOX BRAID SEW IN??? https://youtu.be/sGW41bCEpX0
$5 High Ponytail w/ KANEKALON BRAIDING HAIR! https://youtu.be/tpYE14_IN00
How To: INVISIBLE PONYTAIL https://youtu.be/khA436-g82A
Buy My Books, DVDs, and T-Shirts At
Website http://www.howtoblackhair.com
Personal Instagram: http://www.instagram.com/breannarutter...
Thanks For Watching!
DISCLAIMER: All suggestions, tips, prizes, techniques and advice given are for informational purposes only and should be used at your discretion and best judgment. I highly recommend conducting strand tests when trying or using new products, hair appliances and product mixes. I am not responsible or liable for adverse or undesirable effects including hair loss, hair breakage or other hair/scalp/skin/body damage as a direct or indirect result of the suggestions, tips, prizes, techniques and/or advice given.
FTC: I am not representing, being paid by, or endorsing any of the product brands in this video & I purchased everything with my own money - UNLESS OTHERWISE STATED in video/blog content. There are links to products that might be helpful based on the content of this video/blog. Each of your purchases via our Amazon affiliate links supports our cause at no additional cost to you.
Hey, ladies, this is Brianna from howtoblackhair.com, and I want to show you for beginners exactly how to do the goddess. Braids hairstyle please thumbs up this video and click the subscribe button, because I really love showing you guys how to do these styles in yourself for free, and I want to continue self as many women as I possibly can to begin. These are the materials you will need to do your goddess, braids, starting off. We will be using one pack of super jumbo braiding hair. As you begin, you want to make sure that you go ahead and remove the rubber band from the hair, so that you can begin paper in the end. Now, when tightening is what I like to do is actually lean the hair to one side and then, when I do that kind of like a fan, I then grab the hair in the direction is going so that way, I can shake the rest of the hair Down the way, so I'm creating slightly different layers within the hair. So now you just want to make sure that the hair is thoroughly detangled before you begin braiding, so that it's not snagging or causing you any issues. So I'm literally just running my fingers through the hair, making sure that it's not bunched up together. You want the ends to have a tapered feel so that your braids do not come at one blunt in because it makes it hard for the braids to stay intact. That'S why you want your braids to gradually get thinner so that it creates that effect. So now, this is how your hair should look before you begin brain. So now, of course, because this is for beginners, I'm going to be using red hair. Show you how to do it. You want to divide it into two sections: pinch off 1/3 from the rest, so that you have one smaller section and with that smaller section, you wrap it around the bigger section so that you can create 3 equal legs for your braids. It'S very important that when you're doing the style, all legs of your braid is very equal. So now, with my very last section, I'm going to show you exactly how to do the goddess braid so to start off, remove the clip from your hair and use a wide tooth comb to thoroughly detangled in smooth, through your section now, taking some edge control you're Going to put a little bit in the front section for your braids, so that it adds a very sleek look and it's optional. You can also do the same thing to the back of your section as well. Now just divide a very small section in the front. The smaller your section, the close to the gray, will be to your hairline. Here we are with our red section of hair and, as you can see here, the hair - that's in my hand, was at third smaller section. That'S the section you place right behind your party, so you just want to make sure you get it right, tight up against behind your section of hair and then you want to grab your section of hair. To put it into that leg. Remember the leg I'm holding is that third, smallest leg that turned into one leg so now make sure that you have the hair very flat and very tight in that section, because you're preparing to actually break so, with my dominant hand, I'm holding down that third section And I'm getting ready to hook my index finger with the hair. That was to my right so now you're going to pinch off a little bit of hair. That'S behind that loose leg! You see to the left. Every time you have a loose leg of hair. You always want to pinch hair that goes in that direction. So now you're going to grab that section, we just pinched off to add to that leg and you're, going to rotate your dominant hand going counterclockwise so that you can use your index finger to hook. That outer leg it's the same thing as doing a regular braid, but all the motions are in Reverse may be a little tricky, but what I want to do is walk you step-by-step and explain. Every time I grab a section exactly what you're doing so now that we have a loose leg on the right side, you're, repeating the same process and every time you pinch off a piece of hair, always pinch going inwards towards the middle. So that way as you're braiding, the braid doesn't lean too far to the left or right so always pinch from the side where the loose leg is at. As you can see now, the mook leg is going to be on the left side, so I'm pushing that hair over and out the way and I'm making sure to pinch going from the middle to the side. So that way, my braid naturally begins forming directly in the middle of my part, that's why the hair is being pinched and going outwards towards the left. Now, as you grab that firmly into your hand, you're going to rotate your right hand going counterclockwise, so you can hook the index finger around that outer leg. Now you have a loose leg to the right and I'm going to continue to re-explain these steps so that you can really understand as a beginner exactly how to do the style once you get it down, you're going to ace it every single time now pinch off A piece of hair from the side where your loose leg is that, as you can see, my loop leg is to the left, so you won't hair to be pinched out and going towards. The left, once, if I want to keep in mind, is whatever hand has two sections of hair always push it over your head, so it doesn't get mixed up in that third leg you're, creating also when you pinch hair, to serve for hair. To add to your legs, your braids always pinch hair from the side where the leg is free and available. So what that means is, as you can see here, with this leg, what you did was you added hair to it. So that way, you can rotate your other hand and continue the same process. But once again, I'm going to re explain how to do it. So now that these two legs is, in this hand over your head and then use your fingers to part from the middle out to the side where the loose leg of your braid is always directly pull hair from the middle of the section out to the side. Either the left or right side, depending on where the loose leg of your braid is that well mount just want to continue to explain, because it really helps to understand as you're, seeing it pinch from the outside towards the middle for new section holding it finally rotate That left hand clockwise to grab the outer leg of that section. Now, with these two moon sections. In your right hand, you place those over your head so that you can go ahead. Pinch off hair from the left to go into that left, leg, rotate the right hand counterclockwise so hook with your index and thumb finger to new sections into your hand. You just want to continue repeating the process until you work your way all the way down and make sure to keep in mind that if you want your braids to always stay in a very center of your parting, to always pinch hair off from the middle to The left, or from the middle to the right, depending on where your loop leg is, and what I'm my loose leg, is that one standalone leg of hair that doesn't have a hand holding it. So, every time you're pushing those two sections over your head, you're, always holding two legs of your braid in that hand, so that way you can hook it with your other hand, to keep transferring those legs back and forth. If your braid is looking a little bit funny, I suggest that you rewind go back to the beginning until you protect it, because once you perfect those couple of turns at the top, the rest of the way will be a piece of cake. If you keep consuming the process so now, even at the very bottom, you want to continue doing the same thing by pinching off and adding to that leg until you run out of here, you want to make sure that you part your parts a little smaller near The back because it prevents the back of the braid from actually being lifted from your head if you pitch off smaller pieces to feed into each leg of the braid. So now we're fully finished braiding on a scalp. Now that we're off the scalp you're just going to continue overlapping one piece of leg over the other piece of leg. So what I mean by that is always grab the other leg, to bring it to the center and then do the same thing on the left and right side, because that's exactly how you form an individual braid, one tip to make sure it reaches the end. It'S a pinch off a little bit of hair from the longest legs to add to that smaller section. So that way, you don't have to worry about putting rubber bands on the bottom or burning it, or anything like that. You can get the braid to reach all the way down to the very bottom, by sharing legs from one side, that's a little bit longer than another leg so that all the legs can actually come at one point at the very bottom as a tapered. Look to your brain so now that our braid is done. This is exactly how your grade should look, and I hope this red color really helped it's a pop, so you can see exactly the steps you got to do to achieve in your guide astray. So now, after rewriting my section of hair all black, this is how your hair should look when you're finished, but, as you can see, some braids actually stop a little shorter okay. I got a way to fix that for you. So now what you want to do is grab the two closest braids is the indication of how long and thick it needs to be, and then you're going to add a little bit of braiding hair to it. So I'm pinching off a little bit of my braiding hair that I had left from one pack and I'm cutting you in half because really only needs to add about half the length of what the original braiding hair was. But I need to make sure I add some thickness, so that's a braids match so, as you can see here, just like I did in the beginning, I'm tapering the hair, so that the end is not in very sharply. You want the ends of your hair. To always gradually come to a point, because that's going to make it look very paper tonight so now I'm just putting it into position to see exactly where I want to fold that braid in here, so that it reaches the bottom. And now what you see me doing is I'm just unraveling, my brain, you don't have to unravel your braid. All the way up. All you got to do is unravel exactly where it stops at the back of your head or at the desired thickness. Where you see the braid at so that you can actually begin adding hair exactly at that spot so now to add: hair you're going to hook the hair in your index. Finger of your left hand. If you are left hand down, man I'm right hand dominant, but I'm just showing you I'm just starting with my left hand. So now you're going to just continue. Braiding rotating me, hair one after the other and then once you free your right hand. You'Re going to add the hair into the leg. Now, if you start it with your right hand, you just do the opposite. You add the hair. In with your right hand, you rotate your wrist about two times so that your left hand is free to add the hair. This helps you to conceal, where you actually added the hair into your brain. If you make sure to grab the second leg, with the other hand, instead of the same hand, so if you notice that you have a ring of hair sitting on the top of your braid, that's because you added it with the same hand and not the opposite Hand, so I hope you understood exactly how to do that process, because it's extremely simple and it's not feel free to re-watch this tutorial, because you're definitely going to pick up so many tips on exactly how to ace this style. So now that we're all done look at how beautiful the braids are looking so thick and luscious and juicy so now that our braids is done. It'S time for a little bit of styling for Sally I'm using some hairspray and edge control and I'm using the back of my rat tail comb to add my edge control to my hair line. Of course you can dip your fingers and your edge control and add it with your fingers if you want, but this just helps me to have a little bit more better control, as you see as I'm styling my edges now, for this look, you can make it Look as creative as you want to be I've seen Styles, where people have left out their entire hairline curled up their hairline with some actual hair curlers and just styled it and swooped it up making it look. So so it just depends on the look you're going for all of its beautiful. What you see me doing here is I'm just adding a touch of edge control to the very front of my hairline just add a little foolish action to the front. You know I'm Stan just a little slippage, so I'm just combing my hair to smooth it further into my braids, and what I really like about being able to do the style is that it's actually really really fast. It'S because the bigger your braids are the faster it is going to actually do this. Look. I have five braids in my head. You can actually have a lot more if you wanted to it pulls off a total different effect. That'S extremely beautiful as well, but for that traditional goddess, braids look. I know you, ladies, like it chunky. So that's exactly what I'm doing and one trick that I always do with my edges. Is I spray hairspray on top? That is a secret trick. Having your edges, like all date, is having some edge control on top so that it doesn't revert back so now, I'm just spraying all of my hair, so that I can flatten down any tiny little flyaways. I may have just to make it look more sleek and smooth along the tops of my braids, as you can see, with just a little bit of styling. It added such a subtle glam effect to the super gorgeous hairstyle, with just five big chunky, goddess braids. It'S such a breeze being able to do this look and it's a very good break from having to wear wigs in box braids. Ladies, I want to thank you so much for watching my goddess braids tutorial, and one of my youthful goals is to actually get my channel to 500,000 subscribers, I'm currently at three hundred and seventy five thousand. So that means we're more than halfway there, and I know we can do it so subscribe thumbs up and be on the lookout. For my next video you
Comments
Breanna Rutter: Another one. (Khaled voice) Ladies, let's get this channel to 500 thousand subscribers from 376 thousand subs! SUBSCRIBE & THUMBS UP FOR MORE VIDEOS!!! ✌✌
Grace: Breanna, Thank you for posting this tutorial and your other videos. You are a great instructor!!!
Lois J. Bell: Mrs. Bre! I have been watching your videos for a while now and to see you evolve and grow is amazing! If I want details, you are who I click on. Thank you so much for taking us on your hair business journey.
Eva Serio: thank you for this video!! My braids are not that perfect, but I am sure that with training I can reach the same result. Thanks Breanna, you are amazing <3
Rebekah Johnson: This was so helpful! Thank you. I'm about to do these braids on my daughter for camp.
Karen Gallahar: Wow one of the best explanations! Thank you
djuanadennis: I absolutely love the way you showed me how to do the jumbo goddess braids
Jessie Z: You saved my life.. I did these for my bday and they came out bomb!!! Thanks
Andrea Williams: You make it look so easy.. I have my problem the hair get all mess up You do a great job showing the steps
Trisha Hamilton: Thank You Breanna, my daughter has been wanting the Goddess braids and adding in, I finally understand due to the red hair you used also your technique with step by step and edges with ends is a tremendous help!!! She's definitely gonna be happy ❣I also liked and subscribed to your channel
Queen QB: I was trine figure out how to do this on my own, finally I have come across your video and after watching I said "I can do that" lo! Thank you so much. Be blessed.
Brittany: Thank you for this!!! I can finally do this style on myself
Sherry Trotter: I love this style and you are a good demonstrator! I am a beginner! Trying to braid my daughter's hair! Thank you for sharing!
Dii nSD: I don't even like Goddess braids, but I had to compliment you on this tutorial. You did a great job explaining the steps thoroughly! :)
Pursuit Of Natural: Just what I needed. I'm gonna give this a go. Thanks Breanna!
Queen Soul-Flower: I truly love your video's! and it's awesome that you offer them for free... keep sharing hun... you're definitely an inspiration...!
Gabriel G: Best explanation and demo, you did that!!!! Thank your for your willingness to teach this.
Catina Daniels: Thank you soooo much...i finally found someone who did a great job explaining how to braid. God Bless!!
Trieste Kinnon: Tyvm much for this tutorial on how to do goddess braids you make it look very easy
Tanaya Talks: I always watch while doing my hair at the same time and get it just right
dggd: Thank you! I did the best I could on my own head! Just need more practice. But it came out pretty good!
keishaunda marshall: I always loved your videos.. you give it to us step by step.... I know I can catch on that way. I've been watching your videos for 3 years now or more... But I've slacked off but I'm getting back on it... thanks again. ❤
betty mayfield: thank you for this tutorial!very helpful
Sincerely Shalele: This helps alot thanks for the tips
Jennifer Washington: Your videos are great. I hope to someday develop the skills you’re trying to teach.
SrobErson73: Hello, you did an Awesome job in explaining the process. Your camera was in the right position, and the using the colored hair sealed it. Thanks!!! I've watcher several video before I found yours, but none compared to your teaching. Not everyone is a teacher. GReat Job!!!
K. Hines: Great, easy video. Great teacher!
Bopandboogie: Love this video. You have inspired me, now I want Goddess Braids. Thanks for the tutorial!
dmnqwtkns83: Finally!!!! A real explanation, I'm just starting to do my daughter's hair for JR year and so far I've been doing crocheted braids. This is the best tutorial I've seen. Thank you Love, Domino
Najalah Hogg: Very detailed... Loved this
Tanaya Talks: I always watch while doing my hair at the same time and get it just right
qtbeddecor: I know you used the red hair for demo purpose, but I think you just started a new look :). Thanks for another beneficial video. I learn something new every time you post a video. xoxoxoxox
Ginger Espinoza: I appreciate that you start out by empowering women to learn to do it themselves. Thank you for that <3
beLynnbeautiful: Thank you. This was very helpful!
Zay Say: Wow this is amazing! I love it!
Kaho Garcia: Your tutorials are awesome!!!
ZadettaMae: Beautiful!
JLdeathisonyourcards: This was so easy to follow! I loved it!
Erzulie Hills: Your braiding skills are off the hook thanks for sharing and explaining in full details
Cindy Ray: Good video! I want to try this style and this is helpful as well as you adding the synthetic color hair.
Sincerely Shalele: That looks gorgeous
Mika Carter: Great tutorial
Baltimore Bee: I know you said it’s how to black hair, I’m white but I love your videos and styles. Traditional Caucasian hair styles don’t work on my hair type. And it took me years to figure out why my hair didn’t look good. You helped me. Keep killing these videos hun❤️
Kaze Shanti: Gurl I have two packages of hair and wanted to do this
Patricia Rankin: That was so beautiful awesome job that you did I love all your tutorials but I still don't know how to do it I like every hairstyle that you do.
Simply BJs Creations: Very helpful THANKS!
Aleh Mara: Que perfeição
Ashley: Thank you so much for this!
staci lockett: I'm so glad I subscribed I love all of your hair tutorials ...I've learned so much
Pat: you really done a very nice job explaining thank you
nanu dime: Idk abt everyone else but she teaches me a lot I can’t watch anybody else
D0P30N3: I think I can do this! I naturally braid the opposite way but still seem simple. All I needed to know was how to start with the weave (on my own head) its just gonna take practice I'm tired of wasting money on other folks doing simple styles.
Red Empress Rising: I love your technique
SHAWANNA TART: I just love your tutorials, your so young and beautiful and have an awesome talent. I have tried a couple of your tutorials and ppl stop me and ask where did you get your hair done? I enjoy saying I did it myself I feel like wonder woman lol. Ty for everything
betty mayfield: I enjoy RE-watching your tutorials especially when I lose my focus(Thanks sis
anneshirley duncan: Thank you so much. I'm an absolute beginner.
Dezzi Dabest: Girl..I love u..n I love YouTube...I learn so much here..from hair to makeup to nails..craft..its endless..keep up the good work..I always love this braid n now I can do it by my self thanks to u :)...
Aleh Mara: Parabéns não entendo nada inglês mas aprendo só de olhar vcs são ótimas ...
Gabrielle Elliott: Thank you for all your videos really helpful
Platinum Danzie: Your tutorial's are freaking amazing. You're the . Thank you thank you thank you.
Leah Anderson: I have so got to try this! Doesn't it look totally awsome?
Shantel: Nice of you to share your skills with others
Hopper J.: I have been all over YouTube trying to find a great tutorial and this one was amazing. Thank you Doll
Nickell Francis: Your braiding is really good I like the style
Danie: thx for the video. good to see you creating content again
MaraNatha Long: thank you. thank you. thank you for this tutorial!!!
nonjabulo kubheka: thank you so much ive watched so many videos and this is the only one that actually made sense
Patricia Vertel Gonzales: Como lo hacen de hermoso yo no e podido pero le quedaron bellisimasss
Vaughnie NuNu: You are a GOD SENT BLESSING. Thank you from the bottom of my heart ❤️.. I’m learning and saving all because of your selflessness.
Lerato Boitu: such a great teacher. saving so much money doing my own hair. all the way from RSA. much love
Christine Akoto: hi breanna can you give us your relaxed hair update please ❤
Sky N Doughgirl: Ppl like me needs to hear the break down to the t!!! Prefect with explaining to us!!!! Thanks
Frazier's World: its super cute I might have to watch it 5k times to get it but I am going to try lol
Bodiedbyke: I am passing this on to my bestie so she can slay my hair.
Rain: thanks doll love the red!
Brynn Jones: I honestly admire your patience ... I find it taxing to do just one simple french braid :D
Very KinkyCurl: Wow what can't you do??!! You are amazing
Yonnah Muu: Great work
cocina con aicha: Bravo muy bonito
Alyssa Lala: * SUBSCRIBED*^ So I have THICK BiG and long naturally curly hair , and I’m new to braiding in hair with mine ((for the color ☺️ )) and it just looks beautiful! I was doing some braid styles on just my hair alone and it hurt my head pretty quickly anyway to avoid this ..?
Whitnye Williams: I love it please teach me again .. I really wanna learn how to do these ...
Strawberry Richardson: thank you so much I know how to braid but not the goddess very helpful
ItsQueen Babii: how you stretched the hair....its called feathering. i love using that technique also. it tapers the braid perfectly.
Chantal Hart: Just A Little Swoopish Love How You Give So Much Detail ... Keep Up The Good Work Breanna!!!
Bernis YABI: It really makes hair grow
Juliana Freitas: thanks a lot!!! <3
J Rose: Do you separate the same amount of hair for each braid? Like I want to know how to make and the end the same length because they always come out different.
Sarah Singleton: She is so so thorough...always wanted to knw how to strt a braid and this helped
Im a Queen First: Very Beautiful hun You did an Awesome job Thanks for Sharing But too many legs for me
necessitousfox: So cool!!
Nekeidra Cromwell: I recommend you to all of my students and clients I love and appreciate you
Yris Justo: You are good artists gob bless you. Excelente trabajo.
Angela Brown: Breanna can you do a hairstyle for kids 9-13 please I need some ideas for my daughter's hair
Maxine Brainey: Thank you❣
White Emily White: wow very nice......I wish i can it!!! ....love it tnx de video
Queen juju: Omg I wish I can do this
Leya Smith: Can you do this on un straighten hair? Should I run a hot comb through it or something. My hair is very thick (4c) and I don't think it will look as neat as yours! Thank you❤️
Vanessa_Eyelish: Yes! Love this !
Hilando Pasiones.: Muchas gracias
Marian Gamble: Soooo Beautiful.....