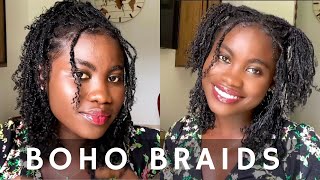
Diy Ash Blonde Goddess Box Braids With Kanekalon Hair | Blonde Braids Mix Color 613, 60 & 27
- Posted on 13 April, 2019
- Braids Hairstyles
- By Anonymous
Hello guys! Welcome back to my channel!
In today's video, I will be showing you how to archive this DIY Ash Blonde Goddess Box Braids With Kanekalon Hair by mixing three different hair colors together ( Color 613, 60 and 27 ) Also I'll be showing how to get these beautiful curls using a braid out method...I hope you find this tutorial helpful if you do please don't forget to LIKE, SHARE & SUBSCRIBE if you're new to my channel!
THANKS SO MUCH FOR WATCHING!
HOW I PREP MY BRAIDING HAIR FOR BOX BRAIDS/ CROCHET BRAIDS | PULL/ STRETCH: https://youtu.be/-Aa-VpPKrXk
Braided Crochet Wig | Feed-In Braids With Box Braids: https://youtu.be/rfVc4XRufG4
Curly End Box Braids | How to do Tucked Box Braids On Yourself Crochet Method: https://youtu.be/F98nZ3BYIYI
Half Cornrows Half Crochet Box Braids w/ Aliexpress Braiding Hair https://youto.be/WQHDSHfyjE4
Social Media
My Hair IG: https://instagram.com/vivianbeautyands...
My Makeup IG: https://instagram.com/vivianbeautyv
Gmail: [email protected]
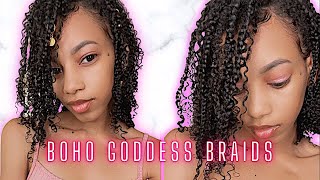
Hello guys welcome back to my channel if you need you're, welcome, hope you are doing well, so in today's video I'm going to be showing you guys how to achieve this beautiful blonde goddess braid in this video. So if you want to see and know how I did it, please keep watching so for the hair color, I'm using three different hair, color color 27 color 16 and color 60. So I'm going to be mixing all three colors together for each braids, so I'm just gon na go ahead and I'll show you guys in case they're right here. I'Ve already prepared some of the hair. So that way, the the braiding path will be really easy. Most all the hair are all pretend, and also I cut each braiding hair into three session so altogether I have a tattoo of 9th wonders of hair. If you listen like that, okay, so to prepare the hair, I'm going to be taking a little bit of hair from all three colors a little bit from the Colo sixty and a little bit from the color a thin in a little bit from the color 27. So, moving on to the next step, I've already combed my hair and apply all my hair product. So right now, I'm going to make the session for the first braid so next time going in with an edge control and I'm gon na add that I'm going to apply that on the roots of the hair. So that will help to smooth out the the back of the hair. If you don't have edge control, you can use the gel all hair wax. So next I'm gon na go ahead in the Judy boss braid, so you can see right there just right the hair. You just like that and go ahead into the buzz braid so for this balls braid, I'm not going to be braiding the hair all the way to the tip. So I'm only gon na be braided a little bit past, where my natural, my natural hair ain't and then I'm gon na tie a double knot to secure the braid in place. So right now, I'm going ahead to tie a knot on the at the ends of the braid, so that was the carrot in place to make sure it doesn't unravel. Why we, why we're braiding the rest of the hair so also did the tied. The knot will also help when it's time to cut the tip of the hair, so we get to that soon. So right now, I'm just going ahead and cutting doing the same thing. Braid the back of my hair and I'll be back for the next clip. Okay, I'm almost done with back session, so right here doing the same thing. You want to go ahead and set off the hair for the pause, braid and then go ahead and apply a gel edge control, hair cream. Whatever you use it and next you want to go ahead and repeat the same thing to the buzz braid braided a little bit past, where your hair end and tie a knot to secure it. But the reason why you need to braid it a little bit past where your hair ended so that way, when you dip in the hair into hot water, the hair would get into the hot water and then damaged in your hair. So it's better to Brady. Give it a bit butter an inch away from where your hair stop so that way, you're saving your hair and not causing any damage to your natural hair. Okay, let's talk about the color of this hair. You don't have to use the same color I use in this video. You can use any color of your choice and your hairstyle was to come and look in the same. I said the color will be a bit different, but if you want, if you want the same color or what maybe just two of those color, one of the color is 27 1 is the color, this tech, team and ER and it's old one, is colors 60. So yeah so moving on, I'm gon na repeat the same thing. Just keep doing the same thing braid it all the way like little bit past women naturally and I'm gon na, do a double knot to secure the braid in place and also check the description box. If you want to see and know how I prepare my braiding hair extension before each hairstyle I'll put the link in the description box below so I didn't show how I cut the hair and put on the end of the hair to give me extra length. Because I have a separate video showing you guys how to do that so be sure to check the discretion bus if you want to watch that video. Thank you, okay! So moving onto the moving on so for the front session, I'd separated in into two so making the middle session and and to get the the braid right. I start from one side and walk my way towards the middle session and go back to the other side. The walk my way towards the the middle session myself. I got this okay, I'm done braiding the hair. So this is the finished result before going ahead to walk. I did tip of the hair, say Casey. The color is well blend together and also you don't have to use like. I said you don't have to use this exact hair color, but you can do this thing to missing a different colors together, three colors together by liking any color of your choice or using this technique we have to blend the colors together. They kind of give you the highlights on great effects on the hair, so the next step now is to prepare the hair for the coiling pads and also once your toner right here once you're done, braiding the hair. You want to go ahead in position or do your braids, so what you want to do you want to make sure that the parts where the the knots are you want to make sure they're all even linked. Don'T worry if the main braids are not even, but you want to make sure the areas in the pads where you tie the knot they're all even so that way, when you don't coil in the hair, you're gon na have a perfectly clip there. So this we have to ensure that your hair, doesn't your natural hair, doesn't get into the hot water. It'S okay! If a little bit of the braid gets into the world.they hot water, the part where we braided get into the hot water. So that is the reason why we braid the hair a little bit past, where the natural hair ends on the pathway of hair and so that, when you dip the hair into the hot water, your natural hair will be in the hot water. So to cut the hair right here, I'm going ahead, I'm going to go ahead and divide this hair into four session seeds, the same amount of a braid I'm going to between and then I'm gon na reset rate the session into a session for each for each Hair session just right, there dance okay, so moving on to the next step, I'm gon na go ahead and braid the hairs, but first you want to make sure to culture. The hair so is tangle free. So when it's time to separate the coils, you won't have like a tangle or some of like the hairs are freezing so right now, I'm going to hate to break the hair, just show them this, take your time and braid the hair and don't worry you don't Have to braid the hair like super tight, it can be a little loose, so that would have now make sure that you have a Kalu's wavy quois. These are like a super tight chords and also the reason why I'm going to be adding the young. The extended braids Estonian hair is because I won't exceed all the hair to be like loose and soft wavy quois. Instead of a super tight chorus on the tip of the hair, but by adding hair, braiding hair extension tape to make sure you have the same code faster from there from the static points of the coils to the tip of the yoke of the hair. So that's the reason why I'm adding the extension so now that I'm done adding all three pieces of hair, I'm gon na go ahead and bring it all the way to the tip of the hair just right there next time go ahead, I'm gon na go ahead And do the rest of the the braids off-camera? Okay, now that that is done. The next step now is to dip the the hair into hot water, and for this part, you want to make sure to have two towers want to put over your shoulder and the other one to dry off the excess water. So once that is done, you want to go ahead and unravel the braids so unravel the bright white. The hair is the wet help to ensure that you have like a super defined Kois and also help to reduce the volume on the hair. So next right now, I'm going ahead to remove the hairband and I'm gon na go ahead and separate decoys. So after separating decoys, if you want more volume, you can go ahead and and then we separated into two, if you want by it's better to do it. Why the hair is still a bit wet, so here is the finished result of this beautiful, beautiful hairstyle. I hope you find this video helpful. If you don't, please not forget to give it a thumbs up. If you new to my channel, please not forget to hit the subscribe button down below if you already subscribe. Thank you so much for subscribing. Thank you. So much for watching and I'll see you in my next one

Comments
Precious Uchechi: Ever since I found out about your channel, I've always been looking forward to seeing more of your videos. Keep doing the good work, this is a job well done (mixing three colours)
DivineDestiny23: Your hair looks so healthy and moisturized.
Terra Bell: Cute color and you are a nice color , people have so much to say- wear it boo- I currently have #27 and I’m doing it boops. Rock it and do you.
Just Me: Young lady, your hair style looks fabulous on your complexion. Thanks for the inspiration .!
MyLifeMyJourneys: These are my go to braids. I braid to the end of my hair and wave the rest. Takes less time that way. I have to try this color combo, it's sooo cute
Nikita: Really adorable!
D Orr: Beautiful!! How do u keep the ends from tangling and frizzing??
J Collins: Thank you for this video!!! Everyone else keeps showing other braiding hair nd I accidentally brought this braiding hair
Temi Kojo: Wow.....your styles are mind blowing I must say
Angelina Accra: Beautiful love it
Denise Harvey: Gorgeous! You look like storm!
Manuela Winkelmann: Wow
Gracelike rain: I love it omg
Tay Tay: Very pretty
Adetoun: Did you have to tie the end of the braids so it wouldn’t loosen when you add the hair in water
Queen: Just did my hair like this
alexier cameron: This month is my birthday n u give me the hairstyle I'm searching to thanks
THE GRACE TO FOLLOW: I love the coulor
Vivian Ehima: Beautiful
Kayon Mitchell: Beautiful
Ci Ci: I'm addicted to your videos
fabulouslyme: Very cute how long did these take
Agiscobay Agiscobay: I like how u use colors...
Corinth Stark:
LAUREN FERGUSON: Amazin
Jennifer Laignel: Wow Nice
Susan's beauty: So cute
biclvr: Totaly out of topic... but even in a long sleeves thick sweater your arms, biceps, looks amazing. Will you ever let us know how you get those excellent arm and shoulder muscles? Pls tell and do a real muscle flex. Show those bicep once for real. Pls
Lorraine Daniel's: you look beautifull sweetheart l have smashed the big fat like button love from lorraine Daniels whit special needs and l am autistic and I suffer from depression and anxiety to YouTube video's
Quin Egbe: You very very talented i just descovered u and am not going
cloudyvisor: Intro song?
NeShale: C’mon man!!♀️♀️
Just Ice: ❤ the style not the color any shade of red would look so much better on u sis
Peacock Beauty: Not that color sis. A 27 would have been better.
Queen Ashanti: Oh nahh♀️♀️♀️
Faith Kwaku: What a mess