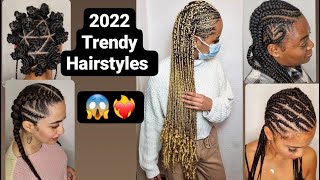
Protective Hair Style (Diy Natural Hair Braid Style- Step By Step)
- Posted on 14 October, 2021
- Braids Hairstyles
- By Anonymous
Protective hair style, natural hair single Braid Style for natural hair using rubber band and lastly used bendy rollers to coil the ends in a wavy form.
#Protectivehairstyle #HairbeautybymayHello guys!
Welcome to natural hair braid style tutorial video I will show you how to do a slick back bun as a protective hairstyles for 4c hair.
▶️ Please Subscribe: https://www.youtube.com/channel/UCF48R...
A natural hair braid style is appropriate for both day and night. When you want a minimal-maintenance hairstyle, this braids are ideal. To make the braid, use small rubber band first to hold the hair together.
Protective styles are an important element of maintaining healthy hair. No matter the season, they should be a part of every natural hair wearer's style rotation. They protect hair against freezing winds, rain, snow, and frosty air during the winter months. If you enjoy water sports in the summer, protective styling will keep you safe from the sun, wind, and water. Hair expands and contracts in response to changing weather conditions, wearing down the hair's fibres and weakening it. This causes damage and, in many cases, length loss. Hairstyles that keep hair healthy and allow for noticeable hair growth are known as protective styles.
Hair that is styled in protective styles is less likely to tangle or catch on clothing or accessories. Protective styling benefits our roots and hairline as we shift the points of tension on our scalp.
▶️ What will I require to achieve the desired look?
• Eco gel
• Hair comb
• Cantu leave-in
• Hair brush
• Pre-stretched expression
▶️ P.S: Learning to achieve a style you really want on your own hair is step by step, if you keep on trying you will get it right someday.
So, watch the video till the end and share your thoughts in the comments section.
If you like this video, please SUBSCRIBE and don’t forget to press the bell, like, comment and share. Stay safe and Love all.
----------------------------
▶️ Please Subscribe: https://www.youtube.com/channel/UCF48R...
----------------------------
▶️ For business enquiries: [email protected]
----------------------------
▶️ Other videos:
• Tesco Christmas Shopping Haul: https://youtu.be/B7cCH4f1Zmc
• Protective Hair Style (Simple Updo): https://youtu.be/YJS0gj_Fzf4•
Natural Hair Journey(Protective Hair Styles): https://youtu.be/sDqf1OIhFyQ•
Shea Butter For Hair Growth: https://youtu.be/7OFTGSz5_h4
----------------------------
▶️ MUSIC BY: www.bensound.com
----------------------------
#protectivehairstyle #naturalhairbraidstyle #healthyhaircare #blackhairstyles
Hello, everyone welcome to hair beauty by may today we're going to be talking about 4c protective braid hairstyle. So if your hair is natural, this is one of the hair style you can have or do to your hair. This is my diy protective hairstyle from natural hair. My fussy hair and i'm going to be using rubber band two pack of expression, because i don't like heavy or too long hair on my head, so i'm gon na be braiding. So if you want simple braids that will make your hair grow longer, because gray, natural hair is not easy, but this is simple: protective hairstyle for fussy hair and if you have texturized hair too, you can do this. Anyone can do this. It'S very easy with the rubber band, so it keeps the hair together for me to grip. So, firstly, i start with my two strand and i make my own hair, the third one, so i'm gon na be splatting. You can see. I grabbed the hair with two strand, and my hair is a third one and i'm gon na start flattening from the roots, and this style is very easy, with the rubber bands and i'm gon na place, my hair with it as a stud third part, and then At the end of my hair, before the end of my hair, i could not make the extension into three and keep on braiding, so this hair um, the braid - i did took me three hours because it's not packed packed full. I, like my hair, not too heavy, because i got heavy hair myself. I don't want anything that could weigh my neck down or, while i'm sleeping i want to have freedom. Braiding should not be painful, so this hairstyle, this protective hairstyle braids, doesn't hurt the the scalp, because i have sensitive scalp and i don't like anything that put pressure on my hair, so keep watching and see how i finish and at the end, when i plot to Almost to the air i twist the ends because i'm going to roll it so keep watching and see how i roll my hair. So that's it i've plant, my hair, i braid forward, because that is the only way i know when i'm braiding my own hair. I can braid in in inward, i would say so. I will pat the hair path, the hair with the comb and then use rubber band to hold you can see. I use rubber band to hold from the root i'm gon na hold it tight, not too tight, because i don't like pressure on my brain and i'm going to use two strand two part of the expression to hold the my own hair as a third part, and I braid as if i'm doing cornrow then after that i turn it forward and i braid. So it's very easy and it took me three hours to do keep watching and you see how i finished the braids. So, if you're, looking for any simple protective hairstyle natural for your natural 4c hair for your natural hair and before i did this, i make sure my hair is very clean. I wash it with shampoo condition it and blow dry with number one, not too hot, so that i will be able to plant. I need to be neat. If you have the time you can wash it your hair a day before the braids and let it air dry, but i didn't have time because i was going to work the next day, so you can see me braiding. This is simple braids you can do for yourself and it doesn't take time so so this is hair beauty by may, where you have uh a lot of treatment for natural hair and frosty hair and for fast hair growth, you can check my other videos and now I'M rolling the ends, so i'm gon na roll it with this roller. You don't roll them in one. In one position you spread it around so that it doesn't. It forms a wavy coil so that if you have your length, so you can see how i wrap it around wrapping it around and then spacing them up and then after i close the bendy rollers on the other side too, i'm going to roll. With my other hand, so that the forms uh curls, but it will be coiled, not the tight coils, so i'm gon na keep on rolling and after rolling uh the ends in a wavy form, i'm going to put in the boiled water. If you can't do the hot water yourself find someone to do it for you, as for me, i'm experienced in dealing with hot water on my hair, please don't do it yourself if you can't find someone to do it for you, so i put them in hot Water and then dry with the towel and then take out the rollers. You can get the bendy rulers from any hair shop, just ask for bendy rollers and it's very easy to use. You can decide to leave yours straight wall of wavy hair. This is my protective braids, let's get into winter, and this is what i will be doing from now on braiding my hair, to keep my head warm thanks for watching and see you don't forget to like give a thumbs up and share this video. Thank you. Thanks for watching my protective 4c hairstyle for natural hair and protective braids for natural hair, thank you.
Comments
BEAUTY BY SORAYA 💞: Amazing love it Thanks for sharing@hairbeautybymay
Living with Evelyn: Nicely explained and you did a great job. The hair looks beautiful.
Maggie's Diaries: It looks so easy, when you are making the braids. Very interesting to see this.
Ify Success: I like the wavy Curls. you did a great job in braiding your own hair well done the hair looks so beautiful
Arize and Shine With Mommie: Great protective style you did a great job thanks for sharing
BLESSED FAITH CHANNEL: Wow great protective hair style you did it perfectly the braids
MsNike A: Wow the braids looks so beautiful
Gla' Diary: The braids looks so good with the curls
Jennifer space: Its amazing how you are able to braid yourself
All Things Faith: I love your hair and I like how you are explaining how to do your hair.