How To: Poetic Justice Braids For Beginners | Patra Braids Step By Step
- Posted on 18 May, 2017
- Braids Hairstyles
- By Anonymous
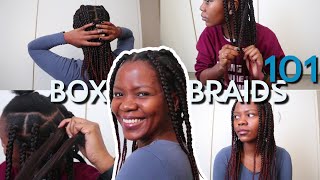
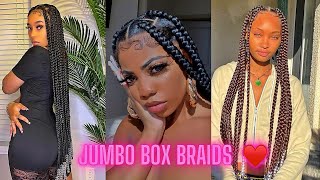
These individual braids are popularly called Jumbo Box Braids or Solange Braids. These individual braids are so fast to do taking you about 1 to 2 hours to complete! You only need a few hair supplies such as braiding hair, edge control and a parting comb to achieve these braids. For this look, Breanna used 5 packs of braiding hair and 1 pack of pink braiding hair for demonstration purposes. This style will work if your hair is about 5 inches or longer to prevent your braids from slipping. If your hair is shorter, it’s better to do smaller braids called box braids. Comment down below hair tutorial ideas you would like for Breanna to do!
JUMBO BOX BRAIDS HAIR SUPPLIES
DooGro Hair Vitalizer Triple Strength Formula Hair Grease http://amzn.to/2qihX1x
100% Kanekalon Braiding Hair - 5 packs #1b http://amzn.to/2oLTuBe
1/2 inch White Plastic Hair Rollers http://amzn.to/2qmKvF3
Metal Rat Tail Comb http://amzn.to/2iJlL6o
Hair Cutting Scissors http://amzn.to/2hVVg09
Hicks Edge Control http://amzn.to/2mnYQPi
Wide Tooth Comb http://amzn.to/2mviyZ8
Bobby Pin http://amzn.to/2rhaWvn
Hair Tie http://amzn.to/2qis6eH
CHECK OUT MY NEW HAIR TUTORIALS YOU MAY HAVE MISSED!
Senegalese Twists FOR BEGINNERS! https://youtu.be/4bcHBFBC4PM
Cornrow Braid Hair FOR BEGINNERS! https://youtu.be/wkjQEde0AX8
Feed In Braids FOR BEGINNERS! https://youtu.be/yDYRPcRZxeI
Goddess Braids FOR BEGINNERS! https://youtu.be/g2ealpvva8Q
INVISIBLE PONYTAIL WITH WEAVE! https://youtu.be/khA436-g82A
Buy My Books, DVDs, and T-Shirts At
Website http://www.Howtoblackhair.com
Personal Instagram: http://www.instagram.com/BreannaRutter...
Facebook: http://www.Facebook.com/OfficialBreann...
Thanks For Watching!
DISCLAIMER: All suggestions, tips, prizes, techniques and advice given are for informational purposes only and should be used at your discretion and best judgment. I highly recommend conducting strand tests when trying or using new products, hair appliances and product mixes. I am not responsible or liable for adverse or undesirable effects including hair loss, hair breakage or other hair/scalp/skin/body damage as a direct or indirect result of the suggestions, tips, prizes, techniques and/or advice given.
FTC: I am not representing, being paid by, or endorsing any of the product brands in this video & I purchased everything with my own money - UNLESS OTHERWISE STATED in video/blog content. There are links to products that might be helpful based on the content of this video/blog. Each of your purchases via our Amazon affiliate links supports our cause at no additional cost to you.
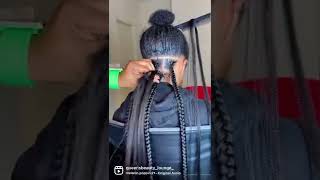
Hey, ladies, this is Brianna from howtoblackhair.com and I'm going to be teaching you how to do jumbo box braids subscribe to my youtube channel to watch more hair to port or beginner, so that you can do them on yourself for free. One of my youtube goals is to get my channel for five hundred thousand subscribers and I'm more than halfway there. So click that subscribe button and let's get start it with these beautiful jumbo box braids. These are the materials that you will need to achieve. Your jumbo box braids, you will need a rat tail comb and scissors. A wife is home, a hair tie and bobby pins, a butterfly clip as well as hair growth grease. If you choose now at this point, I'm going to show you how to feather the ends of your hair, to achieve your braids, we're going to start off with this pink braiding hair, and you don't want your in to look like that. So, in order to do the feathering techniques, you want to first remove the rubber bands from your package of hair and then after that, you're just going to locate the very end via section, and we are going to start doing this technique, which is known as Betemit. When you're setting the ends of your hair you're pulling on the body so that way, there is no blunt appearance at the end of your braiding hair. This is going to help you to effectively braid your brakes all the way down to the ends and they naturally taper off to a sinner look. This holds your braids together and prevents them from unraveling, and it also gives you a very natural appearance. Your braids now at this point you're going to take some scissors and you're going to cut off the ends of your hair. You just want to clean it up a little bit more selections or a lot more because after several, you may have tried a lot of mousse. So now, as you can see here, this is exactly how your hair should look and I'm going to go ahead and spin around to show you how much hair we have left, because I'm going to demonstrate on this section here and on this section I have two Bracelets, the map pack a wide tooth comb and gently detangle, through your section of here now, tracking your rat tail comb you're going to fly through your parties to make sure it's very easy and then you're going to click. The other section out of the way. With your butterfly click, now we're going to be starting with this section and what I'm going to use it as a hair growth grease. This is completely optional. This is something that I've been wanting to try on my hair, so I've been using it to put on my scalp. Since I've been doing bright side, you only need a little bit and you're going to take this little bit and you're going to put it on your visible part. Now, if the grease in your scalp you're going to use some edge control to flick at the very beginning of your brain, I only like to use edge control on the areas where the braid will be at the front of my hairline. So, for that second bite, that's cooked the way I won't be using any edge control on every now you just going to take a rat tail comb or brush if you prefer and you're going to smooth the product in at the very front. So now you're going to divide your section into two equal parts and I will explain a little later wide for now. I want you to take a good look at your braiding hair because remember it has to be paper so now. At this point, you want to divide a large chunk of braiding hair because remember we're doing jumbo black free. After dividing that section you're going to divide two unequal pieces, one piece will be a third of the size and the other section will be two-thirds of the size. This is going to help you to create three equal likes to your brain grab, the smaller section and put it all over. The bigger section bring those two legs together, which is your third leg and this important to create three equal lengths and are using your three many fingers of your right hand. You hold one side and you insert your other hand. So that way you can hold the hair in place now, you're writing in a front row tight, underneath you're, going to open your index and thumbs to pinch the second leg of your braid. Now, as you can see here, we have three full lips when writing and insert your real hair in between your image in yourself. So now it's time to start braiding and you're going to begin with that top section, making sure that you see the section in between your index and your thumb now. The reason why the section provided Institute is because it greatly prevents your bracelet so not grabbing that top section I open my index and stones to grab my real hair and I'm using my other hand, to hold the 3rd leg out of the way. Now I insert my index finger underneath that middle section substantially outer section, then I grab the piece of hair, that's at the bottom and start again into my index inside. So that way, I have two sections of my real hair in two different legs of the brain and then you're just going to continue to rotate your hand underneath, while inserting your index finger under the middle section to pinch, the outer section bring your other hand doing The same thing over and over here so, as you can see here every time you actually insert your index finger, you're, always poking the other way, so that way, outer leg can become commitment that way. You'Re rotating all three legs equally one over the other, so that you can actually form a free leg frame. Now this is a little bit confusing. I suggested to re-watch the beginning section of this video so that you can get it down because it's extremely simple now to make all your legs even in thickness and length, you can piss off a little bit of braiding hair from one of your neighboring legs. So after that leg so that you can continue braiding all the way down to the end after you finish, writing your individual braids. This is exactly how your brace should look and, as you can see, I hope that the skincare really allow for you to see exactly where to feed your real hair into your legs. Now, as you can see, the braid is thicker at the top and then it slowly starts to do Center at the bottom. This is very important for individual braids because it prevents the brain from unraveling. So now, as you can see here, you can rotate your braids in all directions with this technique that I've shown you, and if you can do this, that means your braids are not too tight. Now inside us to clean up, both parents are speaking out of the brain. One important tip that I want you to keep in mind is to be very, very careful not to cut the ends of your real hair. It'S extremely easy to see where the end of my real hair is because there's four different colors and braiding yes, but if you're unsure I highly suggested to only cut some hair off at the very end of the braid. After I finish braiding all of my braids look at how juicy the stylist this is such a fast hairstyle. I can get anywhere from an hour to three hours. If you have issues gripping your roots, I'm going to show you an alternative style you to do. This bow is called crochet box free and with this process you do not need to do cornrow, but you have to brave individual braids, your real hair from your scalp. To do this. Look now with your box braids. You can actually handwrite them yourself with braiding hair or purchase pre braided box, free and you're, going to move the ends of your real hair in and out of the legs of your box braids. So that way you can hide your real hair within your crochet box. Free this is a great alternative if you have issues gripping the roots of your hair or if your hair is a little bit shorter. Now, as you can see here, your style definitely looks amazing and super realistic. This is a great alternative, collage box right now back to the style, it's time to curl in of our braids, so I'm using a one inch or one and a half inch roller to roll the ends of my curl, depending on how wide or small your chroma Piece will be determined by the size of your roller. What you want to do is roll all the way up to the top and then you're going to use your plunger to clip it in place, as you begin to dip it in a box. So now what you want to do is make sure that you have pipe and not water, but you want to be careful that it doesn't spill well, have a cow as a barrier of protection, just in case the water drips around. But now after dripping, the excess water off you're going to put it into your towel you're just going to keep it right. Releasing the hot water and steam now make sure to get the rest of the water out and then take your plunger off and slowly unwind. It from your curl not to disturb the beautiful curl. You just create using exercise you're going to clean up any finances. Socalgas, don't look as good! So now you can see this, how bouncy the curl look and I'm just gon na stretch the ends a little bit to show you how much it's free now at the point. This is how all of your braids should look with those goofy in terms for a really quick hand, shot I'm going to show you how to do a high side ponytail with your jumbo box braids. This style can literally be done in like one minute. It'S that bad, so what you want to do is grab each braid one of the time to feed it into your ponytail. One tip I want you to keep in mind is to make sure when you pull your breaks up into your ponytail, that it's not twisted. So that way, you have a very flat unique look beard here now, after adding all of our braids, are going to put your hair tie around one to the doesn't need speed back and you're going to grab about three to four jumbo bring and you're just going To rotate it very flatly around the start of your ponytail there's a bunch of fast and easy and beautiful stop to do with your catcher break, and you just want to make sure that you will cut it all the way around. As far as you can get it, here's a slight twist use a bobby pin to pin it in place. As you can see, the beautiful ponytail added such a gorgeous looks to the style in ladies, I want to thank you so much for watching my jumbo Patra braids tutorial. If you want enjoyed the support for beginners - and you want to see more, all you have to do is subscribe and give this video a thumbs up, because this helps support the growth of this channel. As you know, I'm currently at three hundred eighty-three thousand subscribers and one of my new favorite dreams is to get my sense of 500,000. So I know we can do it with your help so sales and look out for more videos and improving you guys, like Baba
Comments
Breanna Rutter: SUBSCIBE For More Hair Tutorials & THUMBS UP THIS VIDEO!
Donnesia Scott: Very informative and extremely helpful Thank you!
Beautiful Beast: Anytime your ready to do a makeup tutorial I'm sure you will double your subscribers in no time. Your styles have always been amazingly detailed and videos so clear.
Alexis Stiver: OMG Thank you so much for this I might be able to do my own hair now thank you so much!!!!
Mrs Tee: Always spot on - you inspired me to do my own hair
Michelle Stinnett: You are an awesome teacher!! Thank you so much for all you do for us.
Latasha Chanel: Great tutorial!! Your hair is always beautiful.
Mykia Laughery: Thank you so much for the clear instructions
InfinityBee: This video is exactly what I'm looking for
Lisa: Hey Breanna, I have been watching your channel just over a year and a half and u a & a few other ladies are so great at what you do you are very detailed and it is very easy to follow what you do I have had my hair put away for about 6 months and I pulled it out for the summer time so I could start trying some of these hairstyles and I can't wait I think it'll probably take me a lot longer but I'm not going to give up because you give me the power to push through I know that I can do it and if I get stuck all I have to do is look on your channel and if I find out what I'm doing wrong and it'll get taken care of I want to thank you for your home and as always you're beautiful inside and out and I hope that you are having a great new year and this year of June 2019.
Shandra Armstrong: Thank you you made this so easy & I will be trying it myself
Michelle Laster: You explained that really well. I can braid, but I loved your technique and will be trying it. Great job on truly being beginner friendly. I have just subscribed...how you get to 500k soon!
Chavon: How do you keep the braid pattern and consistency when moving the braid over your shoulder to continue braiding? My braids look different when I get done braiding the first initial part then moving towards the middle/end. The braid isn’t straight down it turns or is looser than first started.
Alana Johnson: You are so professional, you should do “how to” videos all the time. I’m serious. Great lighting, great voice, very patient....overall very professional.
Prin Nana: seriously, you make the best tutorials! I wont braid my hair that often, but I'm totally subscribing just because you're amazing
Danielle Spears: Very detailed. Nice tutorial!
GOD Gotcha Gurl: Another amazing Video Bre. Love IT!! I just did these braids on my daughter in law. Now it's my turn.
Kay B: Thank you for this great tutorial
Sara Sara: Thank you so much for this quality video. You are a phenomenal teacher.
Kenya Smith: Your tutorials are awesome. It'll be cool if you had a how to show on PBS. If PBS has cooking shows, gardening shows, and arts and crafts shows, why can't they have a show about beauty and personal care?
Yolanda Jones: beautiful I'm glad your video was long and got str8 to the point loving it girl thanks for the tutorial
Officialmara mara: I like your excellent tutorial. keep going!
Cassia Aguiar: obrigada Brena adorei
LaTonya: OMG you have the best beginner tutorial!!!! Sooo detailed and I love your tips. Thank you so much!!!
Nat: I love your hair. What a wicked skill. It's cool with the pink. I'm on the opposite spectrum where my hairs so fine that it won't even hold a curl. I guess we all want what we don't have.
Compte Google: Wahou! Super vidéo! Merci pour tes explications!
SwaggerChiick1: Absolutely the BEST tutorial I've ever seen! Definitely subscribed!
LA STELLA 🌟: The hair style is soo cute I love it especially with the curls at the end.
Miss Elle: Hi Mrs B. Thank you for sharing all the videos that teach us how to do your own hair. I live in Thailand and there are no African or Hair salons that cater for African Hair. Point is Thanx to your channel I can almost do my own hair. My question is this. I have 4c Natural hair and extremely unruly edges that turn in to pepper corns at all times. How do you get your edges to be smooth looking like yours? Please keep in mind that we do not have access to edge control. What can be used as an alternative? Please please help
Shantastic Ash: I LOVE THIS! You are explaining this to a tee! I thoroughly enjoyed this!
Tassue D.: I love it! I have been trying to get my hair like that, but I end up with single braids. Did you flat iron your hair?
ezlenen224: You are very beautiful and talented. I love watching your videos. You are great at teaching and explaining.
Naïka Denis: Girl your followers goal is achieved !!✨ Respect, keep it up
Netta B: Love it very detailed
Anne Craigen: just wanted to let you know that your videos are very helpful!
I am Cisse: i love your tutorials .... very educative
angel telp sorrentino: This gave me so much life. I love this and will do. Love you sis!!!!
Ryah. Edits: Thank u bc my mom gave up on doing my hair so im learning myself and this helps alot
Syene Ingram: Lol! I JUST got some crochet braids yesterday for that same reason! Hopefully next time I won't need em, the way she broke it down really helped me to see how I should try my braids next time
Technicolor-mom: Fav style from you by far, just when I think you can't get better.
Queimando pela palavra!!!: Hi!!! I love it!! I realy want to learn do by myself I will try it!!! :)
Mi Michelle: Breanna I love your braids my goodness. I must try.
Pinkcandi: Babbbbbbbbbbbyyyyyy! These braids look so good. I love your videos, thank you!
Jerdy LooLoo: Omg this is SO cute I really wish I could just pay you to do mine
Iyauna Shaniece: Beautiful braids
sMORGAN'Sbored: I knew if I really wanted to understand the technique where you rotate your hands (before the actual braiding) I needed to watch one of your tutorials! Thank you!
Jessica Cosmicninja Jones: You’re really made to do this!
Busak Iboh: Excellent work
Oge Ubabuike: Beautiful hair
Qųεεŋ. Hσŗŗσŗ: This is so damn pretty
Fatuma Ngoni: Thank goodness you're good teacher. I ❤️ your videos I am hoping that I'll learn from you.
qwaneasia: I love Breanna. I'm about to do this right now at 1109pm. this 4c hair is thick. no perms in 5 yrs
Kaity Janelle: This was extremely helpful
Ayemerie Marie: Thank You! I'm Learning So Much From Your Vids #PoeticJusticeBraids #PatraBraids
NaturallyRéRé: I just installed box braids using the rubber band method because gripping the hair with the three leg method was too difficult for me. However, your tutorial broke it down very well and I might give it a try again.
Samantha Johnson: How do you keep hair from tangling at the bottom while braiding the box braids?
Ruvarashe Matumbure: great tutorial thanks
Nubian Goddess: I Luv all her videos easy to understand & very precise.
Kimah Mommie: great and so educational you could be a teacher❤
Jerdy LooLoo: I would love for mine to look exactly like this
Kanesha Howard: I like this style of tutorials a lot better than the old ones. Good job
Breezy Bre: You explained perfectly, I just suck at gripping and attaching weave.
Tranice _1215: you can also do the rudder band method if you don't have a good grip
mysticfawn: how many braids did you have in total? it looks great!
Braids by Raayonne: Good tutorial❤
Miss workingitout: nice video and the braids are extremely nice
Amanda Louise Nascimento: Sooo natural!!!
Very KinkyCurl: Gorgeous
Astride Lizah: waouu perfect merci ma chère
Deanna love: Congratulations!!! On making to over 500k subscribers
Eliseee: How many packs of hair did you use and how long did it take ?
Natalie Jones: What was your preparation for your hair before you braided it?
Danielle Ardoin: omg these braids are gorgeous
Hadja Keita: Do u know how long it took to do it all yourself? these braids are beautiful❤
Desiree Grayson: What if your braids are stiff? How do you fix this?
Jolettabarnes: New subbie Your soooo awesome
Samuel Romero Falquin: Beautiful
Y Brown: I like that you used a different color for a better visual. Thanks
Caryn: I love this , I could do without the curls though
Mob: I LOVEEEEEEEEEEEEEEEEEEEEEEEEEEEEEE your videos you earn all the subs in the world you seem so nice as well
StormyLove: Subscribed!!!! Awesome video
Cocoa Puffs: How many braids is this? So pretty!
Thoko Em: You're a really good teacher.
Chas & Taya: Great job
Віка Vika: Thanks for your help ))))
eden Phiri: Luv ur videos
maureen pitiman: love it.....
Destiny Amari: That's so helpful.
LuDreama Fortune: how do you get the braiding hair to not slide or slip ? no matter how hard I try yo grip it , it always slides
Aleila Barringer: Luv this video!!!!!!!!!!!!!!!!!!!!!!!!!!!!
bliss: can u do a tutorials on how to part hair in any style the technique of how to do it, plz I have difficulties in parting hair
Kimorah Oates: Thank you so much for this hair tutorial and the music in the back
brianna Wilson-Carter: how many packs of hair would you recommend for this style?
Meda F N Mba: nice can you us how to divide the hairs in sections?
Caitlyn Larkin: edges are always so. .. bomb
a handful of love: ❤
Keiwaunna Samuel: How many braids do you get out of a pack
choirsongsable: Do you have to straighten your real hair?
Brooke: What size were the parts
jakaiya Scott: