How To Create A Passion Twist Crochet Wig On A Braided Wig Cap
- Posted on 23 May, 2021
- Braids Hairstyles
- By Anonymous
#PassionTwistwig #Crochetwig #Crochetwigtutorial
In this video you will learn how to make a Passion Twist Crochet wig on a braided wig cap step by step. Feel free to ask me any questions and also please remember to like, share and Subscribe by clicking the Red Subscription Button, it allows me to continue providing you with helpful content.
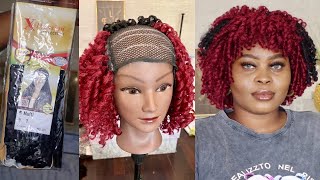
Hair used in this video: ZURY SIS SYNTHETIC CROCHET BRAIDS V11 PASSION TWIST 9/10/11 inches-Hair was purchased at my Local Beauty Supply for 18.99 per pack and 2 packs of #2 hair was used to achieve this look.
Product used: LottaBody Wrap Me Foaming Mousse, 7 fl oz
Qfitt Braided Horseshoe Cornrow Cap Black-https://www.samsbeauty.com/service/Qfi... (Price now is 7.99)
Youtube Copyright Free Song: Satisfaction Guaranteed by Dan Lebowitz
Lets Stay Connected: Instagram: https://www.instagram.com/mercydesigne...
Etsy Shop: Etsy Shop: https://www.etsy.com/shop/MercyDesigne...
For Business Inquiries: [email protected]
Hello guys welcome to my channel in this video. I will be constructing this fashion twist um crochet here on the on my braided wig, that i have here and i purchased the hair from sam's beauty supply online and it came in this pack uh. I think i paid like 9.994 for the cap and i've had it for a while. I'M like, let me go ahead and make just put together a quick look for you guys, and so i went to my local beauty supply, and i saw this i'm like. Let me go ahead and give it a try. I was looking for something curly, not too silky, but more like a textured curl like something like a jamaican buns, i'm here or something like that, but i i ran into this. I'M like. Let me go ahead and give this a try. It'S in the number two, and it comes a layer. It comes with um, nine, ten and eleven would be in this lower one here that i already took off and i'm gon na start with the 11 on the back okay. So let's go ahead and dive right into the video and also um in the pack. When you purchase the wig for this one, um q fit it comes with this. It comes with the clips already in in the pack, so you're able to just go ahead and add it. You don't have to purchase it separately, which is good okay, so we're gon na go ahead and get started under here and before i start working on. Then here i'm just going to go ahead and pin it down here, so you first, you take it from the pack, you add it to the mannequin head and then you want to pin both sides and always remember you want to pin in the back as well. Okay, just to make sure when you're working it doesn't shift or move, i'm gon na put it back and then let's go ahead and get started. Okay, so to get started. I'M just gon na go ahead and tilt my mannequin head forward a little bit. So i could get access the back of the um wig cap easier. Then i'm just going to open the twist here, just a little bit so when i'm trying to get the needle through it's the easy um task. So this is the needle i'm using and first i'm going to start off with this braid in the back. I'M just going to push the knee through here, put my hair on the hook close the latch fold it through and to make it simple. I'M just gon na open the latch here, close it and just fold that through here or you could do the other way as well and just use your finger i'll. Do it that way here? So this is our 11 inch, so i'm going to do 11, 10 and 9 to the front. So let's take this one open it a little bit. I'M gon na put this one on this other side here, because they did to like two braids to the anchor down to the back, which i like so i'm gon na pull i'll push. My needle through put the hair on the hook open the hook close. It pull it through and for this one i'm just gon na use my finger here through here and then i'm gon na open it up and pull that through. So you could do two ways: either way is fine and you can leave it like this. If you want - or you could go back after you've put the air in, if you want to do extra to make sure it's really secure, you could just open that loop open the loop. Take your finger twist like twist it one time around then use your finger. Pull that through again to make it extra to me it was already sturdy but for i know um for some people they like to make sure the hair is really really attached. So you could go ahead and do that next step. Just push your both fingers through my index and my thumb, so i stick them through the hair. Make it big enough just twist it around one time and pull the hair through okay and then we're going to move on and take it all the way up until we're finished with all of the um and uh 11 in length, and then we're gon na move On to the time, so let's do this one! So i'm going to go here right here in the middle open, the lash put the hair on close. It pull it through use your finger, pull the hair through twist it around once, pull it through again and tighten that to the braid. Okay. I'Ll do the same thing here and i'm going to put this one right here: just want to eye to make sure you're, giving it a nice spacer because remember you want to fill it. So what i'm going to do is go in between each one and just the space that layered um like when you're doing your braids, then you do it in a layered way, so it fills in nicely that's what i'm doing. I'M gon na have that one fall right there and then i'm gon na put another one right here to fill in this piece here, apart from layering the hair on the wig, i want to make sure i'm also putting ensuring that i have enough hair around the Base of the wig cap to make sure it has a nice full look around the base. So i'm just gon na put this one here open it up, pull it through twist it around once and i'm going to do the same for all of these loops that they put here, i'm going to make sure i have a um hair braid. I want to make sure i have a braid on all of this loop coming all the way around with all the different lengths, so i'm going to put the next one right here, okay guys, so this is where we are and what i'm doing, i'm just placing It before i actually place it, which means i just look at the hair, see where um the space is and i place it in and then i actually go ahead and just add the the hair to the way cap. So i open my either close. It pull it through with my finger, open, pull it through once twist it and pull it through a second time and point all the way to so that spot is filled in so what i'm gon na do. Is i'm gon na put this one right here? Okay and since i have that i'm just gon na i'm gon na put it here instead, you could just look and just fill it in before you actually place it on the cap. So that's what i usually do for my braided wig. I just i eye it. There'S no actual technique that i use. I just i to see what where the space is - and i just fill it in and i work my way up - i'm gon na put my finger through here twist it around okay guys, so we just got finished with the 11 inch and now we're moving on To the 10 inch - and i forgot to mention the brand - is the zoe brand. I will list that in the description box below i'm sorry about that. Okay, so now we're going to start adding our 10 inch here, i'm going to start it off with this row. Right here do do do okay, guys so now we're to the top, and i have two more pieces of the 10 inch 10 inch twist left and then i'm gon na start adding the nine inch. So i'm going to put this one right here to fill in this space here: okay, guys! So now we're moving on to adding the our twist, that's um nine inches and i'm just gon na line them off in the front to ensure that the front has coverage going across and then i'm gon na start working. My way through the rest of the wig cap, so pull it through one time twist it pull it through again, a second time do so now, i'm going to start filling in the top part of the wig cap. To finish your wig and i'm gon na make my part right here, so i think i want to make the part here so since this has a smaller section in here, so that way it will be easier to close it up compared to here, which is wider. So i'm just going to go ahead and get this one right here. I'M gon na put this one right here. Okay, so usually we close the latch pull it through. Take her finger open that pull the hair through once twist. It pull it through a second time and then for some of them. I twist it pull it through a third time: okay, okay guys, so this is um or awake after i've done the full pack and see all that spacing and trust me, it's not that thick! It'S not that full and it still has a lot of space in here. So i'm not sure, but they said that one pack is enough, but - and this is just this - is a 22 inch wig block, which is the average size for um for the measurement for um any head, which is 22. So i went ahead and got another pack because i don't want. I want it to be nice and full, so i'm gon na just start off using this, the the shorter one, the nine inch, that's what i'm gon na start off using and um. I made sure i got the same color, so i'm going to start off with a nine inch and then after we finish um i'll, see if it's nice and full enough, then i'll just leave it there or add some more okay. Okay! So now we're gon na put this here, make sure that you guys are seeing what i'm doing so. I'M gon na go under the braid. I'M gon na take her hair, put it on the hook close the latch, pull that through take her little with your finger and pull it through once twist it twice twist it again pull it through then we're gon na pull that in on the braid. Okay, guys. So this is our finished look and i just moved the hair, so i was gon na have like a few twists left and i'm like. Let me just go ahead and put everything in so i went ahead and used the full uh, the complete pack. So i basically used two packs to achieve this. Nice full look here, okay and it could be worn as a side part. This is basically a center part, but it can be worn as a side part as well. So i hope you guys enjoy watching this video and hope you learned something. Thank you guys so much for watching. Please remember to like share and subscribe.


Comments
Rottie Island: Very neat and detailed. Thank you!
Gwynne Wilson: Thanks I will try this this week it’s was very easy to follow you did a beautiful job
Cheryl Stewart: You did a great job! I love the hair you used.
Jackie Colbert: Looks good I have never tried Passion twists before. I might do crochet on my hair. Thanks for the video excellent job.
Fivestarrmommy: New Subscriber Here! Great job! Love it! ❤️
Hunni T: Love it.
necee11: Are you pushing the needle under the braid or in between the braid?
jpzz123: Looks great
1 Safe Space: Hi how many packs fid you use?
prettybaby80: I can’t get that needle to get through those braids at all
jewelzofthasea: Excellent video
Belinda: What's the name of the hair used
Sherisse Barnaby: I'm
Avis Rosser: That cap looks like that’s the front of the cap you have facing the back