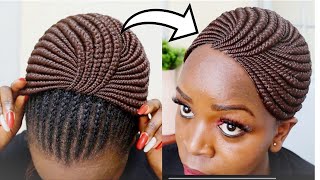
Telephone Curls Short Box Braided Wig.
- Posted on 21 October, 2021
- Braids Hairstyles
- By Anonymous
Here is another video on Telephone curls short bob braided, so easy to achieve. Please do Subscribe, like and share. Turn on the bell to get noti fication each time I upload a new video.
These are videos you will like
Braided Wig: Short kinky Twist, No Closure, No Lace Glue needed
Cheapest Afro Puff Under $6, Using Hair Bun. Quick and easy
How To: Recycle Old Ankara To Sew BUBU Style
Deep Center Part, No Closure Wig. 62 inches Long. NO NEED OF LACE GLUE. JUST GRAB, WEAR, AND GO.
How To Cut And Sew Female Pants/Trousers.( PART TWO)
DIY: All back feed in braided wig, no closure, no glue,
For business Email: [email protected]
Hello, everyone welcome back to my channel, i'm florence, i'm worried boy. How are you guys seeing how people are doing great? Yes, guys? Today'S wig is all about telephone wire, shorts, ball, braided wig, yes, guys telephone wire, short braided wig, so guys before we proceed with the video. I really like to appreciate all my subscribers. I say thank you for your support. Thank you for supporting your girl. I really appreciate you all, thank you all and for those of us that are just tuning in for the first time you are welcome. I appreciate you all for tuning in. Please don't forget to subscribe, hit the red bell, written, read: well, written, subscribe, click on it and turn on the bell notification to get notified. You can upload a new video. I appreciate you all thank you for supporting your girl. Thank you. Thank you. Thank you. Thank you. I say god bless each and every one of us so guys. The first thing i did was to go in with a crochet. I would do single braids. I won't be braiding it all the way i will read it like half, depending on the length of where you want the brace to to get to it. So i just wanted the phrase to bring the room so that they remain and will be for the the telephone coil i'll be making. So after braiding it i tied it, you can look at the way, i'm doing it right now. I tied it to ensure that it doesn't come to lose, so this is the braided pretty waist looking after cleaning up that portion at the back, so i'm going in right now to just trace out the particular side. I want to do the cornrow. That'S the feeding! Braid, i'm just sectioning it out it's going to be two layers, so the one at the bottom and the one at the top. So i'm just sectioning it out right now we are not using closure, so i'm trying to create a kind of line. That will be a starting point for me to start doing the first layer just watch what i'm doing, and you really understand what i'm doing. I'M just trying to get this at the midpoint i'm trying to get the mid the mid line of the of the mannequin head so at the center, the the upper part of the layer of the feeding braid. Usually i start at the middle of my cornrow. You can see i'm starting, i'm not starting from the front. I start at the midpoint right there that way. I will know how many braids on each side, of the, how many braids i will have on each side, so right now just start pushing crocheting on on that line. That will be the middle. The midpoint right there, after which i will come to one side and do i will know how many brick cornrows or feeding braids i have on that side. I will do the same number on the other side, i'm just showing now that i've sectioned the the braiding hair so as to be easy for me, as i'm braiding i'll, just be taking it and doing the feeding braid. So, basically, that's just what i'm doing right now going in with the feeding brakes. I wanted it to be long, so i'm just adding adding more edge just to make it longer to get. I want everything to be added even at the same length with the other ones, so i'm just adding braids. So i studio the same length with the same braids. I'Ve already done remember. I said that i'm tiny, so i just have to tie so i start to unravel. So this is what i mean by starting at the midpoint, so i will know how many breaks i will do. One side count the cornrow and make sure that it's the same on the other side you don't want to have you know we want it to look similar, not really not having more on what's on one side than the other side, smaller side, so we wanted. We wanted to build up the same number of brick cornrows on each side, basically updated appreciating i'm going in with the braiding hair, starting with a little piece, after which i will now start with the feeding. Braids do so i've. I'Ve done the i finished with the first layer, so i'm going in now with the top. That'S the second layer. That'S the one at the top, still doing the same crocheting tracing the line and appreciating on it. I did three off camera already, so i'm just continue tracing crocheting and doing the feeding bridge so guys i'm done doing the feeding braid. So it's time for us to do the telephone wire, because so, if you notice i'm twisting this, i'm twisting it. If you don't twist it, i just you turn the the yarn around the braiding hair, like that, it's not gon na be smooth, so the purpose of this telephone wire is to be smooth, unlike the other coils that we do you just you know you fold it Together and you twist, but for telephone wire, you have to twist the braiding hair first before you use the rope with the yarn to run across it. If you just coil without twisting the braided hair, is not going to look neat, so the purpose of twisting it. First is for you to be very, very neat: you have to twist it if you want to make telephone wire coils, i'm just saying for the telephone wire boys, for you to be neat and smooth. You have to twist it first before using the yarn to run across it just watch what i'm doing you understand what i'm saying i will twist it first, you can see guys i have to twist it first i'll be doing that on i'll, be doing on the Simple braids, each i'm not taking too. If it takes two, it's not going to come out to be nice at all. The coils will loosen up. Then, when you want to do it one at a time the coils will be defined. They want to take more than one. The coil is just going to be loose because you'll be unraveling, two two braids. At the same time, and this time once you take out the the decoys after painting hot water, the coils will still retain the way it is. It wants to take two drains. You unravel everything so i'll be doing each one like that. So i'm done doing the decoys telephone calls each on the on the braids. The nest i'll be doing right now is to dip it in whole world. I forget, if you have watched the video up to this point and you've not subscribed. What are you waiting for support your girl, join the family, support and always come and watch us? I post videos every week, but due to i'm in school right now guys? Yes, that's why i've noticed for a while right now, it's kind of tough, i'm in school and it's you know school and doing youtube this kind of stuff. That'S what i've not been really posting. I say i have to do this. I just have to do this guys. You can see the way it's looking right now see how beautiful it is. It'S so easy. The most important thing is make ensure that the the telephone wire poise is being twisted you twist, each of the braids. If you take more than one it's not going to be defined, the coils will be so rough. This is it right here guys. Please support your girl. Don'T forget to subscribe, hit the bell notification to get notified every time i upload a new video. God bless you! So, thank you all appreciate you. Thank you.


Comments
Symply Tricia TV: Amazing tutorial, lovely braided wig, love the color
MsNike A: The braid and curls came out beautiful also love the colour
Lydialove beautyhome: Waoo i love this hairstyle very beautiful you did a great job dear
Muna Leonie: Thanks for sharing sis, how to archive these curls has been a challenge to some of us. Please in how many half did u cut the attachment?
Empress Chronicles: Turned out nice.
Bxby Brattz: