How To | Braided Wig Install | (Coi Leray Inspired)
- Posted on 05 April, 2021
- Braids Hairstyles
- By Anonymous
IG: https://www.instagram.com/jonicejenkin...
Wig Used: https://www.amazon.com/dp/B07RY7FSTQ?r...
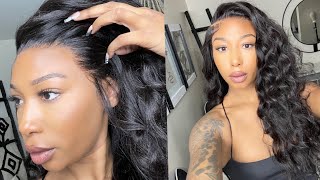
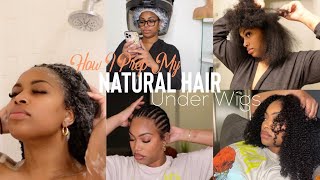
Hey guys welcome back to my channel today, i'm going to be showing you how i did this braided look on this 13x6 lace front: wig um. I hope you guys enjoy this video and i hope it's helpful and useful to you and if you're not already go ahead and hit that subscribe button, because i'm going to be posting lots of videos with hair, tutorials, makeup, tutorials, etc and we're just getting started so Hope you all enjoy okay, so the first thing i'm going to do to this wig is just wash it. I'Ve worn it before. So i'm just getting all the excess, gel and stuff that dried up on it off and i did flat iron it and it's a water wave wig. So i'm just trying to bring it back to its natural state and start with a fresh, clean base. So you're, just gon na see me wash it with some pantene, nothing special and then i'm gon na put some deep conditioning, uh treatment in it and i'm just gon na. Let that sit. I don't wash that out. So i'll just speed this up and let you guys watch now that the hair has been washed. This is what it looks like it's damp. I just towel dried it all. I'M going to be doing is spraying some heat protectant on it and brushing it out so that it's easy to detangle, because i am going to be blow drying it straight. I didn't flat on it or anything because i am putting braids in it. So that's all you're going to see me do on this part, so this next part i've blow dried the hair to my liking. I didn't get it completely straight because there's honestly no point, but i got it straight enough, so that it's not completely curly and it'll blend well with the braids um. All i'm going to be doing is sectioning off the hair with some edge control and that's pretty self-explanatory. You can choose how big you want your parts to be because the method that i'm showing is how to braid a frontal wig, because it's not a full lace. Wig - and so i mean, if you have tracks showing and all that you can cover it up and you'll, see how i did that i'm just sectioning it off putting some edge control on it, and then i just brush it to how i want it to be, And then i'm going to go ahead and put a rubber band on top of that now, when you're putting the rubber band on it, you want to make sure that you're not bunching up your wig. That'S really easy to do so. What i recommend is just kind of holding it down with your fingers and then putting on your rubber band and kind of pulling at the wig to make sure that it's not bunched. Because if you leave a bunch you're going to end up with a knot with your wig, not fitting right, so just look out for that. So now you see me adding in the braids. I already did one side and i'm just doing it, how you would do a normal box braid, nothing special, there's plenty of videos on how to do box. Braids, i don't know. I don't think i showed it very well here. So if you need more detail, you can obviously just search that up so yeah, i'm just adding in my hair. Then i am adding in little curly pieces and that's going to give me like a messier, look which i liked, and it just adds some definition to the hair. Some volume and i just thought the curly pieces would be a cute touch to it. Hmm. So now i'm doing the same thing that i did in the back with the front except i wanted to do the front, so i can make sure i knew how many braids i was going to be doing and just to make sure everything had an even look In the front, you want to be way more precise and just making sure you cover up that first track behind that lace, frontal and then also just making sure your parts are very straight um. So that's all i'm doing i'm just doing the same exact thing. Sectioning off the hair, how big i want my parts to be and the rest is pretty self-explanatory. Also at this point, you want to make sure you are parting out your baby hairs, because you don't want to bunch all the hair up and then you can't take them out later so make sure you also do that too. My hmm, my so at this point i've already braided the rest of the braids and added the curly parts in and i'm going to be showing you how i covered the tracks you can see here. I have a braid going across these ones and that's all i'm going to be doing going, horizontal and vertically on the wig to cover up those tracks so that they're not showing so i'm kind of moving backwards on here. I don't know why i did it this way, but i did so i'm going to first show you how i sew down the braid and it's really simple um you can see. I got my needle and thread and i'm literally just going to sew the braid onto basically the wig cap and on to the tracks so that it lays down flat and covers the area that it's supposed to cover so i'll. Just let you guys watch so hmm. Now, at this point, i'm going to be showing you how i make the braids to put them onto the wig. I just take a rubber band and i'm looping the hair through it so that it can. The rubber band can hold the hair down. I'M taking the pin from my wig mannequin head and i'm just going to put the pin in between the rubber band hole so that now you can see it's holding the hair up there and i won't have to like hold the hair anywhere else. While i do the braid just taken some of this braiding hair um, it doesn't matter what type of hair as long as it's close in color. This is obviously brown and the other hair is black, but it won't matter because you'll see it's going to blend right in and now i'm just doing that like, i did uh the other braids, just like a normal braid that you would do with hair added in So i'm just braiding it down to my liking and i'm just measuring as i go to make sure that it's where it needs to be so that it covers all the tracks and then i'm just putting a rubber band over it really simple, nothing major, nothing! Crazy! It'S like the first braid. I showed you i'm just going to sew those down where they're supposed to go like i said some will go horizontally and some will go vertically and at the end, i'm going to show you guys how it looks all right. So here is the wig after i have sewed all the braids into place where they need to be, and i'm just taking my scissors and i'm going to go ahead and trim off some of those curly strands. I ended up putting a little bit too much so i wanted to take some off, and so that's all you see me doing is just cleaning up the hair, the hair once i trimmed it to my liking. That'S close up, so you can see you can't see any tracks. It just looks like there's braids within the braids, which i thought was cute it's different and then i did add rollers to the hair so that i could curl the ends and get it that curly. Look, i do recommend, though, really separating the curly strands from the rollers when you dip the hair, because it will make them straight if you don't, because some of mine did that, but it didn't really bother me it's just if you want to keep as many of Your curls as you can you should probably do that so now, i'm just putting on my wig cap and putting makeup on it to match my skin color. I don't do the bald cap method, just because i notice, when i do it that way. My wigs seem like they like want to slide off easier, so this is just what works for me, i'm just adding makeup to it. I also added makeup to my wig and then i'm just spraying it down with got to be to get rid of any moisture or oil that the makeup might have and to seal it into the wig. So it doesn't transfer anywhere else. I'M taking my got to be spray and my got to be gel and i'm going to mix it up in this little container thing that i have and i'm just spraying like basically equal parts, then i'm going to stir it up and you'll see the consistency that You need and that's what i'm going to be using to lay the wig down. So after i get my gel mixed, i start applying it to the edge of my hairline or the edge of the wig cap. Where i want my wig to sit, i do three layers just like you would any other wig glue and i blow dry it until it's dry and then the last layer. I let it stay a little wet until it's like a sticky consistency, and so you just see me applying that and letting it dry um. Now, i'm just applying the wig and lining it up with the glue where i want it to sit um. What i like about this is it's really easy to wipe off if you put too much gel or put too little, so i think i prefer. I definitely prefer the silver glue less of a mess and when you need to wash it off, your wig comes off way easier. So i'm just sticking the wig on and getting it in place where i want it to be, and then i do blow dry it a little bit and then i take my elastic band and i'm just tying up the edge of the hairline and then blow drying. It on hot to cool back to hot and then cool at the end, just to make sure everything is nice and dry. So now that i've taken off the elastic band, you can see that there's some white residue and that's super easy to fix. Just take a cloth or whatever you want to use, put some rubbing alcohol on it and just dab away those white flakes because they're just extra gel that didn't dry properly, which is fine. It comes right off and it doesn't lift your wig up now, i'm going to get started on the baby hairs and i'm just trimming them. I want wanted really dramatic baby hairs for this look, so i'm just gon na be quiet and let you guys watch because i don't really have like a set way that i do it. I just kind of go with whatever i think i'm gon na like and yeah. Hmm. Yes, after the last clip, my phone did run out of storage, so i could not film what it looked like right after i um finished the install, but obviously you saw the video in the beginning and i'll reinsert it at the end too. Just so, you can see what the wig looked like. It was super cute, but i just want to say thank you for watching this video. I hope it was helpful and i'm so excited to make more. If you haven't give us a thumbs up, leave a comment and hit the subscribe button. Thank you for watching.

Comments
SoAnah: I love it
ItsTYMON: Amazing
Johnoy Walton: Beautiful ❤
imani walker: how long was the wig? i really want these
Jessica Davis: Here for it!!
Visionme: Girl you need to make theses wig and sell em I’ll wear it my damn self and I’m a boy Lmfaooo
So Hood: go sis !
ItsTYMON:
Kelis’s Vlogs: Period
Alicia Sanchez: DAYUM YOU FINEE