How To: Make Your Own Crochet Wig | Perfect Protective Style For The Summer
- Posted on 03 June, 2019
- Braids Hairstyles
- By Anonymous
Like, Comment and Subscribe ❤️
Hi my Crowned Ones ! I wanted to do a crochet install that was fool proof and easy so I decided to make a wig !! Now we all can get the look !! I hope you guys enjoyed this tutorial !
If you wanna see more styles like this leave me a like And a comment down below .
I love you guys soo much !
____________________
Hair: @bestshophair
https://bestshophair.com/collections/c...
Crochet Hair #1b27
4 packages
85 grams
8 inch
____________________
Connect with me :
Instagram : https://www.instagram.com/_crownedk
Snapchat: kimberlysudz
Twitter: @its_crownedk
For Business enquiries
“Chin up Queen, or the crown slips “
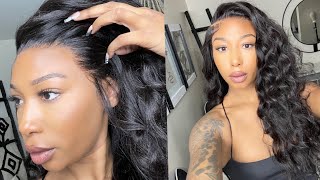
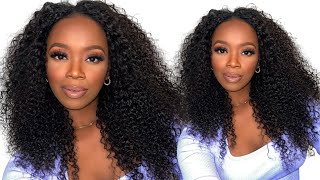
Every time I see a place nice all right, let's taco go down down on the low ticket. Do I'm gon na low baby known as you know, you know hi guys welcome back to my channel if you're new here my name is Kim aka crowns. Kate! Welcome to my channel, since you already clicked on this video than like you can just like did I say like like three times, but since you clicked on this video, you can go ahead and hit that subscribe button and Attorney post notifications on, like you, don't want To miss any of this awesomeness that I put out some my turning subscribers hi guys I love y'all like so so so so so much so. Today'S the video guys is about this hair, like hunty punchy Q, I'll see how I'm serving like curly fives curly sue. I'M loving this guys. Would you believe that this is a wig like I got sent some hair to make a video. I got sent it. They were like some crochet here, however. However, however, I just didn't have the patience or the arm strength to do individual crochets in my head and I'm just like uh. What can I do? What can I do with this hair so guys? I went and I bought myself a crochet crochet, weaving cap. I didn't know they had those, but yes guys I wouldn't have brought my bra. I I went and I bought myself a crochet weaving cap and then guys I constructed this amazing ass crochet wait like it's a wigs this. So if you want to see how I achieve this, then keep on watching, I mean why not, for this is where you need a. What is that a crochet wig cap and I'm using four packets of this crochet here - and this is a 1b 27, as you can see the ombre color and in the package I received a crochet Neal and I'm just putting on the wig cap on my mannequin Head, that's how the curls are and what I do to start off. I separate the curls into two pieces. First I was separating into three and then it was kind of a bit fuzzy for me. So I didn't bother and guys during this tutorial. I was installing the crochet here as my previous crochet video video, where I pushed the needle down instead of upwards, because that's the way how you get the crochet to look not less and to not have that bulge. But what I realized after doing a row, that this method is only like it's better suited for when you're doing it on your own here. So you don't have that big knot and that ugly look for the wig, though I realized, after doing like two rows, that it would be better to do it the incorrect way, because with that, I would get that little knot. That would cover the cap so because of that, I did it the opposite way. I don't know if that makes any sense, but watch as I do the first row guys and then the second and then you'll see that I just started changing the style. This style is perfect, where it doesn't show the knots like that. But it's better when you're installing it on your here and you don't want that big knot on your hair, but because it's a wig and we're trying to hide the the little grids it's better to do it the opposite way. Okay, because I know my previous crochet video, I showed you what not to do so in this video I'm actually utilizing what not to do, because it gave me a better result in terms of hiding the cap. I hope that makes sense. My love's and I separated the hair in two. I did some of them in three, but you can just use like your judgement whether you want to separate it in two or three pieces based on the type of curl that you're, using whenever you're, making your wig. But this works better at the back in two. As you can see, I did the hair like two spaces apart, like two finger spaces apart and the back, you don't want to do it too, close together and bulky, because then your wig won't be like proportionate and it will look really heavy and bulky. So you want to do the back little bits, Pierce and sparks Wow, and then, as you go along and you get to the top, you will see that it will cover the back and it needs me you make. You can always go back in and insert more off the hair, but that's far, that's how I did it and it worked perfectly for me and I'm just adding the hairs. Basically, in like a stacking motion, I'm doing them to overlap the one that was done beneath it and I'm just doing it like a stacking motion. All the way across and I'll just continue that until the back is completely full. And what I like about this cap is: it shows you the sections like where the hair is gon na fall. So you know what you know: what needs to go where so yeah, I'm just gon na. Do this as complete the back and that's basically it you guys as a video goes along you'll, see that I got confused several times like I'm so used to doing the crocheting a certain way like inserting the needle downwards, while going through the video I kept going Back and forth, because it's so weird doing it the opposite way but yeah you see when you push the needs with upwards and you not it. It gives you that little. You know extra bulk that helps to cover the cap. So, that's why I think that way is best suited for doing a wig and you're. Really just gon na continue stacking. The hair, like two spaces, two finger spaces between each other and you're gon na. Do that until all the back portion to the close to the upper section is complete and then we'll move on to the sides you and once we're finished with the middle and the back section, we're gon na start at the sides be sure to start at the Base off the cap and make sure you have individual strands all the way around the circumference of the cap, so it covers and you're not seeing cap like that, and for this section guys I started splitting the hair in like three pieces. Was it this section? No, I was still using two pieces, but, as I got closer to the top, I started splitting the hairs in three, because the whole top section is smaller, like the sections that you put in is smaller as opposed to the size. So I started splitting the hairs in three, but the same thing that I did and the middle is what I did on the side and you see that side is full, so you're, just gon na use that as a guide to fill in the other side. That gets literally the same thing like it's super easy guys and what I did. I double knotted just for extra security, one I looped the crochet needle, I wrapped it around again, and then I knotted it so instead of just one loop, I twisted and gave it two loops and pulled it through and that made and the hair is very secure And guys you have to be really careful because it gets frizzy fast and you don't. You want frizz, but not like so much frizz that it looks extra crazy. So you have to like you know, be gentle take your time, especially when separating it so that you don't get too much frizz and as I'm doing the front, I told you. I split the hairs in like three sections, because the front is really smaller and you do it closer like the back was two finger widths apart the front you can now be doing like one finger width apart and it's really closer and it's more detailed because you Don'T want to be seeing the cap when you have your unit on, so you have to stack it in this in a way that you can't see the cap and that it will look full and it will look. You know great when you put it on so for the front, take your time and just do it neatly and close together. This unit took me like two hours, I believe, two hours in a little bit, because I kept like stopping cuz. I was watching something, but I think if I was doing this, you know straight, I could probably do it in an hour and a half but guys I was trying - and this was my first time - constructing a crochet wig. So you know I took my time, but for my next one it'll be way easier, because now I have the constant down and as you see when you get closer to the middle, you try to put them more close together, because you don't want the cap showing You want to ensure that all cap is covered when you're done so you're, just gon na keep adding the strands closer and closer together until you get the whole entire middle covered, and that's really it that's all you do. Your unit is basically complete and from there the other step is putting it on and cutting it and framing it to your face. I recommend putting it on your head versus cutting it on the mannequin, because your head shape and you're the face of your shape. The the shape of your face is different than say using the mannequin so definitely put it on and cut it and customize it to frame your face and see you guys it's completed and that's what my hair is looking like my bracelet over a raggedy and we're Not continuing like this at all, we about to fix this, like really really quick, so trying to pop this awake on and yeah after fighting with the poems to get them in properly. You know I'm going to go in with my scissors and we're just gon na cut the wig so for any more faces and guys at first. I felt like I cut too much off, but now I love it. I'M glad with the length that I have because looking at it like this, it's crazy. It doesn't look cute at all. It'S all over the place. Everything is on different lengths like it has no shape. No, nothing so we're about to like fix that, put the quickness. Okay - and I wanted to cut this week to frame my face, I wanted to have my eyes out my cheekbones and everything so so cut the hair, guys you're going to stretch the hair and then cut it. Don'T just cut it cuz, you cut it wrong stretch. The hair out first cuz, it's curly here and then you go in and you cut it and you cut in a downward motion. Just so, you won't have any choppy end and yeah you're, just gon na keep doing this until you frame it so you're like king and shape it as well as the ends of the hair. Well, you want to cut it in like a upward shape, so the hair has height and volume. I don't know if I'm explaining that part right, but you want to cut the ends of the hair in an upward shape, so you have height, you'll, see what I'm talking about. I don't think that sounded right, but yeah you have to give the hair shape. You don't want everything being on the same level and just looking weird, so keep watching and you'll see exactly what I'm talking about again guys. This hair is from best shop hair, and this is their crochet here and style. Well in the color 1b. 27. A does not have a style number, but that's what the hair set is say: crochet here and the color 1b 27 and I'm living for this color pattern and living for this color, and I really like this here and I would definitely recommend it. It'S really really pretty and I think it's very affordable, so you can definitely you know, pick yours up and it mimics natural hair. So well like it's the perfect twist out. Look it's the perfect like color like it's like gold sis. I really we need enough. This hair, so this was my first time trying the hair and I am NOT dissatisfied at all and I'm glad I made it into a wig. So I can have this to rock for a long-ass while cuz I'll just wear it and take it off as opposed to installing it on my hair and then I'll have to cut it out after a few days. I cannot keep my hair long, but yeah guys like isn't but curls, just like really beautiful, like. Let me know in the comments down below, if you like this and if you will definitely be trying it and that's the shape that I'm talking about guys like that was the shape. Look at that and look at that and now the other side was not cutting it honey and we're just gon na go in and continue cutting until we get everything to look like that and that's it Torrio's. Thank you guys for watching you
Comments
Ridgewood Gardens: I cant wait to try this. never did it before and you made it look so simple!
Dominique Barlow: Girl this wig is cute! I love it!!! I want to try to make one myself. Thanks for sharing
Asticia Gordon: Ever since I started to follow your IG and watch your videos my confidence and style has gotten better, you look good sis
TuTu Stokes: So cute. I will be trying that. And the color was SO AMAZING!!!
Darling Where’s the coffee?: Girl!!! Shut the front door !! I’m making this wig❤️. You look stunning
Tia Henshaw: You are inspiring! I had no idea there were crochet wig capsomg like I needed another rabbit hole
charlie Remi: Wow you did a good job I love your makeup and this hairstyle really fits you Very natural looking thanks for the video
Dora Morris: GORGEOUS. You did that. The color is perfect.
Nancy Harris: Loving this!
That_Priddy_BrwnGrl Dija: This was cauute! . I literally just bought a curly wig like this from amazon to try out the style for the first time and now i can’t wait lol. SB: where’d you get your nose ring from!?
So Anique: A summer hair mood!
Patricia Nixon: I have no idea how I ended up here but I couldn’t stop watching! Girl, you did the damn THANG. Very nice of you to share your expertise.
TEE🌱: i love it, and its super cute!
ENTITLED: Can we first talk about your gorgeous makeup and your flawless’ prettyness absolutely’ gorgeousness!
Lorraine Blake: Beautiful. X
Betty Habesha Glam: Love this and you
yoidkldk: That eye makeup is astounding!
racheline love: She talks like zonnique so beautiful I love it
Zola Mvelase: The eyeslike wow....
Victory Belongs: I like it
Trible En NNN: Love, love,love
Doreen Kennedy: Darling what type of hair did you use please? Also include your Instagram I want to follow you now
Sadangel73: Slay Goddess
Christina Munnings:
Sade Mathis: Hi! I know this video is old but do you recall the name of this hair? The link no longer works. Thx
Zola Mvelase: Is this Synthetic Fibre?
nwaobiala uzoamaka: I think it was nicer on you when it was a bit longer
AJ: the link to the website isn't working
Latanya Davis: But how does the front look when the wind blows, ladies.. you know what I’m talking about #EdgesExposed
nkiruka akwa: what is the name of the hair you used?
Margaret White: What is the name of the hair and who made it? Is it Freetress, Janet, or who?
carlene farray: 6ou are very creative
Deborah DeLaney: What is the name of the hair and who made it? Is it Freetress, Janet, or who? where did you get the hair. the site you have does not go to the hair.
Lush Beauty: Name of the curls?
cliftonmyson: I know this is a old video but can anyone e tell me the name of hair. The link doesn't work.
Ms_DarlingNikky: You can do no wrong
Michelle Robinson: Could you please provide in
Welshy Wish: Hey beautiful
Mwihaki Ndung'u: Which hair is this ??
Kelsey Stoudmire: Nice tut. Your voice remind me of Rihanna lol. Where are you from?
Vonna: What kind of hair is that