New Hair Rack For Bundle Display
- Posted on 02 March, 2021
- Braids Hairstyles
- By Anonymous
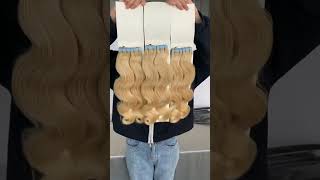
Hey friends, in this video I put together my new hair rack for my bundles to display. I used my custom tissue paper as a back drop because I didn't want to purchase a backdrop for a small wall. This rack took only 7 steps to put together and I ordered it from amazon.
Thank you for watching and supporting XOXO
The hair extensions storage bags are located here on my website https://remygirls.com/product/hair-ext...
Let's be social
Instagram:@remygirls
Facebook:Remygirls
Twitter:@remygirls/remygirlsinc (rarely use but its there)
Snapchat:@remygirls
Shop Lace Frontals:https://remygirls.com/product/lace-fro...
Shop Mink Hair:https://remygirls.com/product/lux-indi...
Shop Wigs:https://remygirls.com/product/lace-wig...
Want to collaborate?
Email [email protected]
Want to share something with me?
33717 Woodward Ave. Ste 245
Birmingham, MI 48009
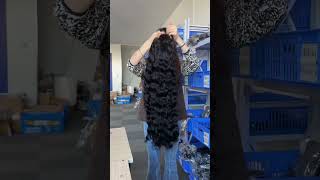
So i just got a delivery from amazon and i have a seat cushion. Oh, my hair is crazy in this video, but i have a seat cushion because i'm in my desk all the time packing orders, um chipping working and my butt be hurting y'all, but um. This is the real box here, so this is my um rack, my raw hair rack - and these are my s um, my s hangers, so i'm gon na unpack those, so you all can see them, and this is how i hang my raw hair for display. Okay, guys so, like i said um, i just got my box from amazon, and this is my um. It'S a garment rack, but i use the garment rack for my raw hair. So that way i can display my raw hair easily. These are the s hooks. This is what they're called these are the s hooks that i ordered that i can just hook my hair and hang it on the rack and i'll show you in a moment um. So this is a 30 pack that i ordered. I did the black hangers, so they can be kind of inconspicuous. I didn't necessarily want to do the silver, but you can get silver or black. I just decided to do the black, and this is the actual garment rack. So i'm going to put that together and let you see how it all comes together. Um displayed all right, so here's the box, here's what the piping and everything looks like here is the instruction sheet. So i should be able to complete this in eight steps. It should be actually in seven, but i should be able to complete this in um seven easy steps, so i'm going to give this a shot um. So, like i said what i'm putting together is the garment rack to hang my raw hair just to get out of its boxes and get it on display, because i need to take more footage of it, and so i ordered this garment rack. I'Ve seen them before, but now i want to put one in the actual space that way i can display the products a lot better, so i'm gon na give this a shot in seven steps. So let's get started so so so. Okay, so far, i would not say it's the most sturdy only because the post on the end i just had to pop back in so it was out of there, but we'll see all right comes with your own comes with the tool set. So i have so many of these l wrenches, it's not funny so instructions a is that we put these long black tubes together so they're, supposedly labeled, b and c and as you can see like nothing is labeled. So, let's see so there's 2b and there's two c's, i guess they're not labeled, so i don't understand how this is supposed to get done when it's not even labeled, so i don't know if they're the same all the same length. No, these don't look like the same length. So let me see this is crazy. I put tons of stuff together so well. I'Ve put tons of stuff together before so. Hopefully this will be kind of easy. I have three of these pipes. Three sets of these and two of these, oh and it's saying that i put my bnc pipes together. So let's see how this is supposed to go because so far it does not look like um and there's four a pipes. So i guess those are the a pipes, and these are the bnc pipes who freaking knows we gon na figure this out? Okay, nope, because this has a pipe on it. I'M freaking confused and i guess if it doesn't work, then we would just have to take it apart and put it back together. Yeah. I don't even know at this point. Something has to be like an n-type, though i would think okay, so these pipes have screwed tips on the end, all right, i guess i'm figuring this ish out and i'm going to assume it doesn't matter which way that they go so all right. I'Ll come back once i get this part assembled okay, so i got through step. One um, none of the stuff is labeled, even though my instructions say that there's seven steps and it's labeled, but it's not so got through step. One okay, guys, as i was saying this rack is supposed to have a seven step instruction to it. I'Ve made it through step, one so far, step two i'm going to put the wheels on, but so far it was not easy because it's supposed to be alphabetical ordered and there are no alphabet tabs on here. So right now i was able to put the base on. I have to put the wheels on and then kind of, build it from there. So i'm going into step two now, which is the wheels all right guys. So i have the base of the garment rack. Put together, the wheels are on the wheels are pretty easy to put on um. It has a little wrench that comes with it. Like i said so far, the issue that it gave me was, the pipes are not um, labeled, abcd and e. I mean this is a seven step process. I got this garment rack from amazon, so i'm going to do step three so step. Three are the e-pipes which aren't even labeled, so we're just gon na guess what those are and um yeah do. Step e, which is the i mean step three, which is the e pipes, put those on and then kind of, go from there. So, let's see what happens next, okay, so i got the next set of pipes on um, which wasn't bad. These um were pretty simple, except for i think i have one of my poles on here backwards and i'll show you. So this is flush. You don't see anything, but when you turn this side around uh-oh, i'm gon na knock over my box thing. These parts stick out on the outside, so i think i need to turn these around, but i i doubt if i'm gon na turn them around, because this one over here, i don't know if you can see it this one here is not locked into place and That one is a bleep trying to even get back out, so i'm just going to leave it the way that it is and put the next set of piping on it. So it looks oh my gosh, i'm about to break my desk, so it looks like i'm supposed to put this one on next, so, let's give it a shot, and maybe i sh - maybe i do have to put this one on the right way for it to Actually operate properly, so i'm going to take that apart and put it back on all right guys. I turned it around now. My pipes on the outside. You don't see the tabs anymore. I had to turn around for it to actually um install properly. I got the second thing going here and onto step five, so step five, which is the last two poles i put those on um and then put the rest together. So this is, this is pretty cool. I'M at step. Five, like i said, seven step process. Let'S see if i can knock this out in a couple minutes: okay, so it is finally put together um. These were a little tough locking them in um. Every tab said top. So there was nothing to distinguish between the top or the bottom, but whatever it's put together, i'm getting ready to um. Hang my s hooks and hang my hair. That way, you all can get a good visual of how the garment rack actually looks for display purposes. You


Comments
Iam Lashaay: Nice video where did you get the backdrop?