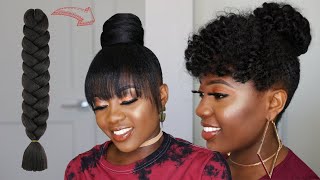
Feed In Braids With Kanekalon Hair 2020 | Kersti Pitre
- Posted on 10 March, 2020
- Braids Hairstyles
- By Anonymous
-CONNECT WITH ME-
Instagram @kersti.pitre
Twitter @kersti.pitre
Snapchat @kersti.pitre
FOR BUSINESS INQUIRIES ONLY EMAIL: [email protected]
Channel the BEAUTY within YOU
JER 29:11
Hey: what's up KP brave babes, welcome back to my channel too girl, Kirsty Petri and today I'm bringing you guys a cornrow look perfect for springtime, we're gon na be starting off on fresh and clean hair. I am detangling it right now with my Denman brush. I did also blow-dry it with my Conair, but for some reason that footage was having trouble uploading, so this is all to get after you detangle your hair, you're gon na go ahead and part your hair into three main sections. Each section is going to hold a particular amount of cornrows to you know, create this braid style, so I'm gon na show you guys what I do here when you're making your parts for your sections, you want to add gel to those parts that just helps define It then you're going to take your rat tail comb and go over this section where you put that gel and it's just gon na create a crisp clean line. That is how you create clean lines. Y'All here, I'm showing you guys a blueprint of my hair. I need to make an adjustment to that bottom part. I created, I made the part a little too low. I'M gon na raise it to right here, and this is going to give me the length that I want for the bottom layer and it's gon na give me the right length that I want for my middle layer. So, as you can see it, I did a u-shape to give me that curve and then I just split it down the middle, so I could see how everything is looking now here is my hair halfway um. I know I guys this looks like they are some tiny braids, but this is what you really got to do in order to get this style to really look its best now I could have made them a little bit bigger, but me and tension just don't do Well, so I wanted them lightweight and I kept it small, so I'm just showing you guys my hair here this felt so good, so I thought I'd insert that clip now here is where I began to panic. You guys my son was sick and had a fever and we needed food, and it was just so many things going on this evening, and I said, oh, my god, I'm gon na have to really figure out something with this top. So I was trying to do you know what I was inspired by just wasn't coming out right girl of what my hair is looking like see how my braids are starting, I'm just not really impressed with it. It could be better and it will be better next time, but for now girl, that's gon na be keep thumbnail yeah, that's cute, all right all right! Here we go so now that I'm up now that I've distributed the moisturizer through my piece of hair that I'm gon na braid. I am gon na go ahead and zoom in real quick. So you guys could see where I start and how I start so here we go okay, guys. So now we are all zoomed in so I'm just gon na start right here. I know this is a weird angle, but this is like the only angle where I can see in these new finders and still break so I'm gon na try my best. So here we go. You wan na get a little bit of gel on your fingertips. This just helps to keep the flyaways down and whatnot and you're gon na. Basically, you could start this cornrow off two ways. You can start it off with the real hair. Basically just start braiding with the real here. That'S how some of these are started, or you could start it off with a piece of braiding hair now we'll just kind of anchor it a little more. I think I'm just gon na go ahead and start off with a piece of braiding hair, so I'm gon na take so here I'm taking that little piece of hair that I created and I'm going to start my cornrow off the kind of like the traditional way. It'S just not a big as big of a knot and I'm doing this because it seemed like you know: number one. My hair was slipping with the braiding hair. I needed a little bit more crimped and when I use a knot, it helps me get a grip and at this point of the evening and this point of the style I was over it. So I didn't care if there was a knot. But after you do your first knot and your first couple: braid movements, you're gon na, go ahead and insert your next piece of braiding hair. That'S kind of the pattern with feedin braids each piece is going to gradually get thicker. Now you don't want to use a humungous piece of hair until it's time to use a really thick piece of hair. You want to start off with a really obscenely small piece of braiding hair, maybe even two. This is going to make sure that your real hair blends with the braiding hair and that you know it just looks like a really neat braid. Now, because I did do a feat in so small at the beginning of my hair and then you know it kind of got bigger, it did help this braid style come along, make sure that you guys are detangling that hair. You saw me just do right there whenever you're, inserting hair, so you insert your hair, you grab go under go under and you pull it all the way through this eliminates those little knots that you get. I don't know if you guys get those I always get them, because I don't like to always pull through, so you go under, go under pull through pull it through one more time to make sure because that's gon na slow you down. Now you grab some gel while you're braiding that corn roll down - and I did this just to make sure my real hair - was blending. It felt like it was getting dry and sometimes I can get little flyaways and I don't want to have to deal with that. So I use gel as I braid if I'd say, if I didn't put enough gel, you know when I first started braiding, I just go ahead and dip it in there and start. You know looking everything down now. That is the last piece that I added I'm going to braid every single one of these braids down and I'm gon na stop talking now and you will see some live talking get your real hair. So let me show you so I take the B alright. So now you want to make sure you actually twist the hair all right and go ahead and just apply it wherever you see your real hair, then take your rat tail comb and begin when you're finishing off your braids. You want to slow down now um. You can go fast once you've passed your hair. Well, when you are braiding, your real hair and the braiding hair together go slower. Okay, because what's gon na happen is you're not going to like really secure your hair and there there will be frizz and then those little city snips that they so slow down all right, but yeah, I just combed it and I'm just gon na keep pulling until It'S perfect, so here we go. I do like the look. It'S not ugly, but you know when you had something in your mind: oh that's smooches! Whatever, when I have a vision in my mind, you know sometimes, when I'm doing my hair half way through wrong with them. When you are doing your braids to make the process go faster, don't braid each braid all the way down to end. You want to actually just braid to your hair, just past it and then the breakdown um. This is something that I learned. Braiding on my clients is helps process just go by way faster. It'S only gon na take about 20 minutes to braid. All of this down versus all those extra minutes being added to style, while you're actually braiding, so you want to have a flow every time, you're doing a corner every time, you're doing a box where you went out flow. So this little tip right here to just braid up until you get to your hair right, you know to the end of your real hair or little Roby rapid, shine, foaming lotion, wrap it shine, wrap it wrap it up wrap. This is Luster's pink Gloucester's. I'M going to do this combo and see how this works. I'Ve never used this mess before. So I really hope that it doesn't flake up on me. Normally this kind of it's the mousse I use it's not really strong, hold or even have any shine to it. Just we'll add in the shine while the mousse gives me to hold so that's the purpose of these to the Glosser is this. Particular glass are number one. The reason I use it is because it does the job of Sheen without the sheen smell. Oh, thank you. Pink luster luster space for making this. This is a brand new bottle. A brand new bottle for a smooth, shiny and frizz free look make sure you spray the Glosser from your roots, all the way to the ends of the braids y'all. I wasn't talking about nothing. This moose smells really good, and I was just talking about that. Just make sure you rub the moose all over your hair at the roots and work it all the way down to the ends of the braids. Here'S a quick recap: I'm going to be using African pride oil moisturizer lotion from their olive miracle, collection, lustrous, pink, gloss, err to add shine and finish off my braids, I'm also going to be using Nairobi. Rapid shine, foaming lotion. This just helps to set your braid styles, throw on your satin or silk scarf, and your style is all good to go. I'M also using this braid lock-in twist gel from African pride from their black castor collection. It is a stronghold, it doesn't flake and it is moisturizing. I also used to be old miracle super hold and smooth edges Jill and it's almost gone. So that's why I dipped into the black castor line, and last but not least, here are some tools you're going to need to accomplish this same hairstyle, you're gon na need a rat tail comb. This is just one particular variety, but just make sure that your rat tail comb has the pointed end, so you can have crisp and clean parts. You need a wide toothed comb. I like to use this wide tooth rat tail. Sometimes you're. Also gon na need a detangling brush like a Denman brush that I've been using here in this video and, lastly, you will need hair clips any type of hair clip hair pins duckbill clips to keep your hair out of the way, and I use this handheld mirror And I use a mirror sometimes on my wall just to help me see the back of my head and little spots that I just can't usually see. Last but not least, I used five packs of this pre-stretched kanekalon braiding hair. This hair is very soft. I bought it at the beauty supply I used to buy packs you can find it everywhere. Thank you guys for watching this video don't forget to drop a comment down below. Let me know what you guys think of this about this style for spring. Let me know if you're gon na try it or if you've already tried this. Let me know if you guys have tried any of the products that I mentioned in this video, this one's my first time using Nairobi, and I really do like it. I will be keeping it on hand, don't forget to follow me on instagram at Kirsty, VIP tree for more braids and spa daily conversation and so much more. Alright y'all I'm out stay channeling the beauty, that's within side of you, bye,

Comments
ReJoyce K: I can't believe you did these braids yourself ....wow....your really really really good at braiding....it looks like you had it professionally done at a salon .....wow I wish I could braid my own hair like you .....
Brandy Jones: Turned out beautifully ❤️❤️❤️...I definitely going to try this look very soon. Thanks for sharing!
Treasure Bammeke: You should have a class section for all types of hair braiding
Ang: Your hair grew back quick ! God bless you !
Jen G: This came out great, I wish I could braid like this
Carla Ramos: nossa! eu sou muito sua fã, poderia colocar legenda em português em seus vídeos.
Rochelle Naturally: Beautiful!! Love the style and hair color. I'll look for the at my local beauty store. Great tips too ...... Thank youuuu! ;))
Hilson Rose: Love it! Trying this next week!
BLESSED BLESSED: Hi Kersti your braids came out really nice!!!
Yamali: I haven’t EVEN watched the video properly and after the first few seconds I gave it a like. The style is absolutely gorgeous!
Pamella Byrd: thanks for sharing I will give this a try. I did the knotless on myself and everyone loved it, thanks
Jazz, Jazz & Jace: This is beautiful and perfect for this upcoming warm weather. I want to try this so bad but I struggle with the feed in method. Adding the right amount of hair and at the right time. I’ll probably give it a go tho
Julian Kakuru: Braiding your own hair is so interesting, m trying this particular style this weekend
Kameela Lateef: I love it! I’m definitely going to try it in my clients at my Natural hair beauty salon located in Phoenix AZ
Teki Peebles: Love the style. I would have wanted more examples of the feed in. I will check your channel for a more feed in real time examples. Thanks
Kim Possible: Your skills are DOPE love how you handle your beautiful hair every style you kilz it QUEEN
Shonte' May: Beautiful as always ❤
Angel Thompson: How long did this hairstyle last? It’s soooo prettyyyy
Laydibug Tarot: Gonna try it this spring for a trip, thanks!
Julian Kakuru: I cornrowed my hair unbelievable, thanks
Krystle Esdelle: I am going to try this! Maybe this week!!
Adrii_Dream: Amazing job
China Dall: Hi can you tell me the number color braiding hair you used ? Its So pretty ❤️
Saraphinia: Soooooo pretty
Adrian Campbell: It’s cute ❤️
honorthelegend1: Great job
Nafissa Diallo: super j'adore.Merci
Shanita Green: Look beautiful...
Miss Empress: Ooh I’m tempted
rachel: Amazinngggggggg
diordiva: you remind me of a young Halle Berry. Beautiful!
iamtrinaful: #KPBraidBabes!!!!
Maya 🍓: What gel is that?
Darshell:
G K: ❤
Shaniqua Quilman: ❤️❤️
rachelmm05: Question.. If you use edge control or gel for the braids why also add the moose when the braids are done?
CKH: U should keep them all the same size and add hair earlier