How I Wand Curl & Install My Kanekalon Crochet Braids Wig | No Cornrows | Protective Styles
- Posted on 30 April, 2020
- Braids Hairstyles
- By Anonymous
#wandcurls #crochetbraids #stayhome
How I wand curl & install my kanekalon crochet braids wig. No cornrows/no leave out protective style.
Hello darlings, here is the detailed video on how I achieved these curls. I tried to mention everything I could think of to make the curling process super easy for you guys. Thanks alot for watching!
Please remember to SUBSCRIBE & hit that bell to always get notified when I post new vids. Also like and comment you find a thing or two that`s useful in this vid.... or if you have a useful tip or suggestion that you`d like to leave with me! :)
God Bless You!!! Muah!
Keep up with me:
IG: https://www.instagram.com/mariamcoreen...
SC: Mariam Coreen
FOR BUSINESS INQUIRIES EMAIL: [email protected]
Products:
Outre Jumbo Braids #2 2 packs. https://amzn.to/2uP9V4T
Curling Wands https://amzn.to/2z0Z4H2
Wig Clips https://amzn.to/2xlLMnN
Disclaimer
While this quick wig technique gives the most natural look, I do not consider it an everyday wig. Since this wig is solely reliant on clips to hold it in place, it can cause strain to your natural hair with continued use. Therefore, this quick wig is perfect for occasional wear or a few times per week.
Click the link to see other natural looking crochet lace wigs that are suitable for everyday wear.
Other Vids:
How To 1 Hour Crochet WIg | No Leave Out https://youtu.be/c46nhuEFYKc
Soft Curls Crochet Wig https://youtu.be/3qvEy85Q-cM
Bridal/Wedding Playlist:
https://www.youtube.com/watch?v=WsEEzM...
Easy Classic Bridal/Wedding Hairstyle https://youtu.be/WsEEzMMptCI
Quick & Easy Bridal Updo
https://www.youtube.com/watch?v=MTcyyl...
Feed In Braid No Cornrow! https://youtu.be/MeXRnaqWpj4
How to Sleek Low Bun https://youtu.be/C6VZ7oa3ZKg
My Go to Makeup Look https://youtu.be/xkdFPKb9J7c
Simple everyday makeup https://youtu.be/wYPO9HPuyG0
How to flat twist https://youtu.be/WAoHesfn_yU
Music:
Track: Unknown Brain - Inspiration (feat. Aviella) [NCS Release]
Music provided by NoCopyrightSounds.
Video: https://youtu.be/aCH1eyWq9B0
Free Download / Stream: http://ncs.io/InspirationYO
Song: Jarico - Island (Vlog No Copyright Music)
Music promoted by Vlog No Copyright Music.
Video Link: https://youtu.be/gZlDn4EmTvo
Track: Syn Cole - Gizmo [NCS Release]
Music provided by NoCopyrightSounds.
Watch: https://youtu.be/pZzSq8WfsKo
Free Download / Stream: http://ncs.io/Gizmo
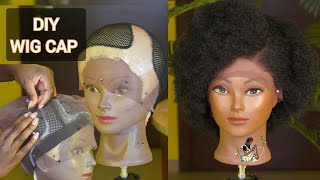
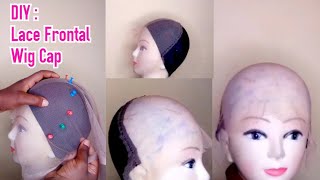
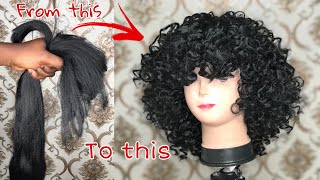
Hello, darlings welcome back to my channel, so I just want to start off by saying thank you so much for clicking on this video and thank you so much for all the lot that you guys have been giving me on the last tutorial, where I showed you Guys how I made this week so today, I'm just gon na be sharing with you guys how I want the curl that this Kanekalon crochet braids wig, so just keep on watching. So this is the here right after I finish, making the wake this, how it is looking and I just went ahead - off-camera and decided to condition it and wet it up, so it also condition it or I don't a shampoo. Well, you can, if you want to so I went ahead and I conditioned it because I had to wet it anyways, so I can do these curls. So this is how it is looking dripping wet. So now I'm taking the third biggest one from my one set and I'll be doing some one curls on this hair. So you definitely need to have to hear what, if you're gon na, be using a curling iron or any type of one on the here, because it is synthetic hair. So if it's not damp or if it's not white, it will burn and it is easier to do these curls with the gloves. But the challenge is that the hair is wet. So, while you're waiting to hear it's gon na cause your gloves to wait and that gets a bit uncomfortable, so you guys will see later on that I had to take off the gloves because it was getting way too wet and it was really uncomfortable after a While so, if you're a professional at using a curling wand like this, then you won't have any problem, doing it without the gloves. But this is my first time actually using a curling wand. So I had to be very careful, and it did take me a few times before I got a hang of it. So I said hurting up to here like this. I just put them together and use these on roller pins to hold them in place until they're cool, it's better when the end of to here is extremely wet and then it holds on to the road a lot better and as it starts to dry, you'll see It just kind of peeling away like it's happening here. You see just separates from the rod and then you know that the curls are pretty much set. So I have a spray bottle of water right next to me to keep spray me here. So as it starts to get dry, I just wet it again to ensure that it is wet enough before I go in with a curling wand. So what I realized by doing these curls is that it's better when you make it in smaller sections, like I'm using here, not too much of a big section at once, and I also realized that it was easier for me to curl the hair when it's wet Enough, but not too wet, because when it's too wet it will take longer to dry on the rod. Oh and I said this iron to 120 degrees Celsius, so guys. I must say that the curling process of this here took me a lot longer than it took me to make the entire wig. So I don't know is because I wasn't so accustomed to using these irons. I needed to get used to it at first and figure out how I wanted to meet the curls so yeah. It took me like twice a time it took to me the way once you get the technique down. It goes a lot faster and it's a lot easier. So, as you guys see right here, I'm doing it without the gloves and I'm just being very careful not to get burned while doing it. So it started to slip a little bit because the ends were a little bit too dry, so you might need to go in and spray the ends again. I'M taking down the pins and I'll be going in with my got to be glued hairspray and I'm just gon na spread out just to make sure the curls are nicer and hold a lot longer in place. So I load the spray it'll just dry into the here for a few minutes and then I'm going in with my fingers and separate the hair. So now it's time for the installation process. So I went ahead and I added these clips to the wig and I did four clips right at the front section of the wig and I'm just going ahead and just clipping that into my natural here and I did not corn on my shoe nor nothing. I just I just had my hair in two plots and I'm just installing the weight to it, and this is how it is looking. So, I'm just going to know and shaping up to here a little bit and I'm really liking how it's looking. Now it's looking really natural, like I just have in regular crochet braids to my natural here or yeah. It looks like a full wig. It just looks really natural so guys. I really did a bit of experimenting with this week before putting out this video. So I worried this week for about a week and a half, and then I decided to go in and change these clips. So um the extreme front of my hair near to my hairline the here. There is not as dense as the here further closer towards the middle so because the front of my hair is not so dense, I decided I'm gon na go in with our much looser clip. That would be a lot safer on my hair, so I'm gon na be using these clips instead and I'll be linking everything in the description box. So I took out those four clips and then I just inserted four of this type. Instead, this hole a lot looser and it is a lot less pressure on the here. So the thing is that, with these clips, you are gon na need to put a twist or a plot or something there to hold them in place where they don't move, because you don't wan na put them there to keep sliding down and before you know, if You have a really big party at the front of your head, so you're gon na need to put a flat twist here and it's still a super easy technique. You just insert these clips on underneath your flat twist and you're good to go and feel free to put arm clips at the sides or at the back. If you wish to. If you're gon na put up a size, you can put these longer clips and if you're gon na put at the back, you denied effort and easy use or shorter clips, because the longer ones are not going to necessarily hold into you here. When you put those at the back, they tend to kind of slide I'll, because I did try them as well. So this is how it is looking guys. This is how my party is looking nice and natural and they're just really pretty, and I cannot even feel that this is on my head. I legit cannot feel anything cause. You know this here is extremely lightweight and I'm not feeling anything tugging on my hair. It just feels really relaxed and comfortable for me so right here, you guys can see that there is a black thing showing right near to the parting, and that is the fabric from the click that I just stitched in. So this is it after I have stitched clip completely to the hair and not just stitches at the ends. So this is it for this video guys. I thank you all so much for watching, and I really hope you guys found this video helpful and if you did, I would really appreciate it. If you give it a thumbs up and share it with a friend leave me a comment, and I will see you guys in my next video

Comments
morbid dom: I love this idea!
Oosha-tuna-bagel: Just beautiful. This is a really nice look for you.
Max Elisabeth: Lovely
Ines Augusto: Well done sis
Skyler Lewis: Mariam, love the accent by the way sounds a bit Caribbean. You’re a life saver with these videos. They’re cost effective and the installation process is very quick. Love ❤️ from JA
Barbra: Can you do a video of doing straight crochet hair
cuisine ifada: Slt halo pelize abonné cuisine ifada