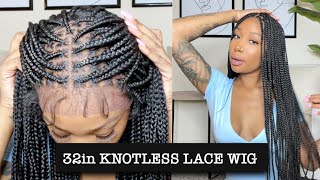
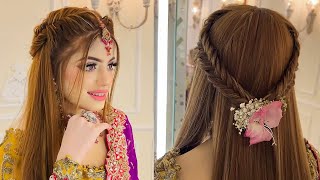
Butterfly Halo Braid Tutorial | Wedding Hairstyles | Crown Braid Hairstyles |@Tatiaunna
- Posted on 07 September, 2021
- Braids Hairstyles
- By Anonymous
#HaloBraid #HaloBraidonNaturalHair #Weddinghairstyles
Fall Season & Wedding season is near! TRY THIS BUTTERFLY HALO BRAID HAIRSTYLE today! This braid style is a great WEDDING HAIRSTYLE & the everyday BRAIDS HAIRSTYLES ON BLACK WOMEN as well as ALL HAIR TYPES ! HALO BRAIDS are also called CROWN BRAIDS . This fall and wedding season is the perfect time for a braids updo !
I hope you enjoy this Butterfly Halo Braid Tutorial
Please like this video !!!!! Comment below!!
Share & join the journey and S.U.B.S.C.R.I.B.E @TATIAUNNA
Hit that NOTIFICATION BELL to be the first to know when I upload a new video!!!
POST NOTIFICATION SHOUTOUTS ARE ON THE WAY!
Thank you for watching this HALO BRAID TUTORIAL!
__________________________________________________
CONNECT WITH ME ON SOCIAL MEDIA:
Instagram: https://www.instagram.com/_tatitv
TikTok: https://vm.tiktok.com/ZMRP2oemT/
Age : 24
Location: Florida
Camera : Sony Zv1
FOR BUSINESS INQUIRES ONLY PLEASE EMAIL: @[email protected]
Music by : SouthStreet24 - Media
__________________________________________________
CHECK OUT MY AFFILIATE STORE for all products used In today’ s video!!!
Check out this page from T A T I A U N N A https://www.amazon.com/shop/tatiaunna?...
Thank you for the support & shopping on my store
__________________________________________________
#BraidsHairstylesOnBlackWomen #halobraidhairstyle #weddingupdosforlonghair #shorthairstylesforwedding #weddinghairstylesforshorthair #weddinghairandmakeup #snoopdoggbraids #boxbraids #crownbraidhairstyles #howtodoacrownbraid
Hey babes welcome back to my channel. I am tatiana, it's been a minute since i did a tutorial, but in today's video i'm going to be showing you how to do this. Nice and full halo braid, be sure to like comment, share and subscribe. Let'S get right into it, i'm going in with my paul mitchell serum before i press my hair out. This can be done before you actually blow dry or after you blow dry. You just want to make sure that you have that protectant serum on your hair before applying heat. So before we get started, i'm going to be sectioning off my edges as well as the very front of my hairline. This is going to help me to create a really dramatic baby hair effect right here. I'M just sectioning my hair off like halfway, because i just got a nice amount of hair and i'm just going to be softly. Pressing my hair out now, i'm flat ironing my hair, because my hair is not all the way long enough, yet even when blown out to actually put into a low ponytail. So i'm giving it a soft press just to be able to apply that ponytail in the back molding my hair into a low ponytail, i'm just going to be using some of my got to be spray just for the very top we're not going all the way Through the hair, because it's not needed, this is just going to be used to really help create a nice low slick shell to really give it a nice slick. Look in the end using three to four large rubber bands. I'M going to be now creating my little ponytail to make sure that my ponytail is nice and even i'm going to be going in one more time. With my got to be spray and my fine toothed rat tail comb to make sure that my ponytail is completely even and now i'm just going to blow dry in a downward motion to make sure that the ponytail is nice and hard on a high heat temperature. Now, for this braid i am going to be using some model model is 72 inch, but really, i guess, 36 inch braid, hair pre-stretched and i'm actually going to be using two out of the three bundles. So i'm not taking the rubber band off. I'M going to be using the loop right here that is attached to the actual bundle, and i'm going to be wrapping that around my actual ponytail. Now that we have the ponytail wrapped, i'm going to go ahead and flip it to the very top. As much as i can holding it in place and i'm going to be now going in and we are going to start creating our long braid, i'm using some of my shine and jam by magic fingers to help create a slick ponytail and to avoid the hair. Getting super like tangled up during the braid, so i'm creating my three sections and i'm also going to be feeding in about four pieces from the actual second bundle. But i am using the entire bundle. I just split it into four pieces depending on the size of your head. For some you may not need to use two bundles. So just beware myself. I actually did need to use two bundles to make sure that i created a long enough braid to be nice and full to wrap around completely and be full when creating your braid make sure that you're not braiding so tight, because we are going to be pulling The braid, apart to really create that really butterfly petal, look so make sure that your braids are not too tight, because you don't want to make it difficult now that we have our long braid at the end, we're just going to place a clip at the very End just so that it doesn't unravel, and now we are going to start. I started at the bottom and i'm working my way to the top and we're just going to be pulling the braid apart, like each section of the braid as wide honestly as you want. It i wanted mine to be pretty wide because even in the end, i actually wound up stretching it out even more because i wanted it to be nice and dramatic, and really big and fluffy. Until you'll reach, hey once you've made sure that the braid wraps around your head and it's nice and full you're going to sew the end with a rubber band and you're going to cut off the excess hair. Now moving on to our baby hairs. What i'm going to be doing is curling my complete hairline as well as my edges, with my babyliss mini flat irons, i'm curling it to really help create that dramatic baby hair effect and to guide each curl as to where i want it to go. I'M going in with my black edge control and as well as my edge effect they're, both by the same brand and level five, and i'm just going to be applying that completely across both products. And then we're gon na be sweeping our baby hairs to make sure that my baby hairs are nice and slick and they're going exactly where i want it. I'M using my fine-tooth rat tail comb. It is great to use for my texture, hair um. Some people use toothbrushes that just does not do anything for me, but, as you can see, of course, when you swoop you still have hair left over when you comb that back make sure that you're taking your time, you don't want to dig into all the ponytail That you just did because you don't want to mess up the mold, but look at those baby hairs, though i'm going in with my got to be spray one more time and i'm gon na blow dry on a cool setting to make sure that i am breaking Down the edge control product and we're getting it nice and cool, and then in the back, i'm going in a little bit with a mixture of hot and cold. Now i am going in one more time to really really spread out. My braid. I want it to be as big as i can possibly get it so now i am going in and i am teasing each section of the braid and i'm just pulling it out as much as i can now after wrapping it around i'm going to go in With a large straight pin - and i'm going to be using about three of these and the first one i'm going to be using, is in the very back, i'm going to be pinning it right above where you can pretty much kind of see like my little bun Back there, when i started my braid, i'm going to be laying it right on top and i'm going to, pin and now that we have that pin the remainder of the braid. I'M just going to tuck right underneath the rest of my halo braid and then i'm going to pin that section connect it a little bit to that braid as well as my hair. Now that we have it on before i pin my last section. I'M gon na go again and tease some more because when you stretch it out and mold it, it just doesn't get as big as you want it. So i am now going back in and making sure that it is as wide as i want it to get to secure the front section. I'M going to be going in with another large straight pin and i'm going to start from the very back underneath that braid and i'm going to connect it to my actual hair to slick the nape area. I'M going to be using some of my edge effect edge control and i'm just going to be combing it up and tucking any extra with the end of my rat tail underneath my braid and there you have it. Ladies look at how nice and neat and elegant this halo break came out like this is so pretty it's definitely wedding hair, definitely just your everyday style as well. It'S really quick and easy, and it lasts for like a good week, or so i hope you guys enjoyed this video be sure to please give it a like comment share and subscribe. If you haven't already join my channel join the journey also be sure to turn on your post notifications, because i do not want you to miss out on anything that i post so yeah. I hope you guys enjoy it. Follow me on instagram my underscore tattoo tv, and i will see you babes in my next video now. If i wrote you a love, no make you wan na change.
Comments
Nicole Flax: This style is beautiful on you I really loved this look it's so timeless to me. Keep them great styles coming girl. I can do this fo'sho!
Metro Customer: Love everything about you from your confidence on your hair texture, edges to your sweet personally. Fuck the haters!!! Also I love how you're able to create these different styles that were at one point in time bad and you just bring them back so naturally where there's no pressure to try to look like the next person but use the style to be the very best beautiful version of yourself that you could possibly be! With that being said sis let's talk your babe needs a lesson in feed in! Please and thank you!
Lashawn Robinson: Oohhh this is really cute!! I love how all of your hairstyles look so easy to do!
APeachy 1: When this style first hit the scenes I was rocking it like crazy... mainly because I hate combing my hair also it was cute on me. Now this is the upgrade version and I'm in love with it... it's so neat and you look so pretty with it. This has inspired me to start back wearing it again... after a fight with cancer...blood infusions and losing some hair I had to wear wigs... I'm a up do girl through and through... I love your videos and want to try everything you do...one day I will ...tfs❤️
Angela Collier: I love it! So when I finally get married I’m coming to u for this look!
Black Girl In Iran !: Always love a Halo braid! You look gorgeous!
Nicole Kemp: Sis this is so pretty as usual.. love it
Sunrise Naturalista: I love this Tatiaunna!!
Queen Irene Mckibbens: Hey Sis! How are you doing on this blessed Tuesday evening and love how you done your hair it is beautiful
18missem: Yes! Been waiting since ur preview post yesterday! This style is gorgeous! ❤️
Kellee Mcfadden: Love it. One of my faves. There som much you can do from here. Add curls waves. Or just leave it. ✌❤️
Renetta Thompson: Love it so pretty and easy I'm in a wedding in March 2022 this gonna be my style
Chillin With Nicole: Thank you for the video. I was wondering if you were gonna do this one. Very cute
Monica Morgan Neville: Absolutely gorgeous
It’s Poppin’ Lipgloss: Thinking of doing this for my baby shower next week I love it
Maydell Savoie: Love it!!!!
tiesha murphy: Love this ❤
Toshyamona Moore: Beautiful!!
Tinta Manengu: I've been waiting on this video... you really know your stuff.
Sharon Harrison: How Lovely! ❤
Keisha La'shay: I ❤it every style i have been doing on myself i do from watching your videos thanks beautiful❗❗
Shonneta Williams: love it
my food for all: Beautiful hair style
tammy king: Beautiful
ms_jblessed:
Leslyne: My next hair do for next week
valav0406: Super cute
Shantey Allen: Do u have a perm or is that on your natural hair?