Create A Closure Using Your Weft! Handmade Closure For Your Full Sew In Weave Installation
- Posted on 23 October, 2016
- Braids Hairstyles
- By Anonymous
I recorded this video WITHOUT the intention to share as much as I did in the editing process. I am sharing some of the solutions to the questions that my students ask the most. I am DEEP in thought when installing extensions and since no hairline or head shape is the same, certain variables must be considered with EACH client. This is only the beginning of my narrative uploads. Thanks for sharing with me how much y'all like my country accent!
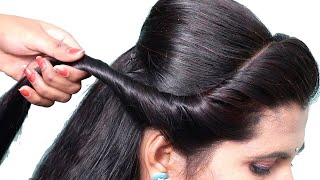
Patience skins were doing a full sew-in. Today, my client, Sylvia say hey Sophia's, gon na have a side, bang dad he's gon na cover. Well, actually it's not gon na cover any of her eyes. She says she didn't really want it in her face. So you guys know what a full so and that's a little bit difficult to try to achieve, but we're gon na get her as close as we can. I'M gon na start braiding her hair up over the right side and I add a little piece of synthetic or human hair to the beginning of each braid. I don't put enough hair into it where it extend out throughout the length, because I don't need the extra bulk in the braid. But I do like to create a little bit more strength at the beginning of the braid. So we're going to go all the way around and I like to go over the occipital bone for the first braid and then, when I continue with the classic, be half back, I'm just gon na go over the braid. I know you've heard me say this too before, but when I'm braiding I'm concentrating on staying as close to that hairline as possible in the front and around the circumference of her hair when your hair grows, it grows back off your forehead and in the back towards The nape it grows up so you'll essentially end up with the Sun wind sitting in the middle of your head. If you keep it in longer, so that being said being that this is a full sewin, it's gon na rise back off of her forehead the longer she keeps it even so, the closer to the hairline, the better and the longer it'll look the best. It can. Look - and I always say the braid pattern - is the foundation of a great Sonia. So, as I'm braiding this up, you guys can see that that first braid, that I did that's going over her occipital bone is actually keeping me balanced. It'S separating the top crown of her head from the back mate. So when I'm sewing my hair in in rows, I'm going to make sure when I get to that row that I'm measuring and I'm balancing out that it's completely even on both sides. I'M also coiling the tail back inside the part lines and I'm sewing it down, so you don't have any book right there. You just hide it within the Park lines, so I always use the soft net. When I'm doing my extensions, it comes standard in my service. I use a Hartnett at the client request so right here at the intersections of the hair, that's closer to the O's at the side temple you see whether the braid that I put across the occipital bone intersects with the bright that's coming around the circumference. Those are my stopping and my starting points, so you see, I started the right there and I stopped it on the other side, then I'm gon na rock it back and when it gets back to the right side. That'S when we're going to continue that Trek towards the face, so everything is symmetric here and everything is designed so that I don't have to create these stopping and starting points myself. I can see it, I can apply it and it makes my job so much easier and faster when your roadmap is already drawn out for you, this method is pull and tug and a blanket stitch, but this is how I turn my corners without cutting my tracks. Okay, so every time I get to a hairline piece, this is what I really want to do: you're gon na sole the track underneath the braid by looping the track under the braid. If you can see, I'm not doing a blanket stitch here, I'm hiding that track and then I'm gon na it's creating a little cubby up underneath the braid. So when I flip it back, it's tucked the way up under there. So I don't have to turn around and stitch it a thousand times to secure it. We will be cutting Sylvia's hair in layers. So when we're come in layers, it's important around the face, especially around the temporal area. That'S where your length and your vote, your your weight, is going to come from in your overall look. So you want to make sure that you have enough here in the temporal area. That'S going to accentuate the hair that you want around the face! Being that it's cut in layers, you can actually lose that hair in the layer cutting process, so we want to make sure we're accountable for their hair again. This is me getting ready to turn another corner. You notice, I haven't cut any of my trick. So every time I get to the face, this is what I'm gon na do just to make sure that when they hit the wind blows and her hair blows back off of her face, you don't see a visible braid and you won't see an obvious trick now. I'M gon na rock this method in her bang area. The same way, I did the hair around her tempura area on her left side. Now I did that on the right side too, but I only showed you the video of the left side. So we have the hair in now and I apologize for the friend issue, but we're just gon na rock that hair back in a bang and we're gon na build that front right side up as much as we can and then we'll continue. The circular sewing pattern. After we establish the heaviness and the weight in her bank, you, okay, so some of you seasoned extensional lists out there are probably trying to figure out why I'm not locking my stitches like every stitch, like some of you do, and the reason is because I only Like my stitches, when I'm about to run out of thread or when I need like a hard turn anywhere, but if I'm just doing smooth circular transitions and everything is laying like, I wanted to lay there's no reason to double knot or to lock each stitch that You do I don't get it. My stitches are um. I really fight together, they're, not going anywhere, and I don't have to lock them all. I do lock, like I said when I'm ending a needle the thread of a needle I'll go ahead and lock it or if I'm gon na hit a hard corner, then I'll go ahead and lock it now. Everything is braided up until you really can't break that circle anymore and then what I do is I take go ahead and lock that that stitch in the remainder of the thread I'll go ahead and eyeball and kind of measure out my circle that I'm gon na Pop into place, and then I begin to stitch it together, it's still attached to the hair. At this point, I'm not gon na normally don't do like a separate. I guess closure handmade closure piece. If I'd know I just keep it all connected. Like y'all see, I don't like to cook in me tricks so I'll go ahead and stitch it together, so it pops in nicely and then, when I pop it in I'll figure out the center of it I'll, spread it out so that the sit so it sits Evenly and that's how I know that's where I'm going to secure it. So, as I begin to get secure, this handmade closure in you're going to take the needle, which is still attached to the piece which is still attached to the hair and you're going to go inside the center of the closure piece. So when you go inside with the needle you're gon na come out on top, your job now is to go back inside that same hole, come underneath a couple of the braids north, then you're gon na turn around take that needle back under that same hole. If you can back to the center of the closure okay, so now you just locked it in north and you're gon na do the same thing South. So go back in that same hole that just came out of and now you're gon na go south. So go back in again, say well, try to hit the center of that closure piece so now, you've locked in north and south. So at this point, you're gon na do the same thing for east and west right, like I said same the same part of the closure you're gon na go in through the center you're gon na. Take it under a couple of braids to the left, I mean I'm sorry to the right, then you're gon na, go it back in that same hole. If you can't, it's not gon na, be the same hole, but you just want to get it closer to and now you're gon na go west making sure everything is secure, go back in and make it come at the top. So at this point, sometimes with some types of hair is not all the way going to be secure. At that point, I put mine my thread, so you saw me sewing with the thread folded over to two strands. At that point, I'll go ahead and cut the thread in half and I'll be sewing northeast, northwest southeast and Southwest just to secure in all angles. With the single row of three and now she's getting cut, we use a razor to cut it. Just blends it blends layers a whole lot better. If you use shears being that you soak this in in rows it the best haircut, is still going to be choppy because the hair is in rows. So what you want to do is you want to use a razor, a feather razor, and then you can go in with a texturizer and you're going and point cut some extra hair that may not have um. You know gotten cut the way you wanted it to now, you're just going to detail around all the flat pieces. You all know that when you have extensions, there's like a one inch, I guess a one inch piece of hair around the left on each on either side where they felt the hair just to stitch it on in your closure piece and on your part line. You don't want that hair sticking out, so I just cut all of those little tiny pieces off now we blow we blow Sylvia out and I just went ahead and curled her a little bit with my curling iron. She did not want any tight curls, but I didn't want it straight so cuz she, you reused this hair. This wasn't brand new hair, so I just put some really really really loose curls in it, so she can have some little movement body and she absolutely loved it. So here's the final look. Thank you for watching. While I have a minute I just want to. Let you know guys I'm working on a store, and I want to bring you some quality equipment, quality tools and quality salon apparel, so check me out. Thank you.


Comments
AKIYIAKELLY: love the braid pattern
Kay Bae: I love this braid pattern. I absolutely understand the importance of the horizontal braid in the middle.
DENISE MONTGOMERY: It's amazing how you keep the braids the same size and your braid lines are always straight. Your work is always perfect!
Dana Wilson: Love your tutorials, and I especially love your country accent!
marsalle richardson: I absolutely LOOOOOOOVVVEEE your work!!! I had the opportunity to see u work LIVE at the BBHS this past August. Oh and yes I did purchase some of the Kirk products AND LOVE THEM! Very informative I've learned alot from your videos, I thank you! God bless u!!!
Amechi Mogekwu: thanks alot for the tutorial ..twas really helpful great job
Amechi Mogekwu: thanks alot for the tutorial ..twas really helpful great job
Tori_Tore_Tee: once again appreciate the tutorial l much for this ☝ she looks Fab!
Tina Hall: I love your videos. I wish I could have that done to my hair because a perm won't work in my hair. See I've got fine blonde hair, I can curl my hair they don't stay without alot of hairspray but it still comes down. This would be great for me but I would have to do some research on it.
LA Plenz: your braiding is flawless
Zoe Anghel: i love it i want my hair like that
adwoa boateng: Great work
tee sea: ive been stuck in the bed on the toilet on the couch watching your videos..thank you so so much..I dont have a job but been working at home doing hair..thank you for the tips..no matter if I didnt learn anything I enjoy watching and listening
M Bell: nice job..keep up the good work
Punchress Barfield: how you you do the braid pattern if you left out hair for a side part. i like your method
Dedra Simmons: Where is your salon located? I need a stylist I can depend on! BTW - Love your videos!
Jakira Mou: How long does it normally take to complete a sewin? How long shotlbut take someone to braid down ?
Carmon Pettigrew: FABB! thanks for sharing!
Jennifer Berry: Yes, nicely done.
Tanika: perfect
Laviana Hampton: Great video
Dosalyn Smith: do you have a video for the different sew in techniques? if you dnt mind teaching tht
Mahogany Coy: You did that hunty yassss!!❤
Yvette Saunders: don't worry bout competition they still need the skills.your are in a league of your own
Shica Solomon: I so appreciate you
Star Hamilton: Training your competition ? Girl u can show these girls how to do it and they still gon get it done by someone else lol .
Yvette Saunders: nice thanks for sharing
Yvette Saunders: you welcome boss chic stack your paper. Have a happy and prosperous New Year
Abigail Gage: where is it shop located?? i want u 2 do mine!!!
Jakira Mou: You are officially my bestie lol
Ikkey73: Nice
Brownocean: Your technique is nice but the finish product wasn't that good.
Jodi_ann876: Impressed
Jaqui Lockett: I love you, amazing work. However by you pulling on her edges, girl her edges Will get thinner & thinner & thinner until they will be behind her ear. Just saying. You can achieve that same look with a wig. Now, so's not to mess with your coin, perhaps you can suggest to your client to take a break from a sew in for 6 months, rest her edges and create a wig for her. A custom wig to her liking during this resting phase. Again, no shade, beautiful work, I love you but her edges are on their way out the door.
Shawn Hart: where are u located I'm going to need a stylist because mine is moving
Deborah Walls: Girlllllllllll...... alright I see you .. where are you located