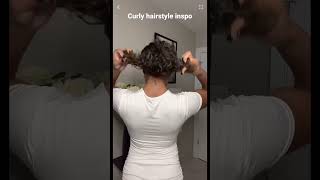
Step By Step Curly Bun Tutorial | Natural Hair | Lyasia In The City
- Posted on 10 June, 2021
- Curly Hairstyles
- By Anonymous
Here's a step by step tutorial of how I get all of my thick curly hair into a high bun. Everything I used is linked below
Satin Scrunchies - https://rstyle.me/+GXkfZuneNa78U-5lJSD...
Pattern Styling Cream - https://rstyle.me/+iaY3lZdzgGFmfk3r_qW...
Pattern Strong Hold Gel - https://rstyle.me/+r5MXGbCHSaatGm8cv1t...
Hey y'all welcome back to my channel, it's your girl, asia and i'm back with another video. If this is your first time here make sure you hit that subscribe button before we go any further, if you're an og around here, welcome back boo glad to see you, so today's video is gon na be of this super cute curly bun with the little tendrils. I did this style a few months ago and when i was posting on instagram stories, i got so many compliments and so many people asking how did i get all my hair up into this bun like this nice and sleek, and you guys seem to love it And it took me a long time to get this video out, but better late than never right, better late than never oh yeah, let's just get into this video, so you can see exactly what i do to achieve this look so that you two can look cute With the curly bun, let's go so the products i'm using today will be the living proof, restore repair, leave-in been loving this and then i'm using the pattern product so i'll, be using the styling cream for my cream moisturizer and then i'm using the stronghold gel, because It'S that slick and snatch gel and this gel is so bomb i'm really out of it. So hopefully i have enough to get me through. So for those of you who aren't new here, you already know that i wash my hair in four sections, so i always start any style pretty much with my hair separated like this, but this works even better for the way i'm doing my hair today, because i Am breaking it down in sections, so it's already kind of separated off it doesn't have to be even like the parts are not even at all, it's just literally separating to four. So i'm starting with the front sections first, because i just think working with the front. First is easier and it gets your position and everything exactly where you need to be, and then the back can come after so my hair has been freshly washed, it doesn't have any product in it right now. My hair is getting so long. I'M also in need of another trim, which i thought i would have gotten one by now, because i said i was gon na try to get trims like every three to four months and now it's already going on like five months and i still didn't get a Trim but i'm taking my rat tail comb and i'm gon na just part out the little tendrils that i'm gon na do for this style. If that's not your thing, and you don't like that and don't want to leave that hair out, obviously you can skip this part and just focus more on the ponytail bun and really i'm just taking the smallest amount of hair like i don't want this to be Too much also y'all know i have this issue with like elasticity on one side of my hair compared to the other. So when i do these tendrils, it's likely going to be uneven, but also i don't care hold on check me, though all right, so that's about as good as i'm gon na go with that simply because i don't feel like driving myself crazy. So i'm just gon na take the two pieces from each side and i just twist it away, which i already messed up, because i didn't put my leave-in conditioner yet which i should have done that before this, but remind me when i get to this part. To add leave-in conditioner, so just taking some leave-in conditioner and just gon na kind of work that into this little section here, braid my hair down some all right. So i'm just going to add the cream to my hair because we need the hair moisturized. I'M taking this pattern brush that i have this is my shower brush and i brought it out instead of using my denman, because i'm low-key really hooked on this. It'S been my shower brush for probably over a year now, when i first tried this. If you saw my video when i um reviewed the whole line, it wasn't my favorite. I was kind of like whatever, but then after that, i started using it and i never stopped so and then for a style like this, when you want to be able to brush your hair, make sure it's combed all the way through for a ponytail. This has just been the best thing so now that i already moisturized and detangled the hair, i'm going to start adding the gel and then now we're going to start placing that, like first half of the ponytail, i hope i have enough gel for this okay. So i take a good amount of the gel because i'm probably going to use a lot i'm going to use as much as i can. I'M going to start with smoothing it out here in the front first right like this and then really focus on those like edges. Obviously, because you want that to be nice and slick you can take your like comb or denman or whatever you use to kind of make sure this part is again tangle free. So now i'm just going to take one of my scrunchies. I like using these. Like long ones - and i just double them, so i'm going to put that on my wrist and then i'm taking a brush. This is a harder it's kind of medium, but i take a hard bristle brush first and i also have a softer one. So now it's time to start placing it and work those arm muscles. I shouldn't even be doing this because my edges are not cute and now i'm just starting to find the spot that i want that i feel, would be the best spot for this. I'M gon na take my this is my softer brush. Should try to you know, slick it a little more alright. So now i think i'm ready so then i'll take this scrunchie like this and then try to make sure i can keep it as centered as possible, which a lot of times is hard because i always shift it and it's always a little slanted, and sometimes you Can fix it? Sometimes you can't, but yeah just keep wrapping it as much as possible. Try not to pop your scrunchie girl, because i've been there and i'm praying that it doesn't happen today, because i don't know how many extra i have to make up for it. So, oh geez, okay, all right, i think that's it pull tight ciao, but i do want to make sure the curls are somewhat defined here. So i will just kind of separate this a little bit. I already put enough cream in it, but i will take some gel and kind of go in with it to really like try to smooth it out just a little to start just giving the curl some definition and some hold. I actually should add some water to it, because you know things work better on soaking, wet hair for me at least, and i'll basically just repeat the same thing over here to this section. The easiest thing to do is to oh, my gosh really is to try to like kind of section it off in a way, okay, so um. I thought i had my other satin scrunchie in here all right, so this is the satin scrunchie. I use this when i pineapple my hair, like to sleep and for all this stuff, so i'll link it below it's from the company slips. I think that's what they're called slips and i have like three of them. I love them. They'Re, really good and i'll. Just um link it below if you're interested and looking for a satin scrunchie. So basically the back is literally the same thing that we did in the front. Oh i'm going to my quinceanera, like my quincy, oh my gosh, alright! So now that i have my leave-in my cream and i detangled each section now we move on so this is where the gel comes back again, i'm gon na take a good amount of that gel and then i'm gon na start on this section back here and Kind of work it into the back, but then also grabbing it like this and kind of rubbing it through. But again you want to focus on the back. You want to focus on that kitchen because i pick at mine a lot. I don't know i have this. Like anxious, like this kind of anxiety or nervous kind of thing with me, and i like roll and twist and play in the back of my hair and it breaks my hair off so i hate how the back of my hair looks because of that, i'm trying. So hard to not do it, but i don't know it's just some kind of like anxious, tic or some kind of thing that i just do like. I could just be sitting there having a conversation, and i play with the back of my hair, which is not good comment below if you have some weird little thing like that, but that's what i do so. My back here needs extra gel extra, loving to really slick it, or else she looks peasy and not cute and broken off in short and overall again, not cute. So now that i added the gel i'm going to just pull it all up like this and then take my brush this like pattern, brush comb brush to try and make sure that it is smooth as far as in fully detangled. Still, as you go up again, that's important because you want it to look nice and slick and not bumpy and lumpy, so you want to make sure that it's detangled and then i'm gon na take my harder brush and now also go in and smooth that out. You may have to switch hands and now you'll see that your ponytail is going to start to meet with the other side, obviously so be careful when brushing, but also try to gel it together. So you don't leave a harsh part which i doubt that will really happen so now. I have to remove this that i did just to get it out the way i'm gon na take a second scrunchie. Remember like the long one where i just kind of fold. It in half i'm gon na take that i have the hair smooth, i'm going to pick up the front, ponytail, hair, okay and have that in my hand, all together like so i take that scrunchie and i go right at the base and now i'm including all Of the hair into the scrunchie this time so bam. Now you have a ponytail on top of your head now. The front part that we already did will fall to the front, but now you kind of have to distinguish what was the back, which you should be able to tell because you'll see that separation in like in hair, and you can tell what you did already okay. So this is my front hair and this is all of that back ponytail hair. So, like i said you just repeat those same steps, so i'm going to separate it and then go back and add some more gel to smaller sections and kind of brush through and detangle it and just define the curls yet again, okay. So this is how it should look at the end. This is when i would take this little twist apart. That now kind of did like a little twist out, but this is when i'll take this and separate it, and now i'll start adding product to this. So i can create my little tendrils, so normally i would have added the product to this. When i did the other part, i wouldn't have sectioned it off first, but then i forgot so i'm gon na just take some of the leave-in and work that into both of these sides here and then i'm gon na take my spray bottle, so i can wet It because it has started to dry and we want the hair to be wet, i'm going in with the little bit of the cream, because we still need this to be moisturized. So i'm taking the cream and kind of work that through and i'm going to add the gel from the roots all the way down to the bottom. I'M gon na smooth out this little part here kind of pushing it and flatten it out to the side that way it kind of stays more on the side of my face versus constantly falling from the front. So i'm gon na do that and then kind of literally just work it down to where it's like plastered. Almost it's just like a straight line, flatten it down and then just leave it already. This is curling up a lot so i'll, probably let it air dry for a little bit or maybe i'll diffuse it. So i can hurry up and be done before i go dry it. What i want to do is take like a scarf or any kind of thing, so we can in the process of drying our hair. We can get keep our hair down and nice and slick with a scarf. That'S always the trick if you need to flatten something and smooth it out, just throw a scarf on so i'm gon na do that before you do it, i would say if you need to add a little more gel to something or try to like just brush Up something and touch it up: do that first yeah. So basically, it's just to kind of keep the back flat and covered so that hair isn't constantly rubbing against it, causing it to like frizz up and then also it'll, just kind of keep this top flattened. And then your little tendrils are out. If you have the tendrils out and that's always easy to add more gel to it so now, i'm gon na go diffuse. This hair some well fully, so it can be nice fully dry and then i'll come back and refinish the rest all right. So i'm back and my hair is dry, pretty much fully dry. I mean there's some parts literally right in here where, like the scrunchie is that's still damp, but you don't really have to worry about that. It'S really about making sure the bulk of this is nice and dry, so you get a nice full. Looking bun, my hair feels like i had a lot more shrinkage than i did before, so it feels a lot shorter than what i remember. I don't know my hair feels shorter, so that's a little concerning about how this bun is gon na come out. I don't know, but whatever we gon na go with the flow we gon na rock with it. Whatever we get is what we get as you can see my little lopsided like look how springy my hair is on this side. That'S how my whole head is on this side in the front and look at this, and it's not that it's cut differently because look when you stretch it out, the haircut is even it's just. I have more elasticity here on this side, so that's bothering my ocd, but you know what she's gon na still be cute, though i have some bobby pins on deck. I believe i was using um this kind of bobby pin. Let'S do the bun, when i do my buns, whether i'm doing like a half a half down top knot or whatever i like to keep the hair pretty much spread out, um and then i'll start i'll. Take one side like this and then start to roll it. As i go around and picking up hair kind of with my hand just to kind of twist it and my hair feels so much shorter in this bun right now, unlike the last time, okay, so i'm going to grab the hair and try to twist it. Oh, no, it's shorter and grab the hair twist it you may need to twist the whole bun around just a little bit and now this is when it's time to start adding those bobby pins, especially if you feel like you, don't have the length to really fully Wrap it around and like tuck you're gon na need your bobby pins so that you can start pinning things in place so right now hold on. I'M gon na hold the back and start taking bobby pins and just pin away. So wherever you see pieces that seem like they're going to keep just popping up and out just pin those oh gosh, all right, um, i'm gon na start doing a lot of these bottom parts. First, to secure that, let me see okay, so roll around and kind of tuck and hold it in place and you'll probably need a lot of bobby pins well at least a good amount so that you can constantly bobby pin where you need all right. Oh, oh girl, hey all right, simmer down, simmer down, see that part sticking out i'm just kind of round it out and tuck it in the bottom, but keep a nice rounded. You know oh love this. For me, i feel like maybe i use too much hair in this. It'S kind of separating a lot, but i have so much like frizzy flyaways happening right now, so, basically, all in all, it's gon na come out bomb. When you do this, if you have more time to keep your scarf on for longer, i would recommend that, because i just feel like it definitely helps flatten and make sure that all those hairs that want to fly around or curl up will kind of lay much Better because i feel like mine laid a little bit better than this, but i also know that i was able to keep my scarf on for like two hours, probably i think or maybe longer. I can't really remember i'm taking the end of this rat tail comb and then i'm putting some gel on it and then just smoothing it in those areas where my hair is kind of curling up and then my mother hold it for a second or two. Just to kind of you know lay some of this down. That seems to be popping up like who asked you. Yes, that's working. This is how it looks. This is my version of a curly top knot bun. I hope you guys liked it. Let me know your thoughts in the comments and, if you do recreate this look, please tag me in your stories tag me in your post, because i would love love, love to see it. I definitely think this is a great technique for anyone with really thick hair. If you're interested in getting a nice sleek top knot, doing this kind of method and separating it into sections is definitely much easier and will allow you to achieve that. Look if you're, not someone who can just throw it all together in one shot. If you can do that, shout out to you, because life is easy for you, sis life is easy for you anyway. Thank you guys. So much for watching and i'll see you in my next upload. I don't like that. Um


Comments
Lyasia In The City: the very end of the video is a true depiction of a Gemini hope you guys enjoy the video!
Nye Gee: I was wondering how you rocked this bun. Thank you for this tutorial. It was really simple to follow! I needed a new hairstyle for this Texas heat We're the same, except that I pick at my edges. I don't know why. I just won't stop stretching & twirling them with my fingers. ♀️
WiLDin!: We got the same hair type ,and yes I do it too. I think it is because there is velus hair on the human nape and it's very soft. So quite comforting * and yes the last part of the video was geminisitic if that's even a word lol.
Andreth Beckles: Hi Lyasia I have watched all your videos on your transitioning journey. I was wondering during your transitioning , how many times did you wear box braids? I am transitioning and now in my 10th month but have used box braids a few times. I love your hair and your personality. Can you do a video on your hair growth
April Chow-chee: That happens to me too. With the elasticity. It's cause I sleep on one side more than the other and I part one side more than the other side part.
Bri Dgett: FANTASTIC JOB PRINCESS!!!
Myrna J: ❤