*Huge Transformation* Long Wavy Hair To Short Curly Haircut
- Posted on 13 March, 2022
- Curly Hairstyles
- By Anonymous
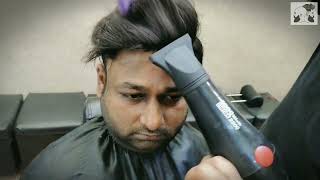
Ahnaf came to the Regal Gentleman Studio for a huge transformation. After over a year of growing his hair, he wanted a big change. Ahnaf and Dan worked together to transform the long wavy hair into a short curly haircut with short back and sides.
GET A FREE HAIRCUT AT THE REGAL GENTLEMAN STUDIO.
SIGN UP HERE -
► https://regalgentleman.com/blogs/blog/...
✂️ REGAL GENTLEMAN BARBER EDUCATION
Education for barbers, stylists, hairdressers and anyone interested in cutting men's hair. Click the link below to get a FREE PREVIEW of our ultimate barber course.
SUBSCRIBE... NEW VIDEOS EVERY WEEK -
► https://www.youtube.com/regalgentleman...
THE PRODUCTS WE'RE USING IN OUR VIDEOS RIGHT NOW -
Use code: REGALGMK for 20% off *exclusions apply* ► https://tidd.ly/3BaHFHj
Hanz De Fuko Claymation ►https://tidd.ly/3rgz6Ge
Daimon Barber Classic Pomade ►https://tidd.ly/2UkmLVC
label.m Matt Paste 120ml ► https://tidd.ly/3rezaX2
label.m Matt Paste 50ml ► https://tidd.ly/3imL798
Redken Powder Grip 03 ► https://tidd.ly/2UjNTnH
Redken Powder Grip 03 Duo ► https://tidd.ly/3evM3XF
Balmain Hair Texturising Salt Spray ► https://tidd.ly/3zb1rR0
label.men Scalp Tonic ► https://tidd.ly/36HhhH3
label.men Thickening Tonic ► https://tidd.ly/3imLmky
Baxter of California Grooming Cream ► https://tidd.ly/3z2NyUY
Braun Series 7 Shaver ► https://tidd.ly/3BefKpV
Braun Series 9 Shaver ► https://tidd.ly/3kpkCmd
Babyliss Hair Dryer ► https://tidd.ly/36HhXfz
Babyliss Pro Universal Diffuser ► https://tidd.ly/3wKkMqL
Denman Precision Large Cutting Comb - Lime Green ► https://tidd.ly/3reQpHM
Use code: REGALGMK for 20% off *exclusions apply* ► https://tidd.ly/3BaHFHj
AFFILIATE DISCLOSURE:
Links to all products in this video are affiliate links. Please know that products featured in the video were not chosen with "selling" in mind, and are all products we are using in the Regal Gentleman Studio because we think they're great products (you'll be able to see all of these in future videos). However, we do make a small commission from any sales that come via these links. If you're going to purchase the products then please do so via these links as it helps to support and grow the channel! Thank you so much!
FOLLOW US ELSEWHERE -
► Instagram - https://www.instagram.com/_u/regalgent...
► Facebook - https://www.facebook.com/regalgentlema...
► Twitter - https://www.twitter.com/regalgentleman...
► Website - https://regalgentleman.com
► Blog - https://regalgentleman.com/blogs/blog
► Pinterest - https://www.pinterest.co.uk/regalgentl...
WHO ARE WE?
Regal Gentleman is a men's grooming brand that helps men to become the best they can be. Our vision at Regal Gentleman is to redefine the modern gentleman and help men to become a better version of themselves. We believe that every man has the right to look and feel his best, and when he does he can make a positive impact on the world.
WHERE TO FIND DAN?
► Book with Dan here http://bit.ly/DanGregoryBooking
WHERE WERE WE?
The all new Regal Gentleman Studio. Sign up to appear in one of our videos and get your hair cut at the Regal Gentleman Studio with one of the UK's best barbers. New barbers coming to the channel SOON!
Are you ready for this yeah, you sure open it off a year to grow 45 minutes to close off and there's more hair on the floor than there's on my head? To be honest with you, all right guys welcome back to the regal gentleman youtube channel at the real gentleman studio. Today, we've got anash in the chair. How are you mate, you're good? So what are we doing? What'S the plan uh, so i want to completely change my look. I'M like a much shorter hair, maybe like really short sides, because i don't like it sticking out too much. Okay, maybe some length from the top and like a sort of like curvy frame like a what sorry, a curvy fringe, okay like up or down what do you think on the fringe down? Oh wait: okay, yeah sure i just take these bobbles at the back. Let'S look at the length okay, so we've got an awful lot there. Are you sure you want to lose all this yeah? Okay? Okay, so you want your fringe to come down. Do you want to be quite quite natural, just sitting kind of quite natural on the front so like loads of texture in it? So it's forward. Okay, be quite nice, though, because you've got that wave in here as well. You probably will have a bit of a kale on the fringe, so i think it'll sit quite nicely. Actually um. So can you just put your mask down a second, so i can see. Okay, you've got a solid jawline man, okay cool! I don't know: okay, sound yeah, that's going to work. Well, i'm just thinking always when you wear a fringe, if you've got say a really wide face or very long face. You can sometimes work quite well, but you've got that kind of you've. Just got like a say just like the oval, maybe it's kind of a bit, maybe yeah slightly square good jaw line yeah it'll work, if you just hold it in like that, that'll work quite nicely yeah, it's just sometimes, if you've got maybe a more narrower face Or something if you wear a fringe, you can sometimes just kind of make close the face up a little bit. So i think, if you've got the option to wear your fringe off your face or down that might be better because you've i mean i don't know about yourself. Do you find this really low maintenance at the moment, this long hair or is it quite high maintenance for you quite high? I think it's because of your hair texture to be honest, yeah, but usually when you just pop it up in a bun, it can be quite easy and quite low maintenance, but i want to try and make it low maintenance for you. You know what i mean, so you just get up in the morning. You'Ve got a little bit of texture at the front. A little bit of length put a bit of powder bit of clay, even just a bit of salt spray. You know anything just minimal, minimal product and just kind of do this and let it fall or scrunch it and let it fall down. Is that all right, yeah and back inside how short you're thinking to go? Uh uh, i'm not sure, but i want it um. I don't want uh, i don't want it too long and i'm really sure okay, i don't want too much skin tone. Okay, that's cool yeah yeah! So just just before scalp exposure, then yeah, yeah, okay, i'm gon na, say i reckon about. Maybe a two in length will be good for you, normally anything for like a two or one and a half is where you start to see: scalp exposure, all right, um again on the neckline as well. We just do a natural taper, so you see a little bit of exposure down the bottom and but you need to kind of taper it in any way just to make it look cleaner and fresher all right. You ready for this cool. Let'S get started mate cool. So, to start, what i'm going to do is i'm going to cut this up into a horseshoe section? Okay, get the back in size, let's focus on the back and sides first, and then we can just connect the top and cut it nice and short, but again, working in stages. It'S really good when you're working on longer hair. If you give yourself like clear, like clean lines, clean sections to work with and also working in the stages, maybe if you want to start on the top, you can work onto the back and sides, but i always just find if you work on a horseshoe first And you focus on the back and side, especially something this long. The shape is starting to sit for you, then all you do at the top is connect the length in so i just find a bit easier to do it. This way. On the session point down, as you can see, you see all this length coming in now dropping underneath the crown, as we always do, just to preserve the crown um recession points matching up to the back like so there we go as you're holding it up just Check the horseshoe sitting right yeah, that's perfect! Let'S get that out of the way like so there we go, so you ready for this yeah, you sure. So let me use these osters heavy duty ones just to remove all the weight in the ball. Now it's up the horseshoe now so i'm working again, don't forget we're going down to number two here, so i'm going to take this fairly short, okay um. So when i go down to this with it on the comb flatter the scalp into number two, but i'm gon na go a little bit longer than that. Just because i want to put the number two in there as well so start from the side burns flipping. It off just taking more wrong section now i want to pull out here so i've got length at the corner. Okay, so i'm still going to treat it as though i was blending in the number two, so i'm still leaving something through here. Okay, i still allow myself to connect the top in whatever length we go to isn't this such a shame, though, like we, we said this yesterday to a couple of clients who weren't quite sure a year to grow 45 minutes to cut off. It'S horrible, isn't it? I said it's a bit like the gym: isn't it you know it takes months to get a six-pack in about two weeks to lose on, so you can see i'm just bulk, removing i'm making it away now. As long as i keep some length to that corner, good right, so i'm going to start on a number three. Okay, just move all this hair over and there's more hell on the floor than there's on my head. To be honest, with you a little end for that there we go so i'm gon na start with the number three just because again scalp exposure, we don't want scalp exposed, so i'm gon na start with a three low, the lead down three and a half. To start with, first and then, i'm gon na wear it down to my number two. So very soft blend, okay, nothing too harsh number three! Now the only problem is when you've got when you've had really long hair, especially the curls you see from the roots. It'S almost created this wave, i'm going to have to blow dry that out, because that won't be like that, if that was washed, now or or maybe even from a short haircut that wouldn't be as as carey as it is, it's just from having the long hair. So i'm just going to put my three and a half in and, as you can see, nice and thick on the back and sides for an ash. But obviously i want to just be quite careful how a number say two would look. So i'm starting with a three and a half just again, i have the whole element of prevention over the cure is, is always works for me. So sometimes you know the hair can be so thick that you know, as you get close to your shorter and shorter and shorter the base. Isn'T that thick so, like you know, that was ridiculous. Well, i just took off then, as you can see, if you come out in the natural light here or the light, phenol or or air or like there, you see that it's not scalp exposure, but you can still see through it a little bit right. But it's not like you wouldn't notice that skeleton it doesn't look like they're. You know scalp exposed like you'd, see on a one or one and a half, it's still as dark from different angles, but if that was a one and a half that would show a lot of scale. That would almost look like probably a one or point five. Potentially on ashes here, so that's why it's always good to start off longer. I'M gon na move down to my number three now close guard use my small round brush. I'M going to dry this here so take away. This kale try and take that curl off much as i can so onto my two and a half now up into my three well, that's a good one, because i think if we did go short and the two you'd start to see scarf exposure, especially on the Sides there there we go finally into our two now keeping that nice and low and choose our cone put the hair forward number two, but i could trust form like that. Now i'm going to work a nice taper into the neckline. Now, just move on to my one and a half one guard on leave it down to make it one half i'm just going to do it very lowly that low down okay, it's very low down, i'm trying to minimize the scalp exposure as much as possible. As you can see, when you use that one and a half, it does start to get much shorter, we're just graduating down to the bottoms. Just a nice little fade down the very neckline now into halfway on the lever. No closed guard 0.5 just around the very bottom of the hairline and then close go to zero and just flick off at the very, very bottom so blend this in it's not enough elevation. Now, if you look at the back here of anasha's head, it is quite flat all the way down, so i want to leave a little bit of weight, as you can see from about here, you can see let's just head up right. There see how much of divot in there, so you want to kind of blend out on that point there to that angle. Okay, so you can see more length at the top getting closer into the number three okay elevation to maintain length and then just get lower and lower down like so just going flat against the scalp. Just goes to the number two and then from the on the cone. You see that now, if you look the back by leaving a little bit of weight, it doesn't look a flattener there's a little bit of weight through there. You pull it out a little bit. Okay fold nicely into that shape. Here, elevation maintain and build up length the higher up so halfway there mate, how's it looking yeah you're happy with that yeah. Is that a real big relief? So, just on the side burns i'm going to go down to one and a half just on the very bottom, because the sidebands are so much thicker on most people anyway. So i want to go on a one half there, just to kind of keep the symmetry on the side and keep the sound the same effect as well, but only literally just on the side, bends and up okay, it's just through here and then flicking off like That makes it look a bit neater as well. There we go like that, we're going to detail around the edges, the hairline temple and side bends and here again because we're having something quite loose on the finish, i'm just going to strengthen up this temple. Okay, so i'm not cutting too much into it. I'M just going to try and strengthen up give a bit of symmetry both sides, i think it'll - be a nice contrast like that kind of quite messy fringe um, along with quite sort of sharp edges. I think if i was to take it like here, for example, let me cut them right into the hairline, i'm just strengthening it up again, it's much easier to match both sides as well, when you just strengthen up around the hair, so i'll just finish off around The ears and then i'll blend the sideburns out just strengthen it. I'M going to blend these out into nothing so just start from the bottom 0.5 teeth facing towards the client. Let'S get a bit shorter. I think that's quite nice, nice and low maintenance, no harsh lines. Just blends out into nothing simple, sharpen it off and then just start to taper in around the ears like so um 1.5 teeth facing towards the clients makes it a bit longer. That'S a zero and i'm going to finish off around the neckline now again, keeping it as wide as i possibly can thing is. When you change the neckline, when you line up the hairline, you can really change the appearance of whether it's wide or narrow the neck. So if i had to follow that and imagine if i would have followed in the strongest points of eyelashes hairline now it would let you come to a v, i'm just tidy up on the neck here, just use my size, one comb, i'm just going to tape. It a little bit a bit more just to make it all the same along the bottom right onto the top now. So what i'm going to do is i'm going to lay the fringe in first and it's a good way to start, that's the main focus, and that was one of the things that - and i spoke about faces that he wants the fringe now. So i'm gon na work on that. First, okay, now we need to look at the gap between the hairline and the fringe to the length that it will be okay, so we can work our whole shorts. Take the back. It'S probably a couple of inches right down to the middle of the eyes, just here, probably roughly here about about two inches, so that's the length we're gon na have to work through at the back as well. Okay, up to the middle! Now you lean your head. More forward for me, there we go and then we can pull that and separate so much easier. That way, i'm gon na do layer the front following the hairline round. Don'T even need clips the hair's that long, it's quite nice, looks behind his ear. Let'S cut this fringe down there, so i'm gon na cut this to where it would sit just along the eyebrows, because then that way it can fall up. It can scrunch a bit tighter just gives them the option. It'S not going to be a really regular mega short fringe. Almost down, don't forget: we've got the curls in there, so we need to be aware: that's going to shrink, we don't want too much tension on it just enough that we can pull the hair down. Okay. So i'm going to cut it to just above maybe around the mask about there, nice and straight i'll. Let go of that so it pings up, but i don't know as it pings up. It sits just on the eyebrows and again level with the mask of the nose like so not too much tension. Look, i'm not holding it too hard. So i'm just going to spring back up just enough of my fingers that let go with springs. I'M just going to work around as well. Okay, this hairline's good i'll work around this way like so because that sits really nice on the front. So we get the other side, pull it down again, not too hard. Let the just loose tension in there cut that straight from right to left turn the scissors around. Should we cut that little card off there there we go that all sits nice just on the front. Okay, here we go so that's the basis right. That'S the fringe length of sorted now, i'm just going to layer everything else in just cutting down to that length. So there's my guy just sitting through right. There keep this section, nice and small. So you can see what you're doing around the guy from the right corner that length away and then just take a section here like that and then just bring this down to match above me, there we go. What we'll do now we'll wet it down! I'M gon na take a section right down the middle. Let'S call that profile section: okay, one side, remove that what this is gon na do is gon na blend the length down to the front pick that fringe up okay there with the fringe layers onto it. There. Okay, so we don't want to cut it like this, because we want that to layer in, as you can see, we're layering that straight, but we just want to take some length off to the back like so just lift it straight up and that length we can Take off there we're still going to lay that in there like that's as you, let that go, it still sits nicely into the fringe. You can see. It still keeps that weight in the fringe like. So no, no, let's take the length off last section straight up, because it is chaos. Don'T point cuts into this just too much. Oh there we go now bring that thing straight up. There should be nothing to cut there. We go. All right. Do now is connect the sides in so we're going to do this horizontally, like so so take a section with around the head, like that away from the fringe push the back away. Bring this down to our blend point like so so you'll see here, lift it up, we'll have our connection underneath there we're just dropping this down a little bit just to maintain them through that corner. There blend point like so: we can bring a section down on an angle into the recession, points going once again with our fringe, so we're going to angle downwards. Take off this length now, okay, the higher look coming that way now, like so there's the fringe. You just want to graduate that into the top like so we'll maintain that length, and it gives our fringes sitting really nice now easy a little bit length, keeping it nice and full through the corners there as well pick it up, and there is our guide right. There there we go there, we go guide again, come right up, make sure following your guides now, as we get down here, we'll start to pull this fringe up and no length should start to come off this now, as we pull it up, see very minimal length. Take that in and just drop it down to the blend point down into the recession, i'm not looking to take anything off the fringe, as you can see that isn't the fringe see all that length is just through the top through that corner right down. If you pull it through lift up there's my guide underneath and just do another cross check just for any longer hairs that you may have missed there. We go another one. The higher up now, there's my guide underneath on this angle. You'Ve got a guide from the top right there, you're just working straight down and over directing that fringe out. All that weight is blended in through the sides. We'Ve got a nice bit of weight at the front as well. So all we need to do now is lay this crown in. If we give my guide straight through, you can see through it like so i'm doing it in layers, because the hair's still very long, if it wasn't that long, i'd, probably just take it all in one, go i'm gon na match up to the left-hand side as Well and just work across like that one point to the other, the short guide, then a short guide on the right, so i'm just going to work in to the hair itself. Okay, with this is a bit like a razor bump, keep everything a bit more blunter. I'M just picking through it just to help thin out them curls and spire it out a little bit more as well, i'm not doing too much. So i won't look chunky anything. I won't go out too noticeable either. I'M just picking in little bits like that's that. Just helps you scrunch the kettle a bit more, i'm just going to slide through somebody help bring out that kale as well just slice into little bits open and close. This is okay across the center because he's wore it in the center part for so long when he came in it's like a natural center part, i want to break up that direction like so i'm just working in through the hair through that blend. Just forcing that hair to sit forwards is he working the hair, the scissor through it's not pulling the hair too much, not causing discomfort? If i was to slice through, it would probably really hurt how's that, for you, mate, yeah, happy yeah, sweet man looks so good. So different, exactly what i wanted brilliant, it's good to hear there we go medium, speed, high heat, i'm just going to try this off! Oh and that's it, but do you need anything else in this at all? It'S all cut into the shape this! It'S nice! You have to just flatten it down a little bit. That'S how it sits. Happy looks wicked mate. Thank you very much. You
Comments
Unity- X Fitness: You can tell how much time and consideration that Dan puts into his work each and every moment, especially my favourite parts of his haircuts are his blow drying, texturising techniques cutting techniques especially when he adds texture into the hair when he point cuts and also he takes the time to have a thorough consultation with the client which is so good to see, which is why his videos have inspired me to continue growing my hair out from a low fade which i had before Christmas so i can get it to medium/long length for example a Leonardo De Caprio style inspired from one of the videos in time for my cousins wedding in may. Huge huge inspiration for any barber who wants to improve their skills
Ciclopea2: Such a beautiful haircut, it gave his natural curl some structure and what a transformation, i don't think he'll be missing the long hair at all lol, and as usual i enjoy those scissor sounds that are always so thoughtfully edited :)
волчонок: As always a great job. I'm a barber myself and I have learned sooo much from you Dan. Thank you for sharing your knowledge.
Rusty Hole Emporium: Looks so much better. I’m a student barber, and have a little trouble blending the sides into the top. I can’t wait to get that down so I can turn out nice cuts like this one.
Tranitosaur: He suddenly looked much younger after the cut.
Michæl: Ficou ótimo! Eu super faria um corte assim, ajudaria a esconder as entradas na testa...
Leecee Smith: I think he looks amazing with the shorter hair says it all in the title, HUGE TRANSFORMATION. Love it. Love Dan
marshall wright: Will you do a video on your haircut? No matter what the length is it seems to always look great
Paul Cuts: That was a great transformation. He looked like a different person
21duthie: You put this lad back in the game!
imtrex 521: from frumpy to youthful and exciting! well done!
Blayne: Excellent video and cut. Quite a bit of blurriness in this one though. The camera is focusing on Dan's hand/wrist and not where the clippers or scissors are cutting.
Mark: We need a t-shirt with ✂️ "So, what we doing?" "What's the plan?" ✂️
Tom Forsgate: That square shape
Basool Atteyah: Nice cut, but my man looks depressed. Smile, Dan’s taking care of your hair!
Free Hypes: any product used to style towards the end to achieve the look? Or did he simply just wet the hair without really styling it with any product, and just diffused it?
Oliver Perez: My middle part doesn't like to stay even. The left side doesn't like to maintain the curtains for that long. Can there be an imbalance in my haircut
Mg92: I assume that the client had to undergo a hair transformation due to force majeure xd
blzr: looked like he knocked off a couple pounds too
A G: why's he sitting there miserable when he decided to get his hair cut by u knowing ur one of the best in the world. he's acting like he is doing u a favour by cutting his hair lmao
makeshift112000: Now for a personality transformation
S.E: take a shot when you hear the words "and here's my guide"
husssein: Jeeez very nice, next time give him mid fade
S.E: You cant add hair so best to take off as little as poss. you can always take off more
Emilian: That client has got no personality whatsoever.
Shaiam IC: Need more energy from the client
HASAN KUMAR A N: The client throughout the video:
Pete Rose: First, love you Dan!
hyupsy channel: Yo Me: Straight to wavy a little bit like letter J Shape
random channel: Ace
Yovi Stanev: The dude at least could donate his hair. What a waste….
Rodricutz:
thinh quach: awesome
Chittiz Pradhan: seems like you even removed his glases for da transformarion
Mark Blann: He wanted that?
Saksham Purwar: dan how to get to your hairstyle man ?
Jonathan Ibarra: The goat strikes again. NY
Eric K.: More razor in side it’s better
Harrypotterlolololool: Get a fade mate
Вероника Усова: 2eliqx VUR.LIFE
UnformedBog9059: Jesus loves you!!!
Nancy Jean Harvey: You talk to much.
RJ Carter: Another many makes a BAD decision, and the result looks ridiculous. No man after the age of ten should have bangs (a fringe).