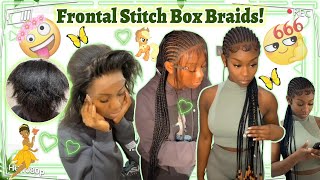
Criss Cross Stitch Braids + Curly Buns
- Posted on 14 September, 2021
- Curly Hairstyles
- By Anonymous
Kasiamaebeauty.com
IG: https://www.instagram.com/hairbykasia/...
Twitter: https://twitter.com/KasiaMae_Beauty
Hey y'all, it's kj and today i'm going to be showing y'all how i did these four feet in zigzag, braids with the little curly buns at the back, i'm first starting off with freshly washed hair and i'm going to be blow drying it. I separated her hair into four, even sections so in the back two in the front and i'm just gon na go ahead and blow dry them. I'M only doing one section on the camera, the other section, i'm the other three sections, i'm going to be doing off. Camera, so i'm just going to come back to y'all once i finish blow drying all of it, but, first and foremost we're going to talk about what kind of hair i use and i'm gon na separate it and everything for y'all that's the kind of hair. I use, but you can use um expressions or whatever kind of hair. You know you really like, but for each pack i was able to get four braids out of it's only used one pack of hair um. I separated it into four and then i went ahead and separated the one bundle into i think 10 pieces of hair for the um braid yeah, i'm not 100 sure, but i do believe it's 10 pieces, um yeah, i'm gon na be starting off with a small Piece and then the pieces are going to gradually get larger as we go along um i'm going to use the same amount of hair in each braid and that's pretty much it i'm just showing y'all how i like place them out, but other than that we can Just go ahead and get started with the braids okay, so i'm starting out with parting, her hair straight down the middle um. The braid on the two braids on the right side are gon na literally be the exact same as the two braids on the left side. So what i'm gon na do is, since i'm doing zig zag. Well, it's not really a zigzag. It'S a crisscross! So since i'm doing crisscross braids i'm going to be crossing them over twice, so i'm going to make two parts which equals three sections. So i'm just going to be doing the three sections. Then i'm going to evenly part the three sections into six sections. So it'll be two braids kind of like if there were two braids going back, but it had three parts going across it or two parts going across it. Hopefully that makes sense. Y'All could see what i'm doing, even though i am trying to explain it. I don't really know if i'm doing a good job explaining it, but i'm doing my best y'all. So i'm going to be putting some product on her hair. I am using my edge control if you are interested in purchasing that, of course, you all know, i will leave my link in the description bar below, if not use your favorite edge control um. I also like the edge booster edge control, the pink one. So you know if you want something, that's like easy to get. Maybe in your beauty supply store, that's a good one. So i'm going to start off with the braid, that's closest to her ear or furthest away from the middle, and i'm just going to be parting. It out and then separating it into three sections, then i'm going to start with the smallest piece of hair braid. That in add the piece underneath and stitch to the next part, add that piece underneath go to the other side. Stitch that part in y'all can pretty much see what i'm doing but yeah after i finish like that section, i'm going to start to braid diagonally on over to the other side of the braid and then i'm going to cross the back over. So y'all could pretty much see what i'm doing, i'm not going to do too too much talking because it's kind of more um, like visually explanatory, i literally just made that up but y'all get what i'm saying it's easier to understand what i'm doing by watching, rather Than me telling y'all so i'll just come back to y'all when i feel the need to add in my two cents now: hmm so hmm, this okay y'all! So basically, now that i'm pretty much done with the braid, i'm going to braid the braids all the way. Well, not all the way down, but i'm gon na braid them down past her natural hair, and once i got the braids past her natural hair, i'm gon na tie them off. I pretty much fast forwarded the other two because literally, as i mentioned before, they are the exact same as the first two that i did so. I'M gon na kind of like fly through these, but i really wanted to touch on the curls. At the end. A lot of people use like um. What is it called? They use crochet hair and i think that that's super they're super expensive and it's super un um unnecessary. So i use flexi rods. You can use any type of curl rods that you have and leave some hair at the end of the weave so that you can have room for the curls and i'm gon na wrap two rollers around the end of the hair. Because i want the curls to be popping and i did wrap them in opposite directions so that the curls could be going two different ways: um and then i'm gon na go ahead and do her baby hair um. They they are dramatic, but they aren't really thick. If that makes sense, so i did like swirls and soups, but they're pretty thin. I didn't do them too thick. So you know you do your clients edges, however, they prefer and yeah. So after i do her edges, i'm going to go ahead and put some mousse on her hair and some spritz and some spray and get it all shiny and stuff, and i'm also going to be dipping the ends of her hair into some hot water, so that Those curls can come through and then i'm going to come back to y'all once i start to form her buns, okay y'all. So now that i'm done with that, i'm going to be separating her curls and making them a little bit fluffy, i'm not going to separate them too much, because i don't want them to get frizzy, but i'm going to be wrapping her braid around one braid and Then loosely wrapping the curls around and i'm going to wrap the other braid the opposite direction. And then, when i get to the curl part, i'm going to kind of loosely wrap that around. Because i don't want the. I want the curls to still be defined within the bun, so then i'm going to put a rubber band on there and you know play with the curls and get them how i want them and that's pretty much it. I did the exact same thing to the other bun, and this is how it came out. I hope y'all enjoyed the tutorial thanks for watching bye. You
Comments
Tashefeya Taylor: THANK YOU! Just braided my hair like this and thought I was going to know how to do the ends. But THIS is a great idea. I added water wave hair and it just didn’t turn out how I wanted
Erica F: Great job and explanation it turned out cute
Gi Gi: It’s soooo neat and prettyreturning subscriber of 3 years
Brittany James: Always wanted to know how to get curly ends! Thanks
Teffell smith: Perfect!
M A R I . X O: Cuteee
Tarajee Ali: Yasssss!!!
deseraymiles87:
lindsey: how much packets did you use?
Nikki Lynn: My favorite youtuber!!!
Alliyah Darden: The fact that I saw this on Google
Caylaa: Dang! I thought you were in Arizona!