Quick And Easy Updo Perfect For Naturally Curly Hair
- Posted on 16 May, 2014
- Curly Hairstyles
- By Anonymous
Who has time for hair when you can be outdoors enjoying the warm weather! I have the perfect easy quick summer hair style that you can do in minutes and will keep you "cool" all day long. Follow my easy step by step tutorial to achieve this same easy style with little to no effort. Remember, if you have thin fine hair you may want to curl with a curling iron or set with hot rollers to create some texture to the hair. If you have naturally curly hair then your in luck! This style is perfect for you and you won't have to work for this at all! your natural texture will do the work for you :) I hope you find this video helpful and fun and of course easy to follow along with. Comment below and let me know what your favorite styles for summer are. Follow me on my other social media sites and you can see the products I used listed below. Thank for watching.... I love all of you!!!
https://www.facebook.com/theglambelle
https://www.twitter.com/theglambelle
http://theglambelle.tumblr.com
instagram @ the glam belle
products used:
Chi shine infusion spray
chi enviro hairspray
bobby pins
elastic band
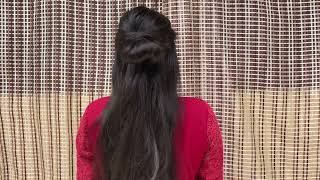
Hey guys, I'm here to show you today how I went from this frizzy mess to a quick updo in just a matter of minutes. Now I have naturally curly hair. If you do not, I would suggest curling your hair to create some texture. What you will need is one hair tie and yuck. You want to make sure that you get your pair off of the hair tie. You will also need a rat tail comb to help separate and smooth your hair you're also going to need some bobby pins. You won't need mini, believe it or not. Unless you have very hard to hold hair, you will need some hairspray, whatever kind of hairspray you choose and you will need some shine spray if you have crazy, frizzy, coarse hair. Like me, we need all the added shine that we can get. What I am going to do is I'm going to separate out my bangs section and I'm also going to separate out a section on the left side. Your left side, my right side of my head - and this is where I'm going to do a Dutch braid. It is something so simple and I am not being neat with this in any way, shape or form. Of course you can be much neater, but I didn't have a lot of time, so I just did it as quickly as possible. So then, I am just tying the rest of my hair out of the way so that I can get started on my braids and you will need in a little elastic to go at the end of your braid. Once you're done with a Dutch braid, you are going to actually take the sections and cross them underneath one another. So you're going to start with one large section, split that into three equal parts: you're going to take the right section and put that underneath with the middle section and then take the left section and put it underneath of the middle section. Then you're going to add some hair to the right section and then take that and put it underneath of the left section and you are going to do the same on the opposite side and you're just going to continue doing the same exact pattern until you get To where there is no extra hair to add in and then you're just going to continue with the regular Dutch braid without adding in hair until you get to the very bottom - and I didn't want to speed this section up too fast, so that you could still See exactly what I am doing and granite. My hair is very coarse and thick, so it does hold very easily. You may need to spray a little bit of setting spray or hairspray on your braid or on your hair before you start braiding, in order to get it to hold better and another secret is that my hair is actually about four or five days out from being Washed, so the dirty your hair is the better it's going to hold, and then I just put a little elastic at the bottom to hold my braid and now I am just pulling and tugging a little bit at my braid to make it thicker and just more Voluminous again, I am NOT being neat with my style in any way, shape or form. As you can see, it is not the neatest braid, but I'm kind of going for an unstructured look anyway. So then I'm going to take the rest of that hair. Besides the my bangs section and I'm going to pull all of that back into a ponytail, so I'm just taking my elastic and putting that around that section, then, once I'm done with that, I'm going to split this section or my ponytail into three separate sections. So I've got my first section, I'm splitting that into two sections and then I'm going to going to just twist each piece around each other, so basically just creating a twist so to speak, very, very simple process not hard to do once you get to the bottom Of your twist, you are going to take a piece of hair which you'll see me, do and just gently take your hair and push it towards your scalp. Then, once you've pushed that towards your scalp you're, going to take a bobby pin and just pin that section in place, we are not going for neatness. Here we are just going for hold. We can separate this and maneuver it into a style that we want later on right. Now I'm just worried about getting my sections so then you're going to take another section, split it into two twist it around and do the same exact thing, and this section is going to go more towards the top of your ponytail and then you're going to do The same thing with the bottom section and that's going to go more towards the bottom, so we're almost creating a bun shape out of this and, as you can see, I have a few extra longer strands, which is totally fine. All you have to do is just take those and put them wherever you want them and just pin them in place again. This is an unstructured style, so it does not matter where you pin them at it's all, just going to flow together in the end, and then I'm just kind of tweaking it and pulling it out. You can make it more voluminous if you want um and now you're going to take your braid. That was left out and I was thinking about going over top. But I ended up going underneath of the style and I just brought the braid right underneath of the bun shape a style that we just created, and I just wrapped it all the way around and I'm taking another bobby pin and just pinning that in place. Then you just want to check around look in the mirror, see if there's anything that needs to be tweaked or pinned in place and until you're happy with the style. Now you've got your bangs. Another super simple way to get rid of the bangs, I'm taking it and splitting it into two sections and doing the same thing I did with the back, except where I'm not going to bring it up to my scalp. I'M just twisting them back and I'm just going to pin them in place and I'm going to take that extra little scraggly section that's hanging out and I'm going to just add that into my style in the back. The style is perfect for summer because it is off your neck and out of your face once you are happy with the shape and the style you're going to take a little bit of hairspray and just spray that into place. Take your comb and smooth out any bulky sections and then I'm going to take my shine spray. If I could get the top off. Yes, it was not coming off, but I won and the can lost then you're going to spray your hair with a little bit of shine spray, just to add a little bit more life back into the hair, especially if you have curly hair - and that is the Finished look a simple, easy, elegant, updo that you can wear any day of the week, whether it be the office, the school or running errands. I hope you guys enjoyed this video. I love you! Thank you so much for watching and until next time, bye.


Comments
Naomi Friesen: Just finished this style and absolutely love it!!! Thank you so much!!
Linnette Hernandez Rondon: Very nice!!! Love your page, I'm going to have fun doing these styles, I have such a hard time with my curly hair, you make it look easy!
TheresaSimonWorobec: So easy and smart and so many available variations to play with day by day!!!
Maud Aznar-Simard: Yeah!!! Natural curly hair !! Thanks for the trick!
Reservechic: Such a very pretty, yet elegant style.
ChrissyH: I am watching this and trying not to feel overwhelmed lol I am sure it is probably not as difficult as it looks when you watch each step. I have naturally curly hair and I have been dying to find ideas for up-dos for my hair in-between washes and I can NEVER find anything. It's either not appropriate for my white girl curly hair, or it is just way too complicated and time consuming lol. Saving this video so I can sit in front of the mirror, watch this, and try it on my hair lol I do have a question though- I don't have "bangs", but I do have slightly angled pieces in the front- I guess I can use these pieces in the same way you used your "bangs"?
ChrissyH: Girrrlll I tried to do this look this morning off of memory (I watched this and several of your other videos yesterday). It was a hot mess. The issue is- I CANNOT French braid my own hair lol especially not a dutch braid! My fingers just do not understand what to do lol
Sheila Sells: You're so pretty!!! Thanks for sharing!
Fiona Huhn: Thanks for the video. I have dark coarse curly hair too and never know what to do with it.
calvinewr: nice easy cute hair do, can you show from the back as you do it to make if easier to see exactly what you do in the back?
Lacy Nicole: So gorg! You have some talent my friend!
Dominique M: Cute style. You've got lovely hair. One tip: I hear you saying "underneath of" quite a bit. It's actually just "underneath." Maybe this matters to you, maybe not. It's just a matter of presentation--something you seem to do a good job of otherwise. Enjoyable video.
anj p: Super cute. More like this pls
Shelly Grant: if i dont have bangs can i skip that step?
Anjali Pokhriyal: Hi,thanx for the gorg hairstyle...i wanna ask about ur bang ,do u straighten coz mine behave in the most absurd way