Crochet Braids With Curly Hair And Leave Out | Super Easy Tutorial
- Posted on 04 April, 2015
- Curly Hairstyles
- By Anonymous
How to do Crochet Braids Tutorial.
For our first YouTube video we decided to try Crochet Braids and we love them!!!
We wish we knew about this simple but effective protective hair style years ago. Thanks to all the fab girls doing YouTube videos on this that gave us inspiration.
Heres what we used
Hair
Isis - Caribbean - Brazilian Curl
Hair products
Ayumi Naturals - Pure Castor Oil (Cold pressed)
Dax - Coconut Oil
Hollywood Beauty - Caster Oil (Hair Treatment with Mink Oil)
VO5 - Smoothly does it (Curl defining mousse)
Subscribe! Subscribe! Subscribe!
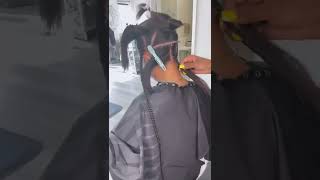
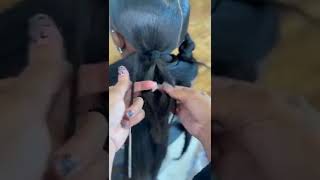
Welcome to shadows and stories the crochet braid tutorial. This is my niece Stephanie who's going to be water in a brazier fancy year, and I'm just going to show you step-by-step how to achieve this look. This is a really cool, like protective style to you, using the wind power stroke spring mobs to protect your hair hope you enjoy so we're gon na start with the hair styling tools that we're going to need for this. So first of all can leave some clips to cut the hair and sections we're going to use a Larry that you can see there, which is like a Nigerian home just to cut the hair regular comb to get through Emily and just a brush to make sure That we can have the hair, nice and fluffy and easy to manage while we're using it. So this is the most important tool that we're going to be using today. This is the crochet tool and, as you can see, it comes in a very snazzy, green and pink. We pick this up in Brixton from 99p, which is incredibly cheap every you can probably get them in most good hair stores. So yeah it's very light. It'S really easy to use and you can just open and close the latch like so so we have a few different products that we're going to be using today, first as the caster wheel, which ends but in a head when she blow dried it and then we're Going to be using some news for kind of uniformity without make sure we get really cool car, we're going to use them a different type of car, selectiveness, the scalp and some coconut oil to actually grease the hair. So it's just combination of things, but really just use what works with your hair and, of course, we'll need some scissors as well to cut the hair. So this is the hair that we're going to use for today, and this is Isis Carribean Brazilian curl in 1b. Now this hair is quite light and fluffy and the weight is quite nice, so we thought it should be a good match for Stephanie's hair. The part that we're going to leave out. We pick this up for $ 3.99 in Brixton, so so we do have full Packard's on this hair and one of the first things we're going to do is actually just do it shake or stick it back it and actually we're going to just cut this in Past this is waiting long for Steph, so she wants a much shorter look than the natural length of the hair. So that's what we're going to do so this is the length of the hair that we're going to be using and I think we're good to go. So this is money Stephanie, and this is her lovely natural hair spin around baby. So I'm actually just going to go ahead and actually get started. So the first thing I'm going to do is actually just part the leave out so that taking out this section from the main hair - and I actually take out some sunny sides as well - our family, our hair, is very weak at the side. So when I avoid putting any additional stress on this area, so this this part is actually actual, don't be scared score. The leave I'm actually going to use some vo5 news, and this is Nicole defining one, and I just think it just you don't have to use this. You can use water and a little bit of oil if you like, or just to have. If you have your own method, but this just tends to hold the car like really nicely and I'm just going to literally just put the mousse in as you can see and just que roll it yeah. So this is what it looks like when it's finished. So you can see the top layer like in the v-shape with cutting some shreds. I'D like it to be and the side bits is well kind of thing which you're going to leave that. So it's pretty simple to do so, and it will just kind of create a really nice weight just going to use some castor oil here to grease the scalp. Why I'm actually payroll in each this section? So I'm I've split the hair into two. So we're going to cream roll to the middle, I'm just gon na go straight back and just came out to the middle and wrist and we create the foundation for the top. And just to note, I just put some product on the back of my hand, just because it's easier to reach, you don't have to do this, but it's just a quick tip. I learn now. I'M just gon na put some coconut oil in on the hair as well just to grease it basically - and I didn't mention this before - but this is our first video and we would really like some feedback. So please, let us know how we're doing and also we'll leave details of all the products that we use in in the description box. So, as you can see, I've just turn roles like I said just to the middle, always the top and you can as the people's head down. You can see the back there as well kind of things in the back is still left out. What I'm going to do with the back instead of going straight down, which you can do, I'm actually just going to do it s, shape like this. So, as you can see the Lighting's, not so good here, so you can't really see it that very well, and what I'm going to do this little bit of Stephanies, just holding I'm just going to crochet it through, so it doesn't get lost anywhere. You can, if you want to just use some needle thread kind of thing, as you would with a leave and tie the same, but I'm just going to use the crochet tool. So this one is what it looks like the Front's going back in the back in the S shape sorry about the bad light and again, but you can see get the gist of it, and this is what it looks like halfway through. So, thank God we put for better lighting now, so you can see it quite clearly. So this is in the background and we're going to start on the front, and I'm going to show you next in more detail how to actually do the crochet braids, okay. So so, basically, what you want to start with is - and I'm going to show you two very very clearly, so you want to grab a piece of hair, not too big, not too small for this style. We'Re not with we using like the natural way that the hair falls. So this is it basically and you want to make sure that you kind of get rid of any kind of black blue strands and make sure that is it's all. Quite you know kind of together and you then want to grab the crochet tool open it. So the latch is open and it does look more harder than it is, but you just want to slide it through the base or the cane roll. So once you've done that you should be able to move quite easily up and down, and then you want to put the hair in the actual hook of the crochet tool. Close the latch. It'S a little bit fiddly to come in close the latch and pull the hair fruit. So you saw that it's quite smooth, so once you've done that you kind of grab onto the hair - and you can just slide that through the base of the cable. So it should be really moving freely and then what you want to do you want to actually twist the hair and pull the hair through the loop, then twist again pull the hair through the loop and twist the final time and pull the hair through the link. So this is going to keep it nice and secure and it shouldn't feel tight or anything like that. It should just feel secure if that makes sense, so the hair, as you can still before it just in form to nap and natural sections. So you want to just make sure that you can see these natural sections again and give it a little tag and then kind of take a really thin strand from each side. So I'm going to take a pinch on from that side. Finish strand from this side, and it is it's a little wispy and you want to tie those together. So I tie it back free time. So there's one and two and just the third one, just pull up pull up and that will just keep everything really really secure and you won't feel like your hair is gon na fall fool out any people that and then just pull that through and just smooth. It down, and that is it really and I've purposely done these gapi, so you can see how it worked. Well, obviously, when you're doing the next one you do it tighter together. So I'm going to show you just one more time as well, and so please just put her head down. So it's like toast this time, just in case you missed it the first time so we're going to grab some hair, make sure that we get rid of holding the straight hair who's, got the crochet tool, push it through the hair. Just at the base put the hair into the hook close the latch just like that and pull it through open the latch again let the hair free and then you've got your loop. So once you have your loop just make sure it's moving freely before you start to twist. They twist once pull the hair through twist: twice: pull the hair through and twist the third time to pull the hair through and just push it up right to the the camera and find that natural part in the hair. And then the last thing is just take a couple of strands for one side and a coverage turn from the other side. So again this is going to be like it. It'S going to be quite wispy, so just make sure you get your technique like this and tie them together and a couple of times and then just smooth that through so it should be pretty simple. Give it a couple of tries and you'll get it. So this is what it looks like when it's done. That'S been lighted again, but this is witless, as you can see, is quite light. It'S very full and everything we've still got the leaves out there. So, as you can see on that side and this side and that's the next thing, we're going to do we're going to take out the leaves out but as you can see, just definitely go a little 12 so on the back is very, very full light. Lots and lots of movement so great style to have so. Yes, I'm just going to begin to take out the leaves out here and and on the sides, as I've said, and to do this we're going to use a little touch of castor oil and when I say that I'd literally mean just a DAB and it's just To kind of add a little bit of shine and just make it easier to kind of take out the fats that we have there, so I'm just going to do that. Real, quick! So just taken out the first side and as you can see, you can't really see much difference with Stephanie pair and the red hair. It'S quite a great blend. I mean again the lines not so great here so, but I trust me it's. It definitely looks um. Really really good and Willa we're done um. You can see like left the parting with the leave out, and you can't really tell I mean again. I said the Lighting's not that great, but it really looks very well blended in with the hair, and you can see it's just light and fluffy something's, giving a good shake there, and this is a style that you can literally just get up and go. I mean there's not much crack to it on a daily basis. Steph is, is still studying, so she can really use a style and just gap and go to her classes without much fuss, and that's it um. Well, we really hope you like to this is our first video bye and hopefully we'll see you next time if you did enjoy this crochet braid tutorial, please like below Selena for more videos, each ah comment below anything that you'd like to see in future videos as Well, that will bring up and share to your friends, because it might be fun, they will excellence and new hairstyles and last of all, please, I think if you subscribe, because we're going to show you support.

Comments
Denise Spillane: I just love it!!!!! Thought it would be hard but the way you explain and show is wonderful!!! Thanks for the tutorial :D
Velvet Kilpatrick Jones: Love the video along with the accent!!! To be honest all crochet braids need to leave hair along the edges out (always), it's much more healthier and less tension on the weakest part of our hair. Thank you miss!!!!
Crazedlovve: Well done, really good detailed video! Thanks for the tips xx
JustQuila : The best leave out video with crochet hair I've seen. Thank you so much and great job. Please do another crochet vid soon. :-)
DI What?: Um. First of all... your braid pattern is beautiful. perfection.
Staycee Pearl: I'm impressed! Can't believe it's your first! Truly great work Ladies!!
francesxaxx E: Love this
Rose Musa: Great tutorial
knatara thornton: oh!! shoot that's it?? I can do sew ins and braids and quick weaves and all but this was the first thing I didn't know how to do thanks this helps. I can definitely do this. better details than the other videos. thanks!!!!
Dorcas Caesar: I really enjoyed your video. I will definitely try this technique.....
Roz Christopherson: Luv this video! Very nice!
MsE Phillips: very cute, and I love your Lil innocent smile, just like my daughter's beautiful facial expressions. just love it.
nappygurlblue: Cute Style....thanks for sharing.
Tope Olayinka: Great video. look forward to more videos :)
IchNaturally: Well done! Thanks for sharing...
ThatBritishChick: I'm thinking of having this hair for when I go back to school so I just want to know how long it lasts. Great video btw
Laperria Andrews: Great job!!!
Trina K: Nice video . Thinking of trying on my youngest daughter .
Natasha Brown: Post more. Her hair came out BEAUTIFULLY
Shhhaw Nee: How many packs of hair did you use? I know they we're cut in half. GREAT JOB. this is my look for the next month if I can find the hair.
Kasey Atcheynum: Hi loved the tutorial. I'm looking to do this to my hair. I don't have ethnic or curly hair so doing a leave out wouldn't work for me. However I don't want straight back cornrows from the front of my crown because I don't want each row of braids so noticeable if I decide to wear my hair up. I like the parts of the four cornrows on the crown of the hair. I'm thinking I would like to try the crochet kinky curl with the crown braided as such. My question: I'm wondering if I crochet the kinky curl into the leave-out braids if it would look more natural if I was to wear my hair up? Also What would I do with the two tail ends of the side part braids?
Jenny Gordon: Excellent video. UK girl here supporting fellow UK ladies. Well done .
TheWayItIs: How do you get rid of the blunt ends of the braiding hair. I have a curly set but the top part has a blunt cut and I was wondering how to make the top look like the bottom?
peepla7: y'all just awesome! good job.
Jasmine Monet: Great video
love life: thank you!
nrsFranci Franci: I see a lot of knots being used in the crochet braiding styles but none on how to remove the knots nor how to remove the hair with minimal damage. Will you make a video on removing this hair?
diana benloss: the first and not the lost, I was going to get mean done I didn't know what hair to buy,and you guys just give me the best hair to used for work and school thz much great job.
buffichar: Great first video thumbs up
Nelly & Riri: it definitely would have been better to see how it blended with the perfert lighting
Lady Escape: good job!
aretha Lee: very nice
Angela Phillips: very nice
trustfull81: super. im going to try tums up!
Cher Pierre: great job
Ellis Kwakernaak-Bajna: Great videoexcept for the lightening
Kai Leannae: Does your hair have to be long for you to have leave out?. Because my hair is like medium/short length .
Anita Ford: Did you cut the bundles of hair in half to get this length?
Bro Kevin: looks nice
Sydrana Marshall: I'm trying to do my hair for the first time
Stylesbykala: How many packs of hair did you use?
E K: Video overal is great but the music is very anoying
DeniseZakiya: Dang that's almost too much hair! How can you make it look more realistic using less hair?