Part With Me! Full Step By Step Box Parting Map. + What’S A Moving Scalp? | Braid School Ep. 89
- Posted on 12 July, 2022
- Curly Hairstyles
- By Anonymous
Tune In to Braid School Mondays
→Share with your friends! →https://youtu.be/Ikz5ETI-dRo
→Subscribe for more videos → https://bit.ly/2P5qptR
→Instagram Lifestyle→ https://www.instagram.com/vandyvanity/...
→Instagram Hair→ https://www.instagram.com/vlshairatx/
Shop Braided Beauty Collection→ braidschool.square.site
Tools and Products→https://amzn.to/3qTq3dU
Shop Braid School Essentials→ https://www.amazon.com/shop/vandyvanit...
Try Amazon Prime Free → https://amzn.to/2IsrzSY
Filmed on:
iPhone 13 Pro → https://amzn.to/3x0W8pf
Sony ZV-1 Compact Digital 4K → https://amzn.to/33DqKRJ
Ring Lights → https://amzn.to/3tPJxBM
******************Popular Braid School Videos********************
*8 Ways to Start a Box Braid→ https://youtu.be/IZY20wNeHc8
*Tucking 101 → https://youtu.be/sNoB5_ZSNdk
*Feedins for Beginners → https://youtu.be/stodAY8XuIA
*How to Seal The Ends → https://youtu.be/23iGQUjnT0k
*Knotless Braid Tutorial → https://youtu.be/GO3nCcilUTU
*Parting 101 → https://youtu.be/NogT0UlU1To
*Hubby Does My Voiceover → https://youtu.be/m8wKrIeXhSM
*Easy Faux Locs → https://youtu.be/QmnkK40VWr8
*Stitch Braids → https://youtu.be/ZqV5aly91Bk
*************************ABOUT ME********************************
I'm VandyV and I have been braiding hair for over 20 years and professionally for over 9 years. I am completely self taught and want to share what I know with those who want to learn, along with generating productive conversation among the braiding community. Practice makes perfect! The techniques shown are strictly for demonstration purposes and designed to promote healthy hair growth and retention. If you learned something, thumbs up and tell a friend!
→I own and operate VLS Hair LLC in Austin/Pflugerville Texas, specializing in natural hair care and professional braiding services. Need your hair did? Book us! → www.vlshair.com
**********************Business Inquiries Only*********************
[email protected] (Paid Opportunities ONLY)
**Disclaimer**
Some links in this post are affiliate, which means I may receive a commission should you decide to click that link and make a purchase. My content is 100% not influenced by brands, PR products received, usage of affiliate links, or brand partnerships. You are not required to use these links but your support helps my channel grow and is always greatly appreciated!!! Thank you! *VandyVanity is a participant in the Amazon Services LLC Associates Program, an affiliate advertising program designed to provide a means for sites
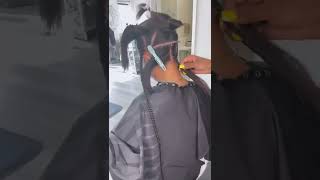
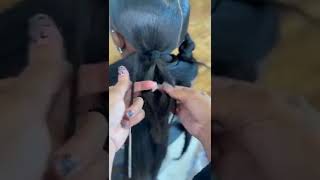
Hi guys and welcome back to braid school today we're going to cover a basic parting mat for medium braids. We'Re also going to talk briefly on moving scalps and why sometimes your parts are not always going to be perfect, because it's not juices a lot of times. It'S your client's scalp, so let's get into this video. So if you still struggle with basic parting maps, this is the video for you, this video we're going to cover the basic box parting for medium sized braids in the future. I will be posting one for triangles and for circle, parts or c parts. So if you haven't already subscribed make sure you do that right now and hit that notification bell, so you do not miss an upload. I will be walking through this row by row, so make sure you save this video and come back to it whenever you're actually practicing or working on a client. That way, you know exactly what to do and you can follow it step by step. You can also reference the parting 101 video, which i will link in the cards above that video covers basic points of reference and rough draft parting, so it's very beneficial to go back and watch that one so that you get idea what we're doing today. In this case today, we're doing it row by row for standard medium size we're going to be doing two rows in the back below the ear. So typically, i will part from the top of each ear to the other top of the other ear and then split that row in half in the back and then the first row will either get three braids four braids or five braids, depending on the way. The client's hair tapers in the back so sometimes the hair from the top of the ear to the nape, is pretty long or it tapers into a v. And you have to start with three work yourself up to four and then five. But in this case she had enough hair to do four on the first row, so to make sure we have even distribution, i located the center of the nape of her neck and then i put two braids on each side of that center. Most of you who have been following me for a long time, know that i like to work from the center out because a lot of times folks lines will be different from side to side. So if you work from one side to the other, a lot of times, you'll end up with uneven boxes, so working from the center out works the best. So here is the second row. It is from the top of each ear, and what we're going to do is we're going to split that into five, because we're going to brick lay those boxes on top of the four. So i like to do that by starting with the middle box and then working my way out and lo and behold, as i was working through all of this. I realized that she had some soft spots and it would be the perfect opportunity to discuss with you guys soft spots, soft scalps moving scalps and what does that mean for us braiders? So there really is no official definition in the braiders world for soft scalps or moving scalp. So i'm going to give you my my take on it based on my experience so essentially when i see a soft scalp or a moving scalp. That just means to me that there is excess skin on the scalp. It'S not taut! It moves it's very, very soft. It'S a lot like when a newborn scalp is really soft, because the skull has not completely closed. It'S a lot like that. A lot of us have scalps that move, but some are more than others. I'Ve seen soft scalps on full heads. I'Ve seen scalps that have just spots that are really really soft. I'Ve even had clients who have had surgeries on their scalp, and so that causes it to move quite a bit as well. It'S not usually a sign that anything is wrong. That'S just your genetic makeup, but for a braider this can be almost a nightmare, especially when you're trying to get perfect parts, and sometimes you don't even notice it until you get halfway through the head and you get to a spot similar to this one that you See right here and there's really nothing you can do about it, because when you start to put tension on that part, it's going to start to move and in this case, because she's getting classic box braids, there's going to be a lot more tension than we would Normally see with knotless braids now, what i definitely don't want to do is put more tension on her hair and scalp by trying to get the most perfect part. So what i like to do is part the hair in a resting position without pulling it too taut, because at the end of the day, when the hair starts to grow out, it will grow out into its resting position. So don't beat yourself up about it. Some heads, you can part with a sewing needle and it still won't be straight because either their scalp is too soft or they have high high density hair or both there's not much. You can do, but just do your best. This is also why a lot of heads are not the most photogenic like they're, not the best for photos and posting on, like your feeds and whatnot, because they just don't present that well. But if you guys follow me, you know i post any and all so. If you got low density, hair, high density, hair, moving scalp, it's getting posted, you don't see it sis, okay, so back to the parting map. What i did was i located the center from the top of her head to the back, and you see where the center lands in the middle of that middle box on the second row right there. This is just a rough draft guide for me to figure out where i need to start my boxes for each row, so this is the first one. On the left side, i created five boxes on that first row and then, instead of going to the other side of the head, i'm going to go ahead and start on the next row and i just created a center part right down the middle of that box. To start the bricklay and then i'm going to work my way out towards the temple of the head, and so i've got five more boxes there keep in mind. We want to keep those lines on top of each other so that the braids lay in between each other and they're, not laying on top of each other. This prevents what i like to call helmet braids. So now that i got the two rows started on the left side, i'm basically just going to mirror the right side with the same amount of boxes. This is how i can keep track of. What'S even and what's not now. This is where i also like to mention that sometimes people's hairlines are different on each side, so sometimes they will look different or you may have four boxes on one side and five on the other, because they they may have not enough hair in their hairline or You don't want to put enough tension on that hairline, and it just makes more sense and here's some more examples of soft spots that i found on the side of her head here. There was really nothing i could do because she kind of had a little bit of spacing like a little bit of gapping in her hair density right there so didn't matter how much i parted it! It was going to have that little off-center piece right there. So luckily it's in the back. You can't really see it that much, but you guys know the braider in us. Is it's just so ocd. We want to go back and redo it, but we would be here all day trying to do that, so we're going to keep it moving. You guys so now that we're on row 3 above the ear. I have a better bird's eye view of the placement of that particular row, so i was able to do the entire row as opposed to doing a semi-circle, but you can do either or whatever works for you and again i started from the middle and worked my Way out - and i want to point out that this is one of those hairline situations where she didn't have enough hair to support that braid in the front. So i swooped it into the braid so that we wouldn't have a lot of tension on her hairline. For some reason, a lot of people get hung up on these last two rows. It'S the very top of the head at the crown, and i'm gon na give you my two cents on how i structure this, because every head is different, of course, and sometimes, if you start with an odd number, you end up with an even number at the Top, but in this case you see how we have a center part right down between the last two rows and that third row. I really hate having a center part that far down all the way down to the third or fourth row, because it just looks weird it looks like you have a cut right down the middle of your head. So i always make sure that i have one box either on the third row or the second row from the top right dead in the middle, so that you don't have that gap in the middle of the head in the back. So if that third row had a box right down the middle, i wouldn't do a semi-circle in the next row. I would just cut these sections into fours, going straight to the front and the back. If you can follow my comb there, that's what i would have done, but because we have that middle part, i'm going to do a semi-circle on that next section so that i can get a center box right down the middle again starting from the center of the Head and working my way out to the front of the head, i can get some even boxes on each side and i just cut right down the middle of that third row box there to make sure that i had a box in the middle of the head. Now we're on the last two rows, we're just gon na slice. It right down the middle if you have to get in front of your client to make sure that it's even do so do not be afraid and then check to make sure that they kind of match up on each side, because sometimes, if you're not paying attention. Those those two rows at the top can be uneven and, of course, we still want to continue our brick layer to make sure that each braid falls in between the braids below them. This is also a reason why i like to work from one side to the other, because if you work on one side, all you're going to do is mirror the other side. Now, if you haven't checked on us here in texas, we are living our best hot hot lives. Here it is super hot. So this beauty wanted her braids really short, but she wanted some curls on the end. So to make sure that i got those curls, nice and tight, i used the string pull method. I know i have a video about that somewhere on this channel, but i may have to do an updated one. If you want one just make sure you comment below, and i got you don't worry and yes, my goodness, this is messed up, because these numbers is up out here and we got to do what we got to do to stay safe. But overall you can tell she loved her look. So, as always, you guys, if you found this video helpful, make sure you give it a big thumbs up and share it with a friend if you're new to the channel make sure you subscribe and hit that notification bell, so you don't miss our uploads. Remember, we've got more tutorials coming on these parting maps and thank you so much for watching. I will catch you in the next video bye. You

Comments
Rejoicedancing: I cannot stand to braid a moving scalp because you can never get the parts straight. I have learned to just part it without holding the hair though and it helps. Thanks for all of your info Vandy.❤️
GLV: Omg!!!I just braided my sister hair yesterday and struggled with parting. Thanks a million u are super.....
Coronda Glasper: Thank you for your instructions, they have helped me so much when I braid my granddaughter's hair.
Lagree_Cheryl Sherman: When braiding don’t stand so close to the client as the braid gets longer. It causes the braid to bend and bow out. As you braid step back little by little as the braid comes to you. Your braid will lay flat and smooth. Much better look. Good luck. I hope you try it and see the big difference.
Sue-Lin Toussaint: This is the video I’ve been looking for! Thank you for making sense of parting…and moving scalp? I think I have one!
TNelly 504: I encountered this for the first time the other day. It’s completely makes sense now. I thought I was trippin it just having an off day but this makes so much sense !!!!
Svonne Gordon-Hay: I always enjoy your videos, they have taught me how to braid with added hair. And yes we are cooking here in this Tx heat.
Wiktoria Gwozdowska: Those short braids are actually looking very nice .when I have my braids done I'm usually go big/long or go home type of approach usually they are around 26 inch long but tbh those ones looks so nice that I will need to have them done one day added plus with then is that there is less weight to carry on the scalp .
adzemk: Very helpful! Thank you for this video
Vernelle Sylvester: Nothing is the best parting and explanation of braiding I've seen
Raina Myrtle: Thanks so much for this!
Ionela Vasile: Please,can you say something about how we should advise people to take care of braids,how to wash,what to use do not have brakage on the lengths when they remove extensions
Dmaura: My scalp, its gon move ❤
Willeneful: Thanks Vv....love thi
Ejejej Hsjsjeje: Hai anna iam Nagendar Anna na age 42 Funfun18.Monster qualification m.l.t medical lab technicianj ,Srpt lo jobs unte cheppagalaru anna.with govt Jobs