How To Draw Hair: Male & Female - Ultimate Tutorial
- Posted on 05 December, 2017
- Easy Hairstyles
- By Anonymous
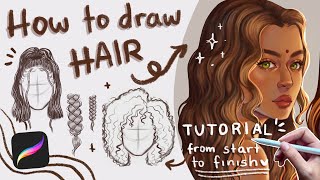
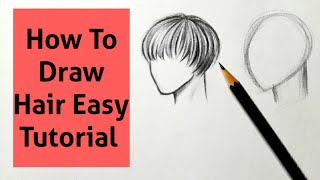
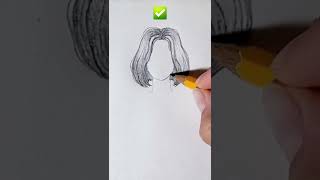
A super in-depth tutorial on how to draw 6 different hairstyles on females and males. I've broken the whole process down into 7 steps.
Become a Patron and get access to printable/traceable files: https://www.patreon.com/RapidFireArt
SUBSCRIBE for more FREE drawing tutorials: https://www.youtube.com/user/RapidFire...
✅ RELATED TUTORIALS
How to draw heads/faces: https://www.youtube.com/watch?v=iMEBSQ...
Learn about pencils: http://rapidfireart.com/2016/07/19/how...
How to draw short male hair (side view): http://rapidfireart.com/2017/01/10/how...
How to draw masculine vs feminine features: https://www.youtube.com/watch?v=RHD7kH...
✏️❤️ TOOLS I USED
- Canson Drawing Paper: https://amzn.to/2A5saTx
- HB Derwent Graphic Pencil: https://amzn.to/2GPXme7
- 0.5mm 4B and HB Mechanical Leads: https://amzn.to/2EpZx56
- Mechanical Pencil Housing: https://amzn.to/2JUD83y
- Kneadable Eraser: https://amzn.to/2M5tVYV
- Screw
- Key
⏰ SKIP TO TIMESTAMP ⏰
Intro: 0:00
Male hairstyle #1: 0:25
Step 1 - Draw a head: 0:34
Step 2 - Draw the hairline: 0:49
Step 3 - Draw an outline: 1:59
Step 4 - Visualize the flow: 2:24
Step 5 - Break things down into simple shapes: 3:07
Step 6 - Understand/plan out the lighting: 5:00
Step 7 - Add the details: 6:40
Drawing gray hair: 9:25
Boring vs. Interesting hair: 12:14
Male hairstyle #2: 14:23
Male hairstyle #3: 15:23
Female hairstyle #1: 15:42
Step 1 - Draw a head: 15:42
Step 2 - Draw the hairline: 15:47
Step 2.1 - Draw the parting line: 16:33
Step 3 - Draw an outline: 16:42
Step 4 - Visualize the flow: 18:25
Step 5 - Break things down into simple shapes: 19:25
Overlapping example: 21:06
Step 6 - Understand/plan out the lighting: 21:40
Step 7 - Add the details: 22:22
Stroke thickness: 25:32
How to add depth: 26:52
Female hairstyle #2: 28:05
Female hairstyle #3: 29:31
SUMMARY of the whole process: 30:50
My challenge to you: 31:37
MY CAMERA EQUIPMENT
Camera (Sony a 5000): https://amzn.to/39Noc1p
Portrait Lens: https://amzn.to/2vSijBq
Microphone: https://amzn.to/2xyv6cB
If you enjoyed this video, help others enjoy it by adding captions in your native language. Thank you! - [Add link]
RFA STORE:
https://teespring.com/stores/rapidfire...
FOLLOW ME HERE:
Website: www.rapidfireart.com
Facebook: www.facebook.com/RapidFireArtTutorials...
MUSIC USED:
(These are affiliate links to AudioJungle)
DISCLAIMER
This content contains affiliate links. If you decide to make a purchase through the link, I will make a small commission at no additional cost to you. This helps fund free tutorials on the RFA channel and website. Thank you for your support!
Hey I'm Darlene and you're watching a rapid-fire art tutorial today, I'm gon na show you how to draw three different hairstyles on the same person, one male and one female. First, I want to thank you for the unbelievable response on my face. Drawing tutorial, you guys have showered me with tons of love and support, and you even helped me reach 1.5 million views in just 5 weeks. I really hope you enjoyed this tutorial too. So without any further ado, let's get to it I'll start with the mail and walk you through my detailed drawing process. The first step is to draw a head. This is really important because you need a solid structure to draw the hair on. You can learn how to draw the head and face by watching my last tutorial or pause this video and trace the right side of the screen ready for the next step. The next step is to draw the hairline. The hairline is what gives the forehead its distinctive shape to draw it we'll need to split the whole head in half and then roughly split the top section in half and then in half again, I'm labeling the top two lines as hair a and B for easy Reference draw your hair, starting at line a as you work, your way down slit in your strokes towards the ear and then down along the side of the face to form the sideburns. Here I'm using a technique, I call shadow lining which are outlines that you don't need to erase ever because they will blend. In perfectly, when you add the details to shadow line, use strokes that follow the general hair direction, you can use regular lines as well. Just remember to keep those ones nice and light, so you can erase them whenever you need to for a medium-sized forehead. I like to draw the top part of the hairline right about here. If you want to draw a shorter forehead, bring your hairline closer to line a and for a receding, hairline bring it up above line B. Okay, let's go back to our main drawing the next step is to add volume to give the hair a good amount of volume. Sketch a rough outline around the head make sure the distance from the hair to the skull is consistent, avoid drawing hair flat on the head unless it's super thin, and/or wet. The next step is to think about where the hair is flowing in general. Why is this important? This will give you a better sense of direction while drawing at the top the hair flows in a large arc shape to the right and left at the bottom. It simply flows downward. So this hairstyle is pretty straightforward. If you're drawing really short hair, these arrows will really come in handy pause, the video to see if you can make out the general flow for the top back and sides. The key word here is general: drawing arrows can help you better visualize the flow and understand your reference image even more. I'M gon na use this image to demonstrate the next step. Well, specifically, this area here drawing hair is much less intimidating when you break everything down into simple shapes, this can help you draw faster because you're simplifying something that looks complex, for example this clump of hair. It can be simplified into this now. Let'S apply this to our main, drawing take your attention off the details for a second, maybe take a step back from your computer and try to pick out major shapes within the image on the left. You can group this whole section as one there's also a similar shape here, and here there's really no right or wrong way to do. It so feel free to use any shape you want as long as they help you simplify the image. Let me get rid of those construction lines first, because we don't need them anymore, once you're done visualizing the group's sketch them out lightly, we're still in the planning and sketching phase. So if the flow doesn't feel right to you, you can still erase and have another go at it. The important thing is to focus on maintaining a natural flow. If you're drawing from a reference image, you don't have to copy exactly what you see try to improvise by designing your own groups of hair and making them flow in unique directions. The outline we drew earlier acts as a boundary to help keep the volume consistent. Here'S one last important step before we hop into the details. Let'S talk about light now, where is the light coming from? In this example, our main light source is coming from the top because, as you can see, the lightest areas of hair are located at the top. These areas are called highlights. Sometimes it's not enough to simply make a mental note of this. If you really want to simplify the process of drawing hair, you might want to put that down on paper how you can use the shadow lining technique to outline major highlights. So you'll always remember where they should be. I'M shadow lining this area by using strokes that follow the general hair direction. Here'S a close-up example: let's highlight this section across these two groups of hair. The hair is flowing from the bottom left to the top right. So our shadow lining strokes should follow that same direction. When it's time to add details, we won't need to erase them because they'll just blend in perfectly aside from shadow lining highlights you can also shade areas that are facing away from the light. I think this is a very useful stuff for beginners, because it's like creating a roadmap for your drawing, so you don't get lost once you move into the next step, which is getting into the finer details if you're drawing from your imagination, like, I am think of This step as a quick, low commitment way to plan out the drawing before you jump the gun and spend five hours on a drawing that still constantly needs revising if you're drawing from reference doing this step will greatly reduce the number of times you have to glance Over at your subject, once you have your road map drawn out, you can start to add the details. I'D like to start in the darkest areas working from the route up, I'm using a 0.5 HB mechanical pencil for a medium shade of hair. You can select a harder pencil for lighter hair or a softer pencil for even darker hair, for a more detailed guide on the different pencil types and uses check the description again. The light is coming from up here, so the top section of hair is casting a shadow on the section directly below it. This cast shadow is darkest near the overhang and becomes lighter near the hairline. The darker you shade an area the more depth you introduce since eyeshadow line the highlights earlier. I know exactly where to lift my pencil after each stroke. Again, I'm starting my strokes at the root of the hair and then swiping up towards the highlight to make the stroke fade out gradually always draw towards the highlight to make each stroke look more natural. Here'S a close-up example of what I mean the strands are being drawn towards the highlight where they fade out gradually to make the highlight dull, give it a light shade of gray. The more white your highlight is the shinier. It will look notice how at the sides the hair seems to clump together in many small groups, when your character has wet or gelled hair, the hair will sort of stick together, as you can tell, he has much less gel on the top of his head. Let'S move on to the left side, since this is where his hair is parted. I'Ll draw this suction extra dark to accentuate the curvature of the hair. This also gives it more volume and adds depth to the drawing. If you want to add, lighter hair like blonde or gray, use something sharp and pointy like a needle or even a screw tip, to make some strokes along a clean area of your drawing once you're finished continue drawing on top and the lighter hair will start to Appear for thicker, strokes, use a thick object like an empty pen or even a key. Let'S apply this to the main drawing, but first I need to erase a clean path before I use this group. I want a nice clean spot, so the strands are white from root to end. This technique is very useful for drawing salt-and-pepper facial, hair and animal fur. It'S a big time-saver. It doesn't work well on thin paper, though, because if you're, not careful, it can tear right through. So as an alternative, you can use a flattened, kneaded eraser to lift thin sections of graphite from the page. Here'S a close up from my Game of Thrones portrait, where I'm adding light hair on a dark background. I'M flattening my eraser and dabbing it on the graphite to lift it away. Sometimes it takes a few tries to lift the right amount, that's needed after each dab. I'Ll fold the eraser into itself and continue the process, if you accidentally remove too much graphite, use the sharpest edge of your pencil to shade around the Strand. The quality of your lines will depend on how well you pinch the eraser. So take your time you can get some pretty unique shapes by bending the erasers, so it's not just a straight line or a simple curve. Let'S go back to our main. Drawing again, sometimes, a group of hair will look boring because it's too patterned like this area here it will look a lot more interesting once you break it up, you can do that by adding some gaps to separate the hair. This will also give it more depth. Here'S what it looked like before and after before we move on to the next hairstyle. I want to talk a little bit about flow, because I think it deserves a little extra attention and another example. On this side. We want the hair to flow in a general downwards direction pointing towards the left, but it would look boring if each and every strand followed the exact same path. You can make your drawing a lot more interesting by pointing the hair in several directions, while still flowing in the same general direction. I know it can be a little bit confusing. So here's one final close-up example: here's the scenario: I want to draw a bunch of hair going in this general direction, but this looks very patterned and unnatural because in reality, hair is never really this neat. Let'S try this again. Alright. This pattern is too predictable an unpredictable pattern like this is much more natural. You can make your drawing look a lot more interesting and natural by pointing the hair in several directions, while still appearing to point in the same general direction. A simpler way to add a layer of unpredictability is to draw stray hairs using an eatable eraser bend. The eraser into a unique shape and then press it onto your drawing several times repeat this process until you achieve your desired results to finish off check if the overall lighting makes sense, as you can see, the right side is lighter than the left to fix. This simply add an extra layer of graphite. If it's too dark, you can easily bring the light back by lifting the graphite away little by little, using an eatable eraser all right. Next hairstyle, let me use the same face to draw a popular hairstyle called high-top fade. This hairstyle is long at the top and really short at the sides. Let'S give him a clean hair line with really sharp edges here, I'm sketching a line to mark where he parts his hair. Our character has curly hair now. So this is where the shadow lining technique comes in again. Instead of outlining the hair using straight lines, you can draw a row of circular shapes this way. When you draw the hair in more detail, your outlines will blend in perfectly instead of showing, through I'm switching to a thicker pencil. So I can cover more ground quickly. Just drawing the hair flowing upward in this direction, keep drawing circles and squiggly shapes until you're done to draw dark hair use a softer pencil grid such as a 4b for his final hairstyle. I'M going back to the original hair line, because that's my favorite one. This guy has medium length, hair the sides and a lot of volume at the top, as you can already tell from my outlines. Moving on to the female I'm gon na show you how to draw a long, dark hair. But first let me show you a variety of hair lines to draw the hairline split the whole head in half and then split the top in half and then in half again start on line a and work. Your way down towards the ear females tend to have softer hair lines with rounder corners, so I'm just avoiding sharp angles. This is a medium forehead. You can bring everything in a little bit to make the forehead smaller. You can also make the forehead shorter by bringing the hairline down closer to line a okay. Let'S stick with the medium forehead, I'm gon na part her hair down the center, but instead of drawing a straight line, let's make an S shape. So it's more interesting. The next step is to sketch an outline around the head. I'M gon na give her a half up hairstyle. This means the top half is tied up while the bottom half is let down. So there will be less volume at the very top and more volume, as we work our way down where the hair is loose so for hairstyles, where the parting line is really visible. I like to start there and work my way out as the hair starts. Wrapping around the back of her head near the ear it starts piling up and becoming quite thick, so this section is gon na have more volume compared to the section directly above it. For the rest, let's make some wavy shape, stretching all the way down. It'S especially wavy near the bottom, because the hair is sort of resting on her shoulders. Now, if she were to grow her hair longer, I would draw my lines much straighter, as the hair would flow down her back instead of being pushed up by the shoulders. Since her hair is parted down the middle, the left and right side should have a similar amount of hair and volume. Let'S get rid of those construction lines from the hairline. I'M gon na draw the fringe reaching down past her eyebrows to match the rest of her wavy hair I'll curve them a little to the right. I don't want them too straight, because they'll look out of place. The next step is to visualize the flow using arrows here. The hair is flowing down and wrapping around the back of the head down here, there's a steeper curve and then it wraps in at the shoulders if you're, drawing from your imagination - and you have trouble making the hair look interesting, especially in large areas like this, create Some randomness I'll add a random arrow, pointing this way to make the flow less predictable. Here'S an example of a boring pattern. Alright, I'm pretty happy with how it looks and the flow seems quite natural. So I'm sticking with this design, if you're drawing light blonde hair and don't want the outlines to show through in the finished piece, lift some graphite using your kneaded eraser until it's lighter than the shade of blond hair, you had in mind I'm drawing dark hair. So my outline should blend in just fine now, it's time to break everything down into smaller, more manageable shapes. I'M breaking this into three smaller shapes remember: to keep your initial lines very light in case they don't really match up. The left side looks too neat and boring. So on this side, I'm creating a staircase shape, so it looks like each section of hair is piled on top of the other. Do you see the difference? Let'S cover part of the ear and create a thick section of hair wisping down to the right and then left for all the other sections. I'M just gon na go crazy and point them in a bunch of different directions. So it looks more realistic and random. Our hair is flowing in the general down direction, but each path is unique, sometimes you're going to want to do some overlapping. The most important thing when you overlap hair is maintaining continuity. Let'S say we want three locks of hair behind this one draw your shapes crossing right through each other to make sure each lock flows smoothly and then erase the lines you don't need after you're done. Okay back to our main, drawing if you're happy with the design and flow move on to lighting. Just like the other examples, the main light source will come from the top except this time. There'S a twist on the right we'll have an intense bright light, while the left, who will be dim, I want to show you how to draw shiny versus matte hair. All we're gon na do is change the size and value of our highlights under intense light. Our highlights should be larger, so the hair appears brighter under dim light. The highlight will be smaller, less prominent because there's less light reaching the surface of the hair I'll talk about the value part later, let's go ahead and shade any major areas facing away from the light all right. Now that we've created a lighting map, we can finally add details for detailing. I like to use a mechanical pencil. An HB LED will produce clean lines because the material is hard. However, a lot of pressure is required to shade dark values if you're drawing dark hair. Like me, choose a softer pencil such as a 4b remember to draw towards the high light instead of away from it. So you get a nice radiated value from dark to light for a matte surface, one that is not shiny, shade, a light layer of graphite over your highlight to cover the color of the paper. So not only is the highlight small, it's also a light gray. Instead of white, I think the biggest difficulty when it comes to drawing long hair is achieving long, smooth, continuous strokes. The trick is to move your elbow and shoulder instead of your wrist. The wrist provides very limited movement, which is fine for drawing short hair here. I'M reducing movement in the wrist and using my elbow and shoulder to achieve a larger movement. If you haven't tried this before it does take a little getting used to. But it's very helpful. A good way to practice is to fill a few pages in your sketchbook, with a bunch of straight and curvy lines going in various directions. If you make a mistake, pinch your kneaded erasers, with thin tip and erase in the same direction you are drawing. If you erase in random directions, it can make the area look patchy for a shiny surface. Try to make the highlight as clean as possible. You can easily control the light intensity of a scene by manipulating the highlight size and value or color. The brighter your highlight is the brighter the environment will be. If you want a little variety in your stroke, thickness use a regular pencil, the more you wear it down the thicker. Your lines will be. This will also help you draw faster because the lead is thicker and can cover more ground in a shorter period of time. If you only have one pencil, you can control the line weight by wearing the lead down while holding it on an angle, rotate the lead, as you draw to get thick medium and thin lines. I do this all the time when I need to draw super thin strands of hair or when I need to draw on tight spaces. If your shot edge becomes dull again, keep scribbling to sharpen the lead areas closest to our main light source will be brighter than areas here which are far down and far back the further back. The hairs are, the less light will be able to reach them. So the highlights should become darker and darker. If you want to add depth to your drawing. This is a great way to do it. The lighter locks of hair are pulled into the foreground and the darker locks are pushed into the background. Here'S a really clear example of where that's used, this image looks very flat once gaps or dark spaces are introduced, the drawing immediately conveys a layer of depth to the viewer. Now this drawing looks really weird having two different levels of light intensity. So let me add more strokes on the right side until the lighting matches the left. Now that my drawing is consistent, it's pretty much complete, I'm going to show you how to draw two additional hairstyles, really quickly we're working with the same girl. Here, let's cut her hair a little bit shorter and part it on the left side, just making a squiggly line to mark where her new parting line is from here. I'M gon na draw the left side of the hair just using some loose sketching lines and then draw the right side. Since her hair is parted on the left. There should be more hair on this side than, on the other, see how the hair is closer to the head on the left compared to the right from the parting line. Again, let's draw her fringe going around the eye and then curving up a little near the ear. The reason why the hair curves up at the ear, instead of going straight down, is because she regularly has her hair, tucked behind her ear, which causes the hair to dent the rest of the fringe wraps around the side of the head on the left. Let'S tuck some of that hair behind her ear. There are so many strands at the bottom that it forms a thick clump. Here are some arrows, so you can visualize the hair flow and here's what the hairstyle looks like when all the details are added. Okay, last one, a lot of time has passed and it seems like she's grown out her hair quite a bit. The parting line is still in the same spot, although I did forget to draw it, there's a lot more volume than the previous hairstyle, because the form is a lot wavier, and because of that, the outline will be much further away from the head. Remember to keep those lines loose and light, so you can easily redesign something sorry. This is where my camera cut out. So I lost the footage in between. Basically, since the hair is longer and heavier than the last hairstyle, the fringe weighs down and covers part of the eye, even though the parting line remains the same all right, let me flip through each hairstyle, so you can see the differences. Here'S a recap of the whole process draw a head sketch the hairline give the hairstyle volume visualize the flow break, everything down into small groups or simple shapes, understand the lighting and then map it out by shadow lining major highlights or shading major shadows. Then add your details by drawing strokes that go towards the highlight and don't forget to use your elbow and shoulder for long, continuous, strokes, make sure your lighting is consistent and have fun remember these are just general steps to help guide you through the drawing process. You don't have to use all of them in one drawing here's. My challenge to you, pull out your sketch book and try to fill it with as many hairstyles as you can like. I am right now. Don'T focus on how accurate or how perfect each one needs to be. It can be as rough as you want. The most important thing is just to start. That is actually the most difficult step. If you just want to focus on drawing hair and don't even want to bother with drawing heads and faces click the link down below to find a printable file of the template, I'm using right now, if you need inspiration, flip through a magazine or do a quick Google search for trending hair styles - I hope you have a ton of fun and if you fill out an entire page, send me your artwork and I'll feature it on rapid-fire art comm. Thanks for watching and I'll see you in the next one you
Comments
RapidFireArt: TOOLS I USED ⬇️ - Canson Drawing Paper: https://amzn.to/2JYd7jV - HB Derwent Graphic Pencil: https://amzn.to/2VUSw7k - 0.5mm 4B and HB Mechanical Leads: https://amzn.to/2JSLMj8 - Kneadable Eraser: https://amzn.to/2VXXrEz - Screw - Key
brooke: This is a big step up from the 3 spikes i used to draw when i was 4 years old.
Day: Seriously the best tutorial ever. I love how you break down every single step. Hair doesn't seem so intimidating anymore
Presley Payne: Best Tutorial ever you showed how to do it showed exactly every step to do and you included the tools you used thank you
DevineSkiee Animates: Why is she the only artist that can seriously teach how to do hair! Literally the best hair tutorial ever I can’t even find the right words to say how awesome she is for this
RapidFireArt: SKIP TO... Quick short summary of the whole process: 30:50 Male hairstyle #1: 0:25 Step 1 - Draw a head: 0:34 Step 2 - Draw the hairline: 0:49 Step 3 - Draw an outline: 1:59 Step 4 - Visualize the flow: 2:24 Step 5 - Break things down into simple shapes: 3:07 Step 6 - Understand/plan out the lighting: 5:00 Step 7 - Add the details: 6:40 Drawing gray hair: 9:25 Boring vs. Interesting hair: 12:14 Male hairstyle #2: 14:23 Male hairstyle #3: 15:23 Female hairstyle #1: 15:42 Step 1 - Draw a head: 15:42 Step 2 - Draw the hairline: 15:47 Step 2.1 - Draw the parting line: 16:33 Step 3 - Draw an outline: 16:42 Step 4 - Visualize the flow: 18:25 Step 5 - Break things down into simple shapes: 19:25 Overlapping example: 21:06 Step 6 - Understand/plan out the lighting: 21:40 Step 7 - Add the details: 22:22 Stroke thickness: 25:32 How to add depth: 26:52 Female hairstyle #2: 28:05 Female hairstyle #3: 29:31 My challenge to you: 31:37
Purple Fire 28: This is the best hair tutorial I've seen. You do really well breaking it down into pieces, and explaining everything really well. Clear, simple, straightforward. The arrow trick for indicating the flow of hair is super helpful.
Moira Kelly: WOW! I wish my art teacher had had your skills. Learned more in 5 mins than 5 years at high school! Subscribed.
Fiona Lee: You really break it down to make it easy and understandable for beginners like me. I find that a lot of videos out there made by even the most advanced of artists glimpse over their steps an lack specificity- but not you! You’re an amazing teacher!
Blissful Meow: This is legit the best tutorial I have ever seen. Thank you so much! You don’t know how much that helped me.
Imperfectly Navie: Many thanks to you, Darlene. This is such a huge inspiration <3 Look forward to watching more and more tutorial videos from you.
Charles art19: You did a great job at teaching us how to draw hair you have a wonderful talent
jackhammer191: Wow! I’ve only started sketching with no background and your videos are so helpful. Not only you put great effort in sketching but also teaching it. Thanks all the way from Australia
Sam Harper: This is an excellent tutorial. Lots of detail. Thank you!
MG S: Thank you so much for this! Can't wait to practice and hopefully be a great artist like you do
up in the sky: It's not the first time time you give us a tutorial that's easy for us to start with. Really thank you so much your kind of teaching is easy to follow and the exercises you give also very helpful. now I'm going to look at your latest tutorial about hands because I want to know more about babies hands and how to draw it :) thank you again.
Half Blood Prince: Your teaching is perfect, I m loving it,thank u teacher..... ..... : )
Tess Goodman: You're a wonderful teacher! Thank you for the awesome tutorials.
Whippy: The detail in the explanation you give is so good, thank you for going into it so thoroughly, super helpful
Melissia Walker: You are an excellent instructor-teacher, thank you kindly for sharing your amazing experiences with us and taking your time to teach us. Your tutorials are wonderful you have a patient way with us and learning thank you again
becca d: Love it! Please keep making these tutorials!!
Richard Grassby: The most logical and best laid out method for a beginner to draw and construct a pleasing face . A great platform to encourage anybody to start portrait drawing . Your teaching method is excellent and non irritating . Well done
Rey: All I have to say is WOW! Your videos are very easy to understand and I LOVE your direction and teaching methods! Thank you for inspiring those of us who didn't think we could ever draw!
Tam riel: Unbelievably great video well paced and intuitive. I’m new to drawing in general and really needed to find this video. Thank you so much Rapid <3
Solo Lesta: I wish I could attach pics to these comments so we could show what we've learned from you. Thank you so much for all these tutorials.
phuc nguyen: Thank Darlene for inspiring me who did not think I could ever do art. Your tutorial are so amazing. Love your talented art so much
Rory Ricketts: You are amazing. Thank you for these tutorials. They have been really helping me improve.
HAIFAA WORLD: Ur one of my favorite drawing instructor , I would like to tell u that in the past month I have drawn 16 drawings so far and am seeing the progress everyday
SoarinOfSorts: The most detailed and yet understandable drawing tutorial for hair i have found. Really amazing video, top notch
Robyn North: Wow! Thanks for all the tips a d techniques Your lessons are simple to follow and your voice easy to listen to. I'm not afraid to draw a face anymore, thanks to you! God bless you! ♀️
English literature Resolution Namita Bikaner: Amazing, and your use of eraser is absolutely stunning. I learned a lot today. Thank you.
Siyeril Bee: very helpful. I understood your tutorial more clearly . Thank you. ❤
Phedre Joseph: You're an excellent teacher and artist. Thank you for sharing your wealth of experience with us.
Megumi Fushiguro: Thank you so much!! I see lots and lots of difference from how I used to draw hair. Thank you!! Now it's not so hard as I thought
Linn Classified: Thank you so much for doing these tutorials! You are the best at doing so, from what I've seen, and I really appreciate all your hard work. :-) You have an amazing talent both for drawing and for teaching. Thanks!
Silver Maran: Amazing artwork ! You're so talented! Thank you very much for sharing❤️
TomFoolery: Thanks so much! these tutorials really helped me in my art! From my prior drawings to now, it's really improved, all because of you! Thanks so much!
Sudipta Kesar: Thank you so much for your contribution here for beginners like me. I really wish to sketch just like you do. You're amazing and your teaching techniques are soo helpful and simplified. Bless you.
keyboard fan: I was exactly looking looking for this video & I got all solutions to my quarries after watching this video. Very helpful.
Alexandra Engelmann: I love your tutorials. I took a lot of art classes in high school and I am trying to get back into it. You are such a great teacher!
Litson Nite: Your the best Darlene!! Your tutorials are so understandable. You deserve more views and subscribers!! :)
Pia Semi-Goldberger: Thank you for all your wonderful tutorials. Right to the point. Easy to understand. I am a beginner so these tutorials are very helpful. Just one little question. How do I keep my hand clean. It gets messed up with graphite and then I keep smearing it on the picture. Very frustrating. Any hints. Thank You again!
mark frank: I've been drawing for 60+ years and have never figured out how to draw hair. After sketching along with this single video (I've watched several), I actually started to get it. It's going to take a bit more practice of course but you got me pointed in the right direction. Thank you! Happy to say I am your latest subscriber!
gintare eimutyte: Thank you so much! It seems to be a lot simplier now!
World_of_Sandun: I loved the way you teach, things are very clear and easy to understand ❤
flowografie: I found your site some time ago and you explain how to draw in an easy way so it is also easy to follow. I really appreciate you doing this! You helped me so much! Thank you!
jmsomps: This was just a little over a year ago. Thank you for your excellent teaching. You have a real gift at teaching how to draw.
Jessica B: This was super easy to follow, and was very helpful to me. thankyou!
Ra S: This is an INCREDIBLE tutorial!! Holy moly. Thank you for this! Truly have never found a better explained drawing tutorial.
Rogério B.: wow this is undoubtedly the best lesson I’ve ever had. and it’s free! thank you so much for this. you’re a great teacher and artist.
Ahmed Hammad: One of the best tutorials I have watched , thank you so much, keep going you are great
Bernardo Sanchez Jr: I love your tutorials and I have to say you are awesome!! I have learned so much from them that you can add me to your fan base. Thank you for the easy to follow tutorials!
Jodie: you are the first person that actually really helped me with my hair drawing problem... so thank you so much <3 you are incredible
Karla Medrano: Sketching is so calming! I just started but looking forward to learning from you. You are the best series on YouTube. Can you do a tutorial on how to do natural black hair? Like Alicia Keys? Or braids?
Mus Sim: Great tutorials! Always love your videos. I'm glad I found your channel. Thanks!
Rajat Bhushan: You are one of the best teacher I’ve come across. You explain complex and difficult steps in a very understandable way to a beginner like me. Thanks so much!
Susan Jerrell: TFS. I put this whole series in my Drawing file and I've been drawing for 50 years. You can always learn.
Peke Jiron: I just found you on Youtube and you are an amazing artist and amazing teacher. I was a master teacher meaning they would give me student teachers to study under me. Therefore I believe I am qualified to spot a super great teacher. Also, you share a lot of amazing tips, tricks...I checked out your website too. Some artists are not great teachers you are both. Thank you so much for your amazing tutorials. Have I used amazing enough!
FineArtNeighbour: Excellent tips that can be a stepping stone for anyone who wants to learn how to draw hair! Really appreciate this amazing tutorial. It's simply the best!
Anushir Ibrahim Abdul Razack: Very detailed and Perfect Tutorial! Thanks a lottt
Daneeta Loretta Jackson: I subscribed to your channel a week or so ago. After watching and following a few of your tutorials, my drawing skill has improved tremendously. I am a filmmaker, so while drawing is not technically part of my job, visualization is. Drawing can help me organize my ideas and to think visually. It's also incredibly relaxing. After a really stressful day, I'd rather pull out my sketch book and lose myself in drawing than do anything else. Thank you so much. You have a real talent in describing and revealing techniques to improve. Keep up the amazing work.
Dot deguerre: I am a landscape artist! Watching your videos inspire me to attempt portraits. Thank you so much!
Izzy: good tutorial for anyone wandering I used a 4H for the majority of the hair and I used a B for a very small part of the drawing (though its up to you what pencils you use)
Shirley Heppenstall: What amazing tutorials!!!! Seriously I am learning so much from you. Thank you
VIGNESH ARTs: Hai, I am Vignesh from India, Kerala. I would like to thank you you. I love arts but I am facing a major issue to drawing hair. You simply and detaily explained about the tricks and easy methods and in your description you mentioned each and everything think including the tools and it's buying link. It was very helpful to beginners like me. Thanks a lot
Liz Sosa: Awesome explanation. You're so clear and make it so understandable wow. Congratulations!! I'm your fan
Celia Burns: Thank you for making this tutorial! Because of it I am not afraid of drawing hair anymore and my art skills have improved a lot.
Chad Kiruy: It helps me a lot. Thank you
Lay Lay: Wow this was very well made, and very informative thank you.
Clara Goh: Your tutorial is very helpful. Massive thank you :))
Thara Srinivasan: I love love love your tutorials. This one was much needed for me as a beginner as I've been screwing up hair pretty bad. Thank you!
The wanderer Ali: Hi Darlene your videos are awesome am learning so much from your tutorials. Will you please upload more tutorials on how to draw faces from different Angles that will be much helpful for all of us. you are doing a great job I cant praise your great work in words you are awesome ❤ Love from India ❤
Klaus Mickleson: Hi..!! Amazing work I'm new to drawing and I really love what you do and I hope and know that I will make it happen
That Creative Life: Amazing Tutorial, very useful!!!
dimple rajput arts: I just love your tutorials u cover the real challenges in drawing n I love tht
Diogo Xavier: The way you teach is so great! :) Would you please make a tutorial about drawing the human body?
Bigfoot Isreal: Thank you so much for making this I've been looking for a good video and honestly most of them are just like "Just do it" this one very clearly showed and demonstrated without giving me whiplash trying to keep up.
thiama Gueye: Big thanks. You explained things so well and in a methological way. I've learned a lot.
Retyu Uywere: Thank you so so so much! I need this tutorial so much!
jihoon winking: Thank you so much for this. You very help me for drawing! You're amazing!
sunshinedays: Your absolutely gold in your presentation, tutorial and how you convey each step of the lesson, a very classy class . Kathy
kawaii senpai: Oh my God, that's perfectly. Thank you so much for your detailed work. It helps me, I feel that my skill get better.
Nilim Goswami: Dear Darlene, I honestly love the way you teach- its rare and really amazing!!! ONE REQUEST - Please make a tutorial on human figure drawing. I am eagerly waiting for that.
Yasmin Diyana: This is helping me so much thank you for uploading this❤️
Ejbcejcbsqjcbucn Jsvijsbckechsi: Very beautifully done !
Steen Maigaard: What a talented person you are, I wish I could draw like this, but I am trying hard, and you are such an inspiration to me. Thank you so much for the videos.
Abigail Roman: Wow! I drew like a pro! Ur such a good explainer and u help me draw rlly great!! Thank u so much! Keep going!
Mary abelaida: The best of the best turorial.. I actually draw an actual face by following all your instructions. Learning each one of the part of the face step by step! Thank you so much!
Amanda: Great tutorial! The only thing I wish is that you had included a model with blonde hair, or curly hair. I have curly, blonde hair, and practice with a lot of self portraits, but I always end up fudging the hair into a giant smudgy mess. I"d love some helpul tutorials for this hair type!
Joy Opheim: Thank you for this excellent how to for hair! I’m curious about the “glove” you wear to prevent smudging. Is it just a cotton glove you’ve modified? Thank again!
Erin Sullivan: You are so talented, I used one of your tricks when I was in my Art class and it helped so much❤thank you
karla michelle: OMG I have been struggling a lot learning to draw hair and this video simplified so even someone who cant draw like me can learn , you make this looks so easy
Natalia: I watched this awhile ago and tried to follow along. Of course, I couldn't, but it still helped! It helped me a lot, because before I was just kinda doing solid chunks that looked good but animated. Now it is so much more realistic, which is definitely my style. Can you do a video on how to do braids? Thank you so much!
Akhil sunny: Thank you so much... The way you teach, is really awesome... The video making was so impressive... Keep going... Make more videos like these... It's really helpful....
Cyngyn1: I have about 6 favorite artist here on youtube so far. The list is growing. You were my first artist i came to when i caught the drawing bug. So you are my top favorite cause i learn by practicing everyday. Then theres the doodle artist oh my.
Nadia Bonn: THANK YOU! Your videos are amazing and more helpful than my college drawing class. I've learned more from you than I have in class!
Maria Paul: This is so easy way to sketch hair. Thank u for sharing.
Szandi Marcsik: I just like the fact that, our teachers at school expects the whole class to draw portraits like professionals, but whenever we ask for help, such as with the hair, they either don't tell anything at all, or they start to explain it in a very complicated way. To be honest, i learn more of these kinds of videos than listening to the teacher for 3-4 hours how to draw portrait. Drawing hair doesn't seem so complicated after watching this
JASON MCCARTY: nice work, I really enjoy your videos, and have learned a lot of new things, thank you.
RiteAsRain: Well done teaching us this, very simple, straightforward and totally manageable by people who find hair difficult and confusing. Hah manageable hair! :D :D