5 Tips For Drawing Hair Better
- Posted on 10 November, 2022
- Easy Hairstyles
- By Anonymous
Hair is really important to nail the look and feel of the character but its also one of the more challenging things to draw. Thankfully there are some things we can do to draw it better. Here are the 5 tips that I found make the most difference. Enjoy!
0:00 Intro
0:20 Divide it up
1:44 The level up drawing system
3:50 Don't draw grass
4:59 Think ribbons
5:48 Add in AO
6:28 Practical application
=========================
Twitter - https://twitter.com/orideizu
Instagram - https://instagram.com/orideizu
PAINTING SOFTWARE:
Clip Studio Paint, Photoshop
WHO AM I:
I'm Ori and I’m an artist living in Australia.
I originally studied to become a teacher but my real passion has always been in art, so I started painting and practicing and never looked back. I’m mainly self taught but have also been mentored by the Japanese illustrator Kakage.
On this channel I make videos sharing what I've learned through tips & tutorials and I hope you find them useful in your art journey :)
=========================
Stock footage provided by Videvo, downloaded from videvo.net
BGM by Flehmann
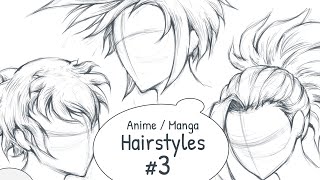
Hey friends, welcome back to the channel. In this video I'll be sharing with you. Five practical tips that I found has helped me the most when it comes to drawing hair. Now, drawing hair is hard, and it's actually a thing that I really struggled with for a long time., But learning how to draw hair better was absolutely worth it as it Made a huge difference in my art and I hope these tips can make a big difference in yours. Too. All right tip number one is to divide the head up into sections.. This is a common tip, so I'm not going to spend too long explaining the basics of it. And instead I'll share some practical advice on how it actually applies.. So I like to see the head as split up into four sections, the front top back and side., And this is important because hair obviously grows from the surface of the head and by clearly dividing it up.. We know which part of the hair we are drawing and where it's actually coming from.. Otherwise we can sometimes end up with this sort of amorphous blob where the hair is kind of like a single mass, and we don't really understand what the hair looks like three-dimensionally.. A key point to remember is that the whorl of the hair is located here between the front and the top section, usually at the center.. Knowing this is important, because, when you're drawing hair, you want the overall flow and direction to becoming from the whorl. Okay. So now we've got the head divided, up., Here's what the hair would look like if we were to grow it out. Flatly. Anime hair tends to be quite volumey compared to real-life.. So don't forget to add that in when you're drawing it., We can further split the bangs into three sections. Left middle and right., And also the side of the hair can be split into in front of the ears and behind it.. Doing this we'll make sure that our hair is drawn off a solid 3d structure of the head, which will make it look more accurate and realistic.. Usually when hair looks wrong or kind of feels off.. I find that it's because it wasn't drawn with this 3d form in mind.. The next tip is to use what I call the level up drawing system.. So you know how in games you start off with this really weak level 1 character. But as you progress and beat more and more enemies, you level up and get stronger. It really helps to do that in drawing too, where you start off with this really crappy, sketch And level it up by drawing a more refined version on top of that, making it `` level 2'' and you keep repeating it to level 3 or even 4 until You'Re satisfied with how it looks like. This approach of `` leveling up'', the drawing completely changed everything for me because, instead of thinking ``, oh my god, I need to get this absolutely perfect and create a masterpiece''. Now I think `` I'm just going to put down some crappy lines and level it up as I go.''. Okay, so I'll show you how it looks like in action.. First, I'm just putting down the general feel of what I want the hair to look like. By the way for beginners. I recommend putting down this flat form of the hair that we did in the previous step before you start drawing the hair, because then you can use it as a guide to draw on top of, and it makes it really easy. Think about it as the level Zero drawing., Also until you get used to it, I recommend keeping it simpler than this.. Don'T worry about the small details like the loose strands. I added. It's totally okay, to draw it in bigger bunches., Like a general rule. I have is, whenever I'm doing something for the first time, I tried to keep it simple and easy, because I know it's probably going to be hard and I'm probably not going to be very good at it at the start, but with practice I can get better And improve.: Okay, now that I've got a rough idea of what I want the hair to look like I'm going to reduce the transparency of the level one layer. And on a new layer above I'm going to draw a more refined level, two drawing., I'm quite happy With how this level two drawing turned out., So if I was going to color this, I would go straight to doing the lineart next., But sometimes I'll do a level three drawing. If I wanted to add in more details - or if I feel like, I didn't - have a clear idea yet of what I want the hair to look like. By the way The `` ahoge'', which is the loose hair, you often see, anime characters have usually comes from The whorl, which is another reason why dividing the head up and understanding the different parts and areas is really useful.. The third tip is: don't draw grass., Okay. What do I mean by that? So initially, when I was doing the level two drawing for this example, I was going to draw the bangs like this, but I quickly caught myself and changed it to be like this.. So what was the problem with the first one? It comes down to how we want to avoid repeating the same rhythm when drawing hair.. So if we take a look at the shape of these. Bundles Tufts, I don't know what to actually call them. But let's stick with tufts. These two look too similar to each other because they have the same rhythm, which makes it feel unnatural, because real hair is not monotonous., It's very much irregular and random, which is why I changed them to be different from each other.. So when drawing hair, you want to make sure the tufts that are next to each other have different rhythms in how they look., For example, like this, where it's small, large small, medium small, large large.. What you want to avoid at all costs is having things monotonous like this, where it's all just medium, medium, medium, medium, medium medium., Because then you are drawing grass and even real grass doesn't look like this because, like hair, it's actually irregular and random too.. The fourth tip is to think of hair like ribbons., So when you're trying to draw hair that is twisting or curling., It can be useful to just draw it as a ribbon first and then turn it into hair based off that shape.. Just remember that hair isn't completely flat like a ribbon., So you want to add in just a bit of thickness to the side like I did here. Practically. I applied the ribbon method when drawing the loose hair parts here in the example., And in this other example, I use that a lot for the twintails.. The key idea is to show the inner and outer sides of the hair. Since that's what will make the hair feel like it's twisting and turning., And you want to show these different sides to when shading.. For example, if you have a light source from the upper right of the screen, this outer plane will be in light, and this inner plane will be in shadow.. The fifth tip is to add an AO which stands for ambient occlusion, which is just a fancy term. For dark shadows that form as a result of something touching something else, because it's really hard for light to get in there. In the case of hair. It'S where it's touching the forehead and also where it overlaps with other parts of the hair.. So these are the parts where I added AO to in the examples and here's what they look like with and without AO.. Personally, I feel that without AOL - or these really dark shadows, it feels like the drawing is somewhat floating from the page and really weak and by adding it in you ground it and give it weight. By the way. This is something you can usually just add in the lineart stage, so you don't really need to worry about it until then. Okay.. So here's how these tips apply in action as part of a whole illustration.. So for this Hololive fan art I did of Kuro-sama. You can see how I applied the ribbon concept in places like here, where you can clearly see the inner and outer planes of the twisting hair and the hair generally flows from the whorl. And here's the front hair side, hair back hair. And there's also AO in The lineart., Also the hair tufts all have different rhythms and aren't monotonous.. I just want to point out that to keep this video short, I focused on just the drawing part., But if people are interested I might put out a coloring tutorial. So let me know in the comments. Anyway, if you enjoyed this video and got to this point thanks so much for watching, and you might like to check out the other tutorials I've made in this playlist here.. Do you hit subscribe if you're into this whole anime style of drawing thing, and if you want to see what I've been drawing recently, you can find me on Twitter and Instagram links are down below.. This has been Oridays and I'll, see you in the next video. Bye.
Comments
oridays: Thanks for watching and I hope these tips can help out! But drawing hair is hard for real, so don't worry if you're struggling to get it at the start - that's perfectly normal. The important thing is to keep on practicing
StormsBeyond: PLEASE. I'd love to see a coloring tutorial
Staryxz: Another quality tutorial form Ori-sama, I'm in love with your style so these tips are very helpful Would love to see the coloring tutorial!
Nike Coro: Thank you for this hair tutorial! I have always wanted to draw hair in style similar to yours and anime illustrations, but most times I feel they come out flat and more cartoonish. I'll give these methods a shot next time I draw and see how it goes!
Nike Coro: Coloring tutorial would be amazing! Coloring is the one thing I struggle with the most, I just can't seem to pick out a good color (either comes out too dark or light so I try using the tonal correction to help in s lot of my decisions)
Charismadozart: Good short and to the point thank you! This video was explained super well
Lordøfweed: Thank you so much for making this video! Can you please do a coloring tutorial too? :)
hanafuです。: i'd been waiting for an upload !! thanks so much for the video !!! ありがちうございます!!! edit: please do upload a coloring video!! it'd make me veery happy!! thanks again for the video!!
Lynka: The amounts of time I give up because drawing hair are ridiculous even though i watch tons of tutorial nom of them help but this, this is very helpful because the way you explain is very great and so many information so Thank You
LiTz: it would be amazing if you make lineart and coloring tutorials
alucia: Id love to see a video with the colour help for hair!
Butters: We miss you!!! Love to see it, also could we get a break down from rough to final render?
Baka Nade: Welcome back! Would want to see the coloring tutorial
06李宗穎: Can u teach me, how do i draw color on anime?
sowzz zz: Yes make color one if you can thanks
Rea Sky: I need how to selection color from HSV slider please
anti: letss goo new upload!
Its Mike: Ur backk!!
Krol: ρяσмσѕм