The Shag Haircuts & Hairstyles For Women In 2022
- Posted on 23 March, 2022
- Hair Styling
- By Anonymous
The Shag Haircuts & Hairstyles Tutorial for Women
Shaggy Bob Cut | Layered Cutting Techniques
"I Love Haircut - I Love Hairstylist"
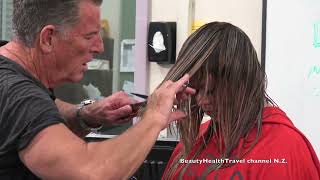
Hello, hello, hello, good evening, uh everybody and welcome in our salon house of artistry, i'm very happy to present you. The first live uh from belgium and uh. Today i want to go with you back to the big event in vegas, where we presented to shaq. Now we have the time to go a little bit more into depth in the technique and you know whenever you have a question, please ask me: i have sarah with me she's, my assistant. Sarah, can you can you come in front of the camera quickly, so they can see you hello, everybody hi. This is sarah she's, my uh assistant in my salon, or actually she's my partner now and um she's gon na watch on the internet. And when you have a question, she will ask me the question and we can give some feedback to you. So, let's jump to the haircut so first of all, uh please share with us where you come from, so that we know who's in the house, so actually uh. When we, when we prepare a haircut. The first thing we're going to do is separate the hair. You know so we're going to make actually the first section from the middle and front to the middle and the back and always stand behind your sectioning. That makes it more easy to work. I must say i had a very good time in vegas. We had a lot of pleasure. The presentation was at certain moments was hilarious. Oh i can see some people coming in sarah mack is saying hi sarah. Well, she has the same name all right so uh. So we make the first section from the front of the in the face and then we go back uh in the middle of the nape area. I'M going to turn my mannequin head and i'm going to make a second section like around on the crown area, and i draw it a little bit behind the ear. So it will be half an inch behind the ears and it's very important when you do a haircut to start with clean sections. So you work, you know you have a good overview of what you do. It'S my first uh presentation live on facebook for lonza worldwide. I'M pretty excited about it and uh. You know to prepare my mannequin head, i used in the end. I used some trauma treatment conditioner because it makes the hair very smooth, i'm going to turn her, and i show you the section that i made on this side. I'M going to make exactly the same on the other sides, and actually you know, working with the trauma treatment as a pre-conditioner makes making sectionings very easy. The second thing i did after i did at the trauma treatment was using this design foam. Okay, now the design foam is a very soft fixate fixation and it allows you to cut you know whenever you, you don't use too much. It allows you to cut very smooth and in this kind of shape, when you create a shack. It'S very helpful because you know when we cut, we don't dry the hair that much anymore, so i'm going to twist her to the side. So you can see that's great all right. So now we're going to make an other section uh just just to to make sure that you can hear me very well. So if you can hear me very well, please give me a thumbs up so that i know that everything is okay, all right, because i added my mic in the camera in the iphone. So just want to know if everything works well, so actually the the way. I create this shack is, is actually is a kind of different approach from normal. There are some things that are the same, but but especially the back the way i texturize this. This back area is really different and it allows you to to let the shack air dry and come out very cool and beautiful. So i make my first section and my first section is above the occipital bone, so this is the first section that i make. Okay, now very important the way we hold our scissor right. So when i hold my scissor, i see some thumbs up from chat, so thank you very much for giving me some feedback. So when you hold your scissor, i never put my thumb in the ring. I always put it on top of the ring, so i don't have too much tension on this area of my hand. If i would put my tom in the ring, it would have a lot of tension. You can see the difference. So whenever you put your thumb on top of the ring, this is more released and it is better to work. Second thing: when you cut, is always put your index finger on top of the scissor like this, so you've got a really beautiful balance all right, so i'm going to use my curve or comb, and i'm going to make a section in the middle of the back. This section the first section, can be pretty wide, but you know, white in my world is like an inch. That'S it alright. So i pull it out the first section and i'm going like 45 degrees downstairs down. Now i pull my hair underneath i pull it up to the top section like this between my top and my index finger now watch me, i'm opening the blades very wide, all right, so i'm starting in the middle and now i'm cutting in a c curve. You see, i'm not back cutting i'm just cutting in a c curve, so very smooth, and this is the way i start creating my motion and my graduation. Now i go to the next. I don't take the same section again so sarah, whenever somebody has a ask the question where the where they can buy the awesome comms from the big event. Okay, so the question is: where can i buy these combs and i know that lanza they ordered a pretty a lot of of these combs. So when you wan na know where to go, go to lanza and they will provide you with the comms, we also will be at the orlando beauty show. I will do a presentation together with the lanza team and there we will also have the comms it's in. In the orlando, it's in june very excited to do that one. So now we go to the other side and you can see like the way. So i pull it 45 degrees down open. My scissor completely use the inside of the blade, i'm not closing completely. I'M sorry i leave it open like this, so i start like this and i go slowly like this. Stop, don't close it all right. So now you go to the next and you go to the next hi. I must say i had a really beautiful connection with you guys in vegas and uh my partner in crime, hi julie, you did a wonderful job and she will also be in orlando. I heard it already so never close your scissor completely so open it softly, but never close it because you know what's going to happen when you close it, you know you will cut it off. So don't do that so now, when we have a look uh at the texture and i'm gon na go a little bit closer to you to the camera, you can see what happens you see so a lot of things going on here, a lot of texture, okay! So now i go in the hair and now watch what i'm doing so. I'M actually searching now for my volume, so i'm starting to create the shape and you can already see what's happening. So actually i've got a lot of volume here and it's going in the sides it's going inside. So that's very important. That'S the motion of the shag all right, so we go to the next one. I already pre-cut the perimeter, so i didn't want to spend too much time on that. So we take the next one and you see when i, when i start making a section from this side, i'm standing here not like in the middle, but i'm standing on the side where i want to go to this is really important and it saves a lot Of time for you guys, so this is my next section and always when you comp always start from the roots till the ends straight down in a natural falling position and from this part on we start again in the same motion as we did in the first Section so we're going to start and then when i pull the hair, you can see that i have a gap like here. I have this gap. This is actually the part where i started my do my pre-cutting. Now this gap is actually my point of reference. So when you want to search for your length here, just go to the gap and find your say this, the point of reference, so i start again: do we have questions? Sarah? Oh they love it yeah. I think you know i i again. I wanted to show the haircut again because i know you know when, when you watch it on a big stage, it's not the same as now in the class. Even if it's live on facebook, you know it's still a classroom and it allows you to have a little bit better site. And you know the movie will stay on the page of lanza, so you can always go back and whenever you have more questions, i will have a look at it and i can answer you always via facebook. No problem. My my biggest concern is that you learn. This is why we are here, it's very important for us, education is key, and especially at lanza. We are, you know, putting a lot of effort in education and making sure that everybody is working and and - and you know doing it in the right way, because you know like products have to be amazing, but your technique has also be amazing. The combination of it is great, so again we created a lot of motion in this hair, see and then again we comb it through and we start again. We start looking for our design and now again you can already see what's happening. So there is a lot of motion going on you see and this technique is com. It'S different from what you saw before with the shack. It'S actually creating that natural feeling in it and it always comes back. You know it's a it's. It'S definition, it's what i call a signature cut all right. Ah, alonso denmark is in the house, hi christian christian. I i met christian in copenhagen and i must say actually that was one of my first event and i was really impressed by the skills of christian. So whenever you have the chance to see him live, you definitely have to uh. I really loved your your. You know your vision and your technique christian, so i was inspired by it and also by your team - oh my god, okay, so we start again in the middle, and now we take the last section from the back area and now, especially on top, you use a Little bit more tension all right now, you start again and you go up. So actually what you do you make c curves, so we pull it out and now i create my length and i create c curves. So again, what is very important is that your index finger is on this on the top of the scissor. Your top is not inside, but on top of it, so you've got a lot of freedom to move with it. Okay, good! Thank you. You know it's all! It'S all about the details - and you know i creating a shack - is, is not only like it's not only. I don't know you have to go inside of the shape. You know it's, it's different, like a lot of shapes. You can make nice parameters and and some soft texturizing, but with a shack you have to go really inside it's different, all right. So again we go and there we are - and we repeat it till we are on the side and that's it. And now i comb it back and you know i just let it air dry, so no water anymore, but just start to create this beautiful shape and because of the foam that i did in the hair or already i can see the you know the way. The hair is moving and it's really nice now, of course, we've got longer pieces, so what we will do next is actually making crossover sections diagonal, crossover sections all right. You can see that so we make crossover sections and now we're going to take away the hair. That is too long. So we go from inside out. Okay, pull everything to the top. I i pull it to the top, because i want to leave some lengths. I don't want to make it too short in the to do a lot of back together, yeah, i hope, doom christian so and again we pull it out. So this is actually the you know this this way. The way we are cutting now is a is a very uh old-school method, but it's combined with some new. You know some new ideas like how we did the inside layering and now you can see how how beautiful this hair is moving and also you know how the color is popping out. So you know we we did some darker color on the roots and then we left these pieces a little bit lighter, so that works really well with the shack. Okay. Now we go to the front now. The front is very interesting, so this is something i rarely do uh jumping from the back to the front, but in this case it really makes sense all right yeah, it is it's actually the curve always changing the way of cutting hair okay. So when we start in the front, we pull everything forward. You see like this now very important. I put my fingers diagonal all right now, what i'm doing i'm lifting the hair here, i'm lifting it and i'm actually, with the point of my scissor, i'm pushing it out now. I also make a twist with the hair, like i'm, i'm twisting the hair a lot. You know the reason why i'm doing this is because i wan na i wan na create this kind of uh graduation in the ends that allows me to make this beautiful shack movement. So i take my second section on this side and again i'm pushing it out. I'M pushing it out so now the point of the scissors again pushing the hair. So what i will create is a very solid parameter in the front question. Sarah, you see what's happening here, so actually i'm pulling the hair out that's very important and again bringing everything to the front combing it over the head, like following the roundness of the head and then twisting and pushing the hair out. I'M choosing now for a shorter length in front, because i want to create a more aggressive feeling, and actually you know what's happening now is that i will have a very strong backwards movement that almost reminds me on the roof cut. That'S the reason. The reason why i called with the latest collection - i called this - the hybrid check, because you know from this shack you can go to a wolf cut. You can go to a mullet, it's actually always the same technique, but in a more extreme version, hi robin nice that you're online - you see what's happening, so i'm pulling everything forward. Also here now, you can see why we use this comp, because this comb is actually following the shape of the head. It'S completely following the shaven, and i love the contrast of colors. So we have this comb in all colors and especially on on this hair. The yellow is a is a great clash with with the with the hair. So what is very important is that we that we keep this, this very solid parameter. So this is my last section and i'm pulling it over the ear. You see, i'm pulling it over. The ear to the front, taking everything here - okay, just leave it like that. You can see that that's what i did if i comb it back, we create a connection more solid in the front softer in the back all right. So now we go to the other side and i keep standing here. Take a small section, just connect it with the previous one and twist the hair. You see twisting the hair and finding the balance in front all right got balance. Now we go to next. Do our lanza lovers have more questions? Sarah, no all right! So again we connected with the other side. I'M gon na have a look in front of the head because without a mirror, it's always difficult, but we are okay. All right. I had a really good time at the big event in vegas and i really hope that for the people that were not there, that they at least can come next year or maybe in two years. I don't know exactly, but i think it's in two years, but it was, it was really an eye-opener, a great show and that show was created uh, mostly by leah and by mark dolan, a big congratulations to these people. They did so much work. You know i. I almost felt sorry for them because they were always. You know, on top of the game and watching for everybody taking care of everybody like look at this. Look at this how beautiful this is coming together now, so we go to the next and again wrap it over the head and only use the top of your scissor like the toe of the scissor and then create your lengths. You know, and you don't have to make sure you don't have to to cut it too clean because it can be a little bit raw, okay, so uh. The question is which colors, which color we used. Now i have to go back to sarah and sarah. Can you come a little bit closer to me and and just uh yeah, and but you have to speak loud because i'm using my uh microphone and you can you can come closer, but it's you know it's hashtag me too. Now all right! Okay, we used 30 grams of uh 100 v with five grams of the r mix um and we did it with the translucent and did we do yeah? I think it's d mile. I hope i hope we spell it correct, but it's um. So actually did you understand what she was saying if you did understand or if you did hear please um say yes or she will text it. Sarah will text it. That'S better yeah, color formula: you can call it like this and then people can write it down and actually what we did. We started, you know coloring the roots and then we just washed it through hi, steve everything. Okay, so we're almost done with the front, and you see what i'm doing, i'm putting my index finger on top of the scissor and i'm pushing it out the hair, but always remember that you have to pull like twist the hair out all right great. So now you know the shape is coming and you can already see that now, i'm going to pull it to the side again now. What i'm going to do now is, first of all, i'm going to i keep shaping that's very important, so always keep shaping the the form, because you know it's also very important for your clients. They have to see. Thank you, sarah for the for the compliment, but you know i didn't do it, but you know i accept your compliments um. So what we did we we just washed the lengths through, so it stayed a little bit lighter. So now i take a part of the back okay and i gon na start in the middle. Where is my oh yeah there? It is yeah all right now, you're gon na see the magic happening. Now now we bring everything together and just pulling it out. Now. I'M using the wider teeth of the comb that word that causes me like sleepless nights, but anyway. I hope that i did say it right this time. Somebody, oh yeah, i you know that sarah did it yeah. I know i know shut up, but anyway make sure that you can be with us in orlando all right all right, so we started the middle. Now we're going we're going to bring every side to the middle, alright so again using the wider teeth of the comb. Oh yeah, i would love to go to the uk. Actually you know my that's where my education started. First, i i did some education at the ellen international school that was in that time was a really good school. I don't think it exists anymore, then, after that i went to sassoon and then i did some education at the tony and guy and also i followed classes of one of my great heroes, which was trevor sobi. You know, i think the combination of them all is what you know what i do today. It'S a it's that signature that i create, so just just to give you a little tip and that's because i was talking about trevor that reminds me on it. You know so you are cutting, but at the same time you are shaping, because that's what i miss a lot of times when people are cutting, you have to shape what you are cutting. This is so important because now you can see what's happening, you know i'm pulling it up a little bit and i'm seeing how flat this area goes and how this is jumping out now. So that's very important. You know to keep shaping now. I keep standing here and i'm going to take the other side, all right, okay, so i'm going to pull it to the middle you know and and that the shaping is so important. It'S not only important for you as a hairdresser, but it's also important for your clients, because you know your clients are watching you. You did promise them a result, and you know when you shape you, they can see the result immediately. So that gives trust to them. I hope that makes sense for you. The picture on the back wall here is one of the shows we did in the past and we created the clothes and and the videos and and everything we did it by ourselves. So you know that show was all about. Fiber fabric and fashion, all right, so we finished this stop so now we're gon na pull her back to the front and please hold your head in the middle lady. Thank you very much now very important when you comb the hair. It should be completely in front very important all right so now, next, what we do. We will make crossover sections on the sides like diagonal again and pull them to the crown area. Okay, so just to make sure there are no longer pieces anymore, but they are always that's the corner that i created just make sure that you make this diagonal sections. And then, if we say that in french it's like e voila. So you can see how the hair is moving and also you know when you, when you create a shape like this. The color is changing too. This haircut is actually it's some somehow it's it's a very simple uh build up, but it's so effective. It'S so um! You know it's for me, it's it's a strong signature. Look, you know it's a it's a strong statement, for you know the one who's wearing it. I'M gon na pull this a little bit up. Can i do that all right? Oh there, she is see like. I think her face is prettier than mine. That'S it all right! So now we can see what's happening and you know um, i'm just checking if i can still change something about it, but i think i i love it the way it is so what i'm doing now is i'm going to use now, i'm going to cut a Little bit of these of these ends in the parameter just a little bit, because i think they can use a little bit more of solids. So just you know make this this line a little bit more solid in the back, but i don't want to cut it too short, because actually i love the difference in length and you know whenever i'm cutting this parameter, i'm always flipping the hair out. I never do it like straight down, because i want to. I want to keep that movement in here all right, nice, so um. Okay, if we want to give this uh look look how beautiful this uh this shape is working. Now you see how how beautiful the movement is in the in the side. It'S it's really nice. I love it yeah, okay! So what we can do if we want to do a little bit more extra, we can create a little bit more. You know movement in the hair by just backcombing a little bit on these sides, but not too much because i think really think the shape is already there and i i want to i want to. Actually i don't want to blow dry it um. You know the re the way i i finish. This hair is actually only by using the the dry texture spray, which is one of my favorite sprays in uh in the lanza range and the dry texture spray is somewhere between. You know, um huh. What can we say we may it's not a dry shampoo, it's not a waxy product, it's maybe more the feeling of when you you know when you walk one day across the coast. You know malibu or you know, whatever santa monica, of course yeah. Let'S say santa monica: if you walk a day on santa monica, you have that feeling in your hair and that works really well, but you see how beautiful the shape is working so always try to keep that shape in there. So this is the the spray dry texture spray, great great product, all right. So what i'm gon na do now, i'm gon na i'm gon na shape the hair completely with this spray. So i'm gon na you see i'm gon na push it to all sides, and you know when whenever it dries, it's beautiful - and you know you know for me this type of girl. She doesn't really blow dry, the hair. You know she's the she's, the the one that loves to wear the hair, a little bit more raw yeah. That'S it. You see how that moves.
Comments
noime: Its very clear and with good smile
Paolo R: i'd like 2 work 4 u..u r very creative...do u need stylists or colour technicians??
noime: Hello... Im come from Philippines..
elaine monteparo: I’m in United states