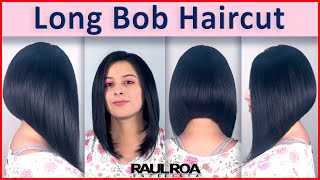
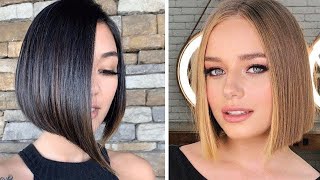
How To Create Volume And Movement In Fine Hair
- Posted on 13 February, 2020
- Heatless Hairstyles
- By Anonymous
Have you had trouble layering blondes, or fine haired guests? You go through the cut, and all the work to find that line after line is visible in your cut?! Sam Villa Global Artistic Ambassador for Redken demonstrates how to create volume and movement in this hair type and color. He also explains why it is necessary to do a dry cut for this hair type, and how to get the best results blending while preserving the perimeter. And the best part is that your clients can still get this in a ponytail like they want!!
Stylists be sure to check out the Stylez App, there's lots of free content like this one from many industry leading stylists!
http://stylez.hairconstruction.co/
If you enjoyed these tips, be sure to check out more cut and styling tips for fine hair at our blog. Click the link below.
https://www.samvilla.com/blog/all-abou...
Want more education? Make sure to subscribe: http://bit.ly/2mCNIib
Click that bell on the screen to make sure notifications are on!
To learn more about all of our styling tools, discover upcoming events, or to book one of our artists for events or in-salon education visit us:
Get Social with us!
Instagram - https://bit.ly/2Bq94bt
Facebook - https://bit.ly/2PKuAAi
Pinterest - https://bit.ly/2DytLDo
Linkedin - https://bit.ly/2PGdfZo
Twitter - https://bit.ly/2BnqG7Q
To learn more about the Sam Villa Signature Series Short Cutting Comb, click the link below.
https://www.samvilla.com/products/comb...
To learn more about the Sam Villa Dry Sectioning Clips, click the link below.
https://www.samvilla.com/products/acce...
To learn more about the Sam Villa Invisiblend Shear, click the link below.
https://www.samvilla.com/products/shea...
To learn more about the Sam Villa Signature Series 7" Dry Cutting Swivel Shear, click the link below.
https://www.samvilla.com/products/shea...
All right, so we've trimmed up that edge. Now, let's get into the layers with fine here, remember what we talked about. If we blend it, we make it finer, so here's a great technique in terms of how to layer hair. Let'S talk about the silhouette, the look that we want to achieve what we want to achieve. We want to achieve a look that gives me a little bit more roundness back into this area. It gives her the illusion of a little bit more volume now the problem with layering belong here like this, is you can see those cutting lines so watch? How I understand my tools and how to use the tools as I'm walking through the haircut now, let's get into the section of the haircut. Remember the silhouette there is that silhouette that we want to create, don't want to layer into this area. So how do we determine what we take start with a middle part? So once again you create your graduation on top, you keep created evenly once we have that now watch what I'm gon na do with a comb and I'm gon na work with a black comb Inc. Why? Once again, the contrast of that to see the extensions of the line that I'm cutting so black on Blondes and white on levels, one and those darker levels of color taking the comb where her hair line is we're. Gon na take the comb and take the spine of the comb and a rocket on the hairline when the spine of the comb comes off at the hairline. This is where the head is starting to transition place your finger there and now just draw like an umbrella right there. Okay, once we have that umbrella, now watch what I do. I see my visual line now. I wanted things AG section so rather than coming in and drawing this exact section, I want it a little bit more erratic. I don't want it too, a little so perfect, so I'm going to go through. What are you doing? Sam? I'M dropping a little bit more weight down why I just saw a little transparency right over that. I didn't want that once we have this now watch what I'm gon na do. Take the white teeth of the comb comb over what you did capturing some of the hair underneath and placing it into your hand. I have a visual to line i comb back. I take the white teeth up and down up and down out up and up and down up and down up and down up and down once I'm there. I take and sliced my finger where that section was and now I've been able to create the zigzag section. So once again eliminating time behind the chair, drawing that now this takes practice, I'm the messenger, giving you the messenger style, zap or the messengers, take the information and make it work for your own. But it requires practice. Let'S go the opposite side. I can come back and adjust anything that I want. What do you mean Sam? Well, I think I might want to adjust that, but let's get the entire section. First, okay, let's come to the opposite side! I have my beginning point based upon where that comb came off the head, and now I'm not going so deep because she has fine hair gets your solid line. First feel the density feel that make sure you've got some hair there we're gon na layer this out. Now, once I've got that now once again watch this takes practice because it's the opposite side, easy on my right side, I'm right-handed watch how I'll comb this back. Picking up some of that hair underneath now take the comb. I know that's the line now move up and down evenly on that line come back to where you physically saw that line slice, your finger and release and just separate. Now, once again you have your zigzag section and now, let's a zigzag, this backyard, I find a lot of times. I have to zigzag this back area, so let's just use the section part of the comb that we made for you, the Y to Sarah. Let'S just use that now draw it in so I don't know about you. I like to challenge myself to do things in a number of different ways. It keeps me a little bit more sense to a little bit more enthused. It challenges me and creates that sense of enthusiasm. I don't want to get bored and mechanical now, once I have this we're going to take some clips and what I want to do is I want to go through. Let'S just capture this hair, that I sectioned off. We'Re going to take another clip, okay and we're going to take two more clips after that and we're going to come through and just isolate. So it's so important that we ice like this. That'S what's going to be cut! What are we gon na do with underneath? I need to isolate this, so I'm going to take another two clips and I'm gon na comb everything back over here. This is the hair. We'Re not going to touch. Remember fine here. We need to be detaching that so I'm just coming through this back area and now I'm gon na take a clip. I'M going to place a clip going up to capture the hair, and now I'm going to take a clip, I'm going to place it going down. Ensuring I'm not going to release that so Sam, why do you go in and why do you suction it like that with the clips? The reason isolate that underneath, because when I cut this, this is gon na fall. I want to make sure I can recapture it again if I need to recut any sections now, let's talk about how we're going to cut this umbrella and that's what I like to call it. You see me maybe cut this in the past where I've taken horizontal sections. I want two more roundness, so I'm actually going to work with the round of the head and I'm gon na go actually through and I'm going to point cut this. So, let's come to this first section, get the clips out and then watch how I control this working with a vertical section, starting as if it was a middle part and watch. I can release this now because I have everything isolated. So, let's go with that middle part and let's take the first section, cutting it dry, visual exercise. Now, let's give you a back view of this section, you can see that section disregard the fact. Don'T let that play games with your eyes. That'S a zigzag section. Let'S go through take a look at profile and now, let's start to think about how we, where do we want to take this layered effect so that I have more control? All I'm gon na do is take a half of this section, just dropping that down. I'M gon na start here, and I want to create more of a round line to this so once again, a great little tip to do to determine how short you want to take this. If a client works with a round brush, ask them what size round brush that work with if they work with a large round brush place, it here take a section wrap it around that large round brush and then that's how short you would take the top reason. Being is because that guarantees the client she's able to get her favorite brush around this top section now. This is the first time that she has had her hair layered, so I want to be fragile with us. I want to take this too short. I just want to focus on building a silhouette, so let's work with the head shape. Okay, let's read it make sure I see I want some bevel and some Bend. So yes, I'm going to go about right here. Okay, now watch what I'm gon na do. I'M gon na come through. I'M gon na lay that down, so it lays down with gravity it's gon na just make it a little bit easier for me to point cut notice. How on the shear is on a diagonal, that's giving me a much softer edge. Let'S work to the shape of the head so see that corner there I'm going to take that corner off now, because it's a little minute here, I didn't need to turn that down towards gravity watch this section, I'm going to take this section now, let's release take Some of our guide, because my hand travels to the shape of the head now. Look how I use the comb to determine the position and her finger the finger angle or the finger rotation of what I'm cutting it's to the shape of the head, so notice. The comb, that's exactly that angle, then I'm gon na cut right there. Now I need to give my room self room to point cut now, look at the length, let the length fall with gravity and now, as you let it fall with gravity. Come back into the diagonal of the shear and point cut once I get all this top point off. All this top cut watch how I'll come back in and I may go back in and change my tool and just start to soften up those lines. Just picked up some hair that I might have missed. Let'S continue with vertical sections working vertical to your path II. I it might look a horizontal curve line. Sometimes it's just on the perspective of where you're standing from me to my eye. That'S a vertical line. I'M looking this way, that's a curved horizontal line. Watch how easy it is to find the hair. I need to cut stand behind disregard its zigzag. Come through elevate, the hair. Why so you slice through the elevation, don't lay it down and try to slice it on the scale you're gon na start picking up some of that zigzag elevate, come through slice now died, there's my guide and continue to cut to the shape of the head. Let'S go last section on her right side of center. Now everything is elevated to the center point. So look how I've taken everything to that center point. So I'm bringing everything so I'm not cutting everything out to the shape of the head. I'M looking at the profile shape of the head and focusing and cutting to that making sure I've got all my hair and relax. My friends in terms if I pick up some of the hair underneath as long as it's not a huge chunk, I'm fine. Let'S continue once again elevate the hair slice through the elevation, don't lay it flat and try to guide it down on the scalp slice to the elevation. Okay, let's give you a front view, I'm elevating vertically, but I'm cutting to the shape of the head. So I'll stay on this side, so you can see the sections take a slice guide. Just I just slightly guided that comb across. Let'S look for the guide. Look how I fold the hair to see where that guide starts and remember point cut to the shape of the head, taking more of the guide back towards the crown notice, how I keep the whole section in my hand, rather than dropping it, why dropping it? You have to pick up the whole thing up again: you're there keep it in your hand, shape of the head all right, look, you're, dry, cutting difficult at times to see the guide. Relax. Your mindset, remember your texturizing, the more you think about precise the stiffer. This is it's not going to move. Remember we're looking for movement and volume, a lot of times to create that we need soft edges. Last section: let's talk about my hands, my arms watch. When I go to cut this, I'm not coming in this way and holding my wrists like this, I want you to take think of a moon and just a Halfmoon come around and now look how straight my wrist of my arm off. Take care of yourselves behind a chair, my friends, what happens is we want to come up and we want to cut it like this? What I want you to do is I want you to swing so that the palm of your hand is facing up towards the ceiling it's. I know it's not comfortable at first, but a brand new pair of shoes, it's not comfortable at first. It'S called wear it out break it in, so you got to break your hand in in terms of doing it. This way, coming back around once again for the aergon ah mcc's at Sambia. We want you to have a longevity in this industry. Why we are concerned with a ergonomics now I'm going to gather everything that I just cut, so I'm gathering it all together. Why Sam? I want to just check the density. I'M gon na fan it all at once and then it any links that I might have missed are going to stick out. So now take a look at that. Okay, you can see there's some long hair that I might've missed, or I might have captured. Okay, now make sure your hand is deep into this. Look. How far down my hand, isn't that way over here today, I'm working with my seven inch or 7 inch dry cutting and now I'm going to slow motion now go in and look look how I close and, as I close I just pull out so all I'm Doing is just softening more and I just released just slightly: it's not a lot now we're gon na take a look, we're gon na comb it down. I don't know about you, but when I layer blonde hair, we start to see the cutting edges the lines. So now understanding tools is important. I am now going to pick up and invisablend ship, which is our soft thinning shear. If you want to call it creates a more of a scalloped edge for you, so with a blend with this invisablend. Please close your eyes. If this is gon na hurt you, this is dull. This blade is over polished. So therefore, when a blade is dull, it pushes the hair - and you know as well as I do when a day a blade is dull. It gives you a curved effect. So imagine that's what's going to happen instead of these being sharp teeth that close, this is going to push the hair into it and I'm gon na get scallops instead. So now, let's comb through this and let's see if we see any lines, look at that it almost looks like she didn't have a haircut but watch when I start to touch this well, just look at the silhouette that she starts to get. She starts to do this. Look at the movement. She starts to have remember these fine hair people, they're very fragile type clients. So now, let's just go in and let's just soften a little bit what we cut but get a little bit of visual blending watch what I'm gon na do. Don'T panic, I'm going to take vertical sections, pick up a little bit of what I left underneath. I can start to see it and now watch I'll, just take just gon na reverse sent I'm just gon na come in and just slide now I'm not getting so much down deep into it. You know I just want to get just a little bit of that. So I get a little bit of a blend. Their same thing here see. This is why it's really advantageous for you to dry cut, because you can really start to see these sections in terms of what you need to take its just soften soften. Here'S that length that I left, let me just soften some of that - don't get carried away. You guys just start to see the silhouette of that now. What'S so cool about this, she can pull this back into her ponytail because she likes to wear ponytail. So she can pull this back into her ponytail and look how all of that goes into her ponytail. What I love about this member, this is all along. So this is short when this pulls back. Can you see the long hair is capturing this, so she can place it her ponytail just about everywhere anywhere. She wants a lot of times. When I do this, I find that your clients will come back to you and they'll say you know what I love this now, let's cut an angle around my face. It'S a great way to sell an angle around the face. Let'S continue to work around now here. Let'S take a look at this look at see how I see a little bit of a layered line in there place your hand there use the spine of the comb and come in and just lift when you lift turn the comb, and now I'm going after. I cut I'm not gon na get any of that down there, so just just a little hot tip I'll show you again, I wanted melting. I don't know about you, but this is cool guys come on. Do things in a different way, create a sense of enthusiasm for yourself see a little bit right there, let's go after it. This is why it's once again haven't ages to cut dry notice with the invisablend close and slide. It'S meant to do that. Let'S just get a little bit of the length and visual blend in here, not technical, so I'm looking for my shortness there it is. There will come not getting into here now watch when I touch this watch, how frothy she's gon na get a cuff frothy she's. Getting that to me is where it's at alright. Let'S continue to work visually looking to see. If I see anything - and I just want to go back in and refreshing and just soften some of these edges now, let's go into the long hair pick up some of that be aware. You'Re over the year, there's that length and now go after the length and just get a little bit of a blend all right. So this is a great way to go in and take fine here, give it some movement, give it a silhouette. So it has a silhouette to it and the client walks away happy. So let's talk about this, how did we create this? Let'S recap. The first thing we did was crosshatch in the back to take care of the length. Remember cross-hatching. It gives you an effect like it looks like it was cut two weeks ago, not so much of a fresh Buntline. How did we do it? Rectangle sections diagonal with the shear notching into it, and I worked with the 7 inch dry. Cutting swivel-chair then knotch the opposite way, so creating points of link points. The link points of lengths leave your hand there within that rectangle section: reverse it where the palm faces, the hair now tilt it and turn over and fan, and look at my standing position. All it is, is just placing your thumb in the pocket of your index. Finger and make an assist you're in a sand position, keep the hair parallel to the shear rotate the fan guarantees you keep you in keep the halo of length and extract way. We did that to the back. When we came to the front or the top, we knew we did not want to layer this. This is what happens with fine hair people they get to over layered. She wants to be able to pull this back in a ponytail, so she wanted something where she had something to it, so it's got a shape to it. So what we did was we took a section where we started. The section was based upon when we took a comb, a black comb off the hairline. At that point we took a solid line or an umbrella shape. Then we came back through combed over that solid line, picking up some of the underneath and then zigzagged with the white teeth of the comb, keeping the comb attached to the scalp and zigzagging slice where you saw the line and you've got a zigzag section. We did that on both sides, our cutting give you a profile view of it. We over directed everything into the center, so everything is brought into the center. We cut this and determined our length based upon size of brush. I want to keep her quite long on the top, not go short, so we kept it longer, but we cut to the shape of the head point cutting to the shape of the head. Everything over dry did once we were done, we combed it down. We started to see if there were any edges that looked like they were just really popping out and once we saw that we went through and just softened those edges out. So yes, her laying layering will be visible, but you don't see hard lines now. It'S all about our after heat product member. It doesn't stop after you're done with a haircut so just to give it a little bit more texture a little bit more kind of movement to it. I'Ve picked up triple dry 15, which is a finishing texturizing spray, and I love this just because this a curator in terms of how it's miss it's just a really strong mist in terms of how it comes out so watch. What I do, I'm just gon na have her take her head down and I'm just gon na kind of shake that and now look at you'll see the disconnection. You should see that okay now watch I'll just spray this in and watch how it's just gon na give it some texture to it. Just gon na waken it up a little bit. You can start to see it already. Now I find that a lot of times clients - sometimes they get carried away with product and it's because they're too close make sure they've got a distance, sometimes I'll, say spray, your hand and just work it in, and this would be a trick that I would recommend For clients that don't like hair space spray, their hand and come through, is it a hair spray Sam? I, like it's a texturizing, finishing spray, so now watch how you're really just going to see the haircut pop in terms of texture in terms of a scent soft sense of volume and in today's world. It'S all about working with your hands head back now and now. Look how I just simply shake hands, hands, hands all right. Now we just start to work it up. You see how everything has a little bit more separation to it, a little bit more texture to it and this length here and able to go from one side to the opposite side. All right, my friends, I want to thank you so much for your time. On behalf of style studio here in Miami Florida, please make sure you download the apps and get Styles app tremendous full of content and remember you're gon na sign fine, Sam via Andrew Carruthers inside of stylus app, please it's all about education! Thank you! So much for watching on behalf of Sam via @ Sam, via we're all about moving the industry forward through the process of Education, enjoy your game.

Comments
Michelle L. Eitelbach: The problem is for us clients! It’s so difficult to find a stylist that can do this! Plus, with thin blonde hair that grows slowly, I don’t have the luxury for mistakes or a bad cut. Always come out disappointed when I know I can get volume into my hair but the stylist tells me it’s not possible because my hair is thin! Thank you for validating what I know about my own hair.
Shilpi Singhal: Your fine hair cutting techniques in this video and passion to teach them restores my faith that fine hair could look great too. I always have hard time explaining what do I want to my dresser. And now started cutting them myself. Could you do a short video on how to give these layers in short hair yourself? Love your videos!
Shelley Brown: With COVID and law school, it's been hard to get hair appointments that fit my schedule. My very fine hair was just hanging there doing nothing. Worse, it had some leftover perm and highlights so lifeless on top, fuzzy from the ears down. Just aweful! I watched this video and decided to try this technique on my own. I went very slow and watched each step, arm positioning, etc. I held my breath taking the clips out wondering if I had really messed up. Nope! My hair looks the best it has in months! Not perfect, but the fact that I used regular household scissors, have no training as a stylist and it still turned out well, really says a lot about how GREAT this technique is. Thank you, Sam, aka lifesaver!!!
LI LY: Great technic i am going to try it on myself. due to pandemic i became hairstylist myself. Sam i can feel your enthusiasm and patience through the screen. Thank you for sharing your talent. This is exactly what i wanted on my hair. love to have those invisi sheers but too expensive.
Amanda Bees: First of all I want to say thank you for sharing your tips and tricksI’ve been a hairdresser for 35 years and love that I’m still learning. Gives me such a boost ❤️
Amy D: I’m going to say the EXACT SAME THING that I’ve seen others below say, “NO ONE CAN DO THIS!!” They end up putting freaking layers in my hair. Years and many moons ago my favorite hair dresser would put in the volume and cut my dang hair almost entirely with a razor. To top it off, she could have done it blindfolded. Oh how I miss her!! I followed her around for years by driving anywhere from 2 to 4 hours because we both moved around a bit. I absolutely adored her. She was destined for greatness and I guess when Hollywood came calling, she moved on. I’m so proud for her but miss her dearly. Check her bio or IMBD out sometime.....Adruitha Lee
David Campbell: I love this technique so much. Of course product is a necessity to help fine hair to maintain some volume. But a great technique like this just put the cap on your ability as a knowledgeable, and well educated professional of our beloved industry. I studied this method and tried it and it came out so beautifully. Thanks Sam, you never let us industry pros down with your knowledge and know how.
carolloveskiwis: Sam, you are an artist. Love to watch you cut. You are nothing short of brilliant. The model looks so gorgeous and her hair comes alive with movement. Well done❤
Sandy Brown: Perfection! 40 years in the business and still learning. I just purchased your invisiblend shears. Love them! Do you always have the straight blade facing up when you blend?
nancy sandoval: Muchas Gracias!! I cut my hair ♀️ in long layers today, following this method to finish it of it came out amazing! Thank you.
Sunshine Galkw: As always exceptional work!! ❤️
Eileen Chmielewski: Excellent!!! I have gray, fine hair, and this was incredible! She looks amazing...
Aisling Ying: This is pretty good, I have fine hair and I never dare layering it, this layer is pretty good on fine hair, it's suble yet gives the hair more movement. I wouldn't try it myself tho I think the shortest layers are too short and you need a structured Caucasian face to pull it off.
Fariya Kamil: Thanks for sharing your tips and tricks ❤️
Flower SafeHeart: I love this passion and thoughtfulness about the art form and would consider flying to Miami to get my hair cut by Sam!
Beej J: Nice cut, tbf and amazng passion from Mr Villa. That said (as a guy who self -learned to cut hair from some incredibly effective and simple tuition 20 years ago) this vid turns the cut into a science well past the end result! Bottom line: You CAN replicate this look using dry -cutting methods *just by knowing how to layer / add texture and detail* (without all the technical over - elaboration).
Kathy Ziolkowski: Awesome video! I would like to say that, according to Google on 4-12-21, Redken does not test its products on animals. But they pay other companies to do it for them. I hope this matters to you as much as it does to me.
Allison Pruette: This guy is so methodical in his technique. Totally awesome cut.
Darlene Carman: Thanks Sam! I am 57 behind the chair since I was 14! lol only a couple days a week these days but I am learning soooo much from you. Simple question..you are washing and dry these clients before you cut? Also I just purchased you combs, dryer and dry shear loving them all. The dry cutting is new for me but getting cleaner results. I thought the shears would be a bit sharper though they are doing the job. Peace my friend!
mishmash65: He is super cautious with not having harsh lines, and making sure that it blends naturally. I admire that ahah.
Ingrida Martini: Thank you very, very muchespecially for going through process verbally at the end-that really makes brain work and record a process inside head
Claudia Gonzalez: You're one a kind Sam. Love your channel. Been watching for years.
Jas Mangher: Thank you so much! Very informative
Lindsey A Riegel: you sir are an excellent teacher❣
Amaezing Hair Salon: I always enjoy your videos and learn tips I can use. You explain things well.
Lawrence Renfroe: Beautifully done
Kathy Hanks: Wonderful. I have fine blonde hair which I have cut into a inverted bob right now and I see the lines all the time. My stylist has used the I think they are called thinning shears to try and blend but I always see the lines. Wish I was close to you
Jie Fu: Although I am not a fine hair client, I was attracted to your technique and the way you thinking,thumb up
Tammy Scott: Beautifully done
Aynjill: Sam. A true artist!
Acirne MeLandHeLL: No way! This is how to separate and cut with style. T.y. so much to you!
Bubbles n Lipgloss: Sam is a true genius!
ann brank: Thank you so much for the knowledge
Lea Janus: I wish Sam could work on my hair- never had a good cut no matter how expensive ...thin, fine hair and over 60 so they don’t really care..
KP: I know he is the expert, BUT. ... cutting hair vertically and "slicing" only thins-out hair more. Conversely leaving bulk and cutting horizontally is what gives thin hair volume.
rebecca muir: Absolutely love it
Deepika: I have a very fine ass hair,which’s difficult to have any cut...but u give me hope❤️
Noreen Freeman: Rarely do you see a model smile as she is listening and feeling what she wants in her mind without touching her hair ?
Ing Prisilia: Love this!
Tanveer Ahmad: Great teacher
Easy cooking with Carla Asuaje: Love it!!!!
Maria Teresa Benedicto Bjerke: Sam Villa, you're a genius!
franchesca jarquin: Quiero ir a verlooooo... para q me use como modelo, por favor!! Nunca he encontrado a nadie q me entienda mi tipo de pelo fino.
ratt pak: You are AWESOME ! Thank you!
Susan Dalcamo: Sam do you know anyone in Central Mexico that is trained in dry cutting? Specifically fine, blonde, mid length-long hair; I have a colic at certain lengths and an underside that is naturally very curly; the top no longer curls due to prior processing. My hair if not cut above or below a natural S wave that will flip if the top hair is not longer and heavier is a mess. I need to go shorter or longer than the colic are no amount of product keeps the hair from flipping especially if blunt cut without an undercut angle. Have a recommendation for post Covid-19...I am in Guanajuato State. Or have a suggestion of how I explain to a a well trained Hair Colorist and Stylist?
Eliz B: OMG, I sure wish I had someone near me that could do this! My hair is full but super fine! All the stylist just want to sell me product! The hair dresser I had late 70’s early 80’s passed away! I live in Winslow, Maine , any chance you know anyone up her in the Pinecone state who knows how to cut fine hair?..
poop alover: such a good teacher
Barb Butler: Excellent. Thankyou.
Andrea E. Dinwiddie: Thank you
kay davis: Amazing!
Tara: I need something similar to this. BUT below the shortest layer looks super thin. How do I get it to be not so short and it all just falls. I don’t know how to explain it. I guess take less off very top. I’m gonna try something
Natalya Gordon: Dear Sam, I love your technique ☘️ Would you please refer someone in San Diego for cut and highlights ( my hair is fine ) I am looking for someone like you!
Prashant Pattanshetty: I love the way you do hair
Beauty by Manis: thank u so much 4 sharing amazing techniq
Mehmet Altun: You are the very best hairdresser Sam villa I like all of your hair cutting tecknichs I'm working in Germany, kind regards
theresa wheeler: You the man sam,love you lots ❤
sara Chan: Ha igualito quedo el pelo de mi niña con muchas layers pero solo que el corte era recto
Nicole Pilling: You literally are the best
Susan Fugman: Very nice but I am very thin long dark hair really seriously around the Chicago area you cannot find anybody to do something like that and I would gladly pay the money for you to do my hair but impossible so what’s the normal people that can’t afford a good swan styles we have to get what we get but again it looks beautiful❤️
Chris P: Thank you both.
Kelly Wolfe: Perfect if you was near me it would be a privilege to pay you to bring my hair to life again ♥️
Lucio Guzman: So beatiful & perfect
Jordan Fogal: Where can we go to get this haircut?
isabel moreno: que lastima que no esta en español, me pierdo sus explicaciones. Gracias
justaphasebizarre: Look how she can't stop grinning - well done, she likes it!
DivinelyLoved1111: May God bless you Sam Villa
W.M Tower: She's not walking away happy. He messed her hair up, poor girl!
Mirche Samardjioski: I like your job a lot !!! can you cutt pixie or same another short haircut ?
dandy d: Gorgeous sir!!
Lisa Cody: YOU'RE A AMAZING ARTIST - SAM
Алиса Селезнёва: У меня такое впечатление, что стрижку не закончили,но некоторые элементы возьму на заметку
Kamila Grieve: Compare to my hair she looks like she’s got so much hair
Fanny's LoA: I wish you'd cut my hair Unfortunately I'm allergic to hairsprays
Tai Gibson: Love you Sam ❤️
Annie Rigsby: GENIUS
Ilsa Galvin: It would be a real gift... If you could cut my hair! I would feel honored!
debra becker: GREATNESS
Zumer Kadri: Wooooww magic
Anna Hanu: You gotta be kidding! No way the average woman/man could do this cut with one video. Best left to a professional.
Linda Wentland: Wish you'd open a shop around LA
Deepakbhai Lakhtariya: Super hair cut sir
Cory Saldana: Bello♥️
Kathleen B: How can we find a Sam Villa trained stylist?
🏃♀️Ray Of Light /Rayo de Luz:
mishmash65: 17:08 “look how frothy she is getting” Am I the only one with my head in the gutter?
Lucio Guzman: Wow
Bonnie Grooms: Cant get a decent cut since 20 years ago. So sad
Chelsea Stone: I would be in tears if someone gave me this look. That's a pretty severe technique.
marilyn manuel: super amaze
Lisa Fanucchi: She needs her roots done! ♀️
BossyBoots TresChic:
Allison Crichton: If you are coming to Northern Ireland on holiday can you cut my hair!
katzi S.D: This hairstyle can be done within 15 minutes but why , if the stylist can make it more complicated and let u sit on the chair for 1 hour so they can make more $$$
JADE: Move that plant out! Lol
Claudia Gonzalez: Anyone in NC you can recommend?????
Lah_Bang: WOW!!! Just WOW! Do you have branch in Toronto?
LaChri: Any chance that master come Here in London UK? Where are you based sir?
Robert Young: too complicated
Linda Wentland: Is there a genius you think is good as you in LA area?
Allison D: Not a fan. That would upset me.