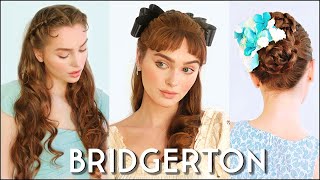
Bridgerton Hairstyles / Wearable Regency Inspired Hair
- Posted on 04 April, 2022
- Heatless Hairstyles
- By Anonymous
Wearable and easy to go regency era hairstyles, inspired by the show BRIDGERTON:)
Check out my tik tok Devontje08
my instagram Drakesnest
and business inquires [email protected].
Hey guys it's devin and today i'm going to be doing three different updo looks they're going to be like regency inspired, bridgerton inspired, looks they're all pretty easy. One of them is super super simple, um, so yeah, let's just get into it. Some of these looks will require a curling iron, but not all of them, but what i'm mainly using today are the tiny little elastics as well as bobby pins. I do have a headband, that's optional. You don't have to do that. If you don't want to. This is from, i believe, the threshold brand from target and hairspray a brush the usual, but that's what we're working with today. So for the first look, what i'm going to start by doing is leaving this front part of my hair out. So it's basically the bang and then a little part by my ear. So i'm going to take that and i'm just going to section it away, because i want to make sure that i don't touch this so you can use a clip. This looks really fashionable, but that's what we're going to do step one now for the next step, i'm going to take this almost like you're doing half up half down and take this whole section here. It doesn't need to be perfect by any means, but take this half down section and we're going to be just kind of putting this into a pony. It doesn't need to be perfect, but let's just try to get those big bumps out. So i'm gon na put that into a pony okay. So this is what we got now. I'M gon na take um clip this i'm going to take that bottom section and put that into a pony as well all right. So this is what we got so far. Two ponies so first off i like to kind of tug at this ponytail just to give it a little bit of body. I don't like it when it's too tight against my head. Okay, so i'm just going to take this section right now and just clip it to the side, so we're going to do so. What we're going to do is the topsy turvy ponytail you're, just going to take that section and you're going to turn it inside out. So that's what you're going to have right now, then i'm going to take this top section and i'm going to do the same thing turn that inside out. So this is what you have to start with. I felt like my top tone. Ponytail was breasting a little bit too high. I want it to be more like this, so i just put the ponytail a little bit lower and then did the topsy-turvy, so just be aware of that when you're doing it yourself, so i want it to be about this. I want it to be right. On top of each other here so now, i'm just going to take this and kind of tug at these sections here to kind of make them look looser and more whimsical, more romantic, looking okay! So that's what we got right now, so i'm just going to put this out of the way for a second and right now, i'm going to just take this bottom and put it into a loose braid and then just tie it at the end, with an elastic And that's just going to make it easier to tuck it under into the topsy-turvy that we got going on. I don't know if it's called the topsy-turvy that's just kind of what i've always called it. It'S like an inside out, ponytail, okay! So now i'm just going to take this and i'm going to kind of roll it up. Tuck it right under here, and you want to just criss cross your bobby pins to hold that into place just like that. So that's what we have here! Okay! So now we're gon na go to this top section. I'M just gon na make it nice and loose, and i'm gon na take that bottom kind of roll it under and try to tuck it in to the top here so make sure that's all tucked in there. So it's going to look something like this. So now, if you want, you have the option of taking a headband and putting it on right there, and this is how it looks. I feel, like that's pretty simple um and you can tailor it to your own. If you like it tighter, of course, you can wear it more tight. I also had another headband that i got this one also from target. I thought it was super cute, it's a little puffier, so it looks a little bit more like tiara ish, but i like this one as well. What do you think so? That'S the first updo, don't mind if you hear any sounds coming from over here, ayla's sitting here with me, but she's on the ipad. Okay. So for the second look um, we are going to again i'm going to leave some pieces out here, but only little pieces. Um, unlike last time where they were a lot thicker, so i'm going to leave these little pieces out and just kind of bobby pin them to the side. So i don't grab them by accident. So my pieces are already kind of curly from yesterday when i did them um but feel free to curl these pieces. If yours are not curly all right, so i'm just leaving those out. So now i'm going to take that half up half down section again and just pin this to the side for a second and i'm going to take this bottom section and do that same thing as before. I'M going to put that into a mid to low pony that whole bottom section and i'm going to put that into a topsy turvy just to get that to where we're going to do later, get it out of the way. So we have that all right. So now these sections - i part down the middle, i'm not a crazy, perfect part person, but you are get your part right, um and then i'm going to french braid both these sides and stop right here and then put the braid all the way. To the end. All right for those of you, if you don't know how to do a french braid, i do have a french braid tutorial i'll, either link it at the end of the video or in the description box. If you want to practice doing that, if you like this, look, okay, so make sure you stay nice and close to your head, so we don't get any weird gaps later all right and then i'm gon na braid it the rest of the way. Oh wait: did i forget a piece? That'S all right! Oh no where's that piece there we go. Okay, it's still there all right, so we're going to braid that all the way to the end. Okay, it's okay! If you have those little pieces, sticking out, don't mind that that's just because you have layers, i do as well all right and i'm gon na do the same thing on the other side, all right. So this is the look we're left with so now you can take your bobby pins out because you don't need those to separate anymore um. Now in the pictures that i saw they kind of kept the braids tighter. That'S not my personal preference. I feel like it makes me look like i have a little pee head, so i like to tug the braid out a little bit, but if you want to keep it closer to that look then don't pull the braid out. So i'm just going to do that and loosen the braid. It'S actually a bit easier to loosen the braid up. If you take the little bottom scrunchie out while you're doing it. I also like to kind of pull here a little bit just to kind of give it more of a casual look and then put that rubber band back on all right. So now this is what we have now just like the first one. I'M going to take this bottom and you can twist it you can braid it. It'S really just to keep the hairs from falling out, but i'm going to braid this loosely and then you can tug the braid apart a little bit put your rubber band. At the end, and then roll and pin just like the first one make sure you crisscross your bobby pins, it keeps them stronger and makes them last okay. So this is what we have okay. So now we're gon na take these braids that we created and crisscross them, and i kind of like to tuck it under and then pin it under this bun that we created so there's one. It seems like during that era there was lots of braids and crisscrossing. It under buns doing twists, okay, and if you want, you can pin these in as well if it doesn't feel secure. So i kind of take those braids and bring them down a little bit lower to cover that center scrunchie, and then i'm going to just fan this out a little bit more and pin that just to make it look a little fuller. The last thing i like to do is kind of pull at this section and just make it look, fuller and more natural, more casual and that's it. You can add little pearls to it or flowers. Here'S the view from the front and the side, all right. So for this last one it's going to be more of a down. Look so again, i'm going to take my pieces out from around my face. If you guys don't like that, look then feel free not to leave. Take these pieces out. You can have it all. Pinned back as well, which is also very pretty all right, so i'm just going to pin these to the side all right, so i am going to break my middle part here. These sections do not have to be perfect because you're not going to see the parting. All right, i'm going to take a little rubber bands and put that into a little ponytail right there, all right! So that's what i have so far and then do that on this side as well, just another little section, all right, i'm gon na put that in a little pony. This is literally similar to what we used to do in the early, the early 2000s lizzie mcguire for those who know know, except we would end it off with a butt with a butterfly clip. So i'd like to call this, the grown-up lizzy look all right, so we have oopsies that broke. Don'T we get you eyela? No, you got a clip nice, okay. So now we have three sections just like this: i'm just going to take this down, because that's annoying to have my face. Okay, so now i'm going to take these and kind of tug at them again give them some fullness. I want a lot of body. Do that with this section as well, you kind of want them to blend together, like you, don't see that they're parted into three sections? Okay, so i have that and now i'm just gon na curl with my wand and then i kind of pull it down a little bit because i don't want it to be super curly all right. So this is what we kind of have so far now for the back so you're going to take these sections and just like we have been doing another topsy-turvy and then make sure you pull this out, make sure it has lots of texture to it, because i Want to just hide those little rubber bands and we're going to do that over here as well. You, okay, i am and last one okay. So this is what we have right now once i was done filming the youtube video. I actually found a bow, so this is a quick clip of what it would look like with the bow. So i didn't get a chance to get like fake flowers or like pretty ribbons or anything to put in my hair, but that's probably what i would do in this scenario. These are my these are my daughters but um. I'D probably put like a nice brooch or like clip flowers right in this section to hide these um. I mean, if you see them, it's not a big deal, but i think it gives more of that effect of like the pearls or the pretty flowers that you saw those women putting in their hair but um. This is this. Look it's more of a down situation. I really love this one. I'D actually wear this one on like a daily basis, um but yeah. That is the three bridgerton inspired, looks if you guys liked these. Please comment in the section below. Let me know if you try them um and let me know if there's any other looks that you guys have been um wanting to see as well thanks. So much for watching and i'll see you guys next time, bye, guys
Comments
DotDotSmile With Angelina Sickora: I love that you’re using a frozen hair brush!! Mom life. ♥️
Sílvia CP: Great, easy and fresh ideas!!
M K: I love the last hairstyle!! What is the brand of the curling wand that you used?
Jennifer Kim: Exactly what I was looking for!
Alisa Ciupira: So gorgeous ! Going to try these when the sun is out hihi
RITA BUTLER: Fantastic
Donna Tomasi: I am 74 and want to try to do the first one in the morning.
Rasia Willmott: p͓̽r͓̽o͓̽m͓̽o͓̽s͓̽m͓̽