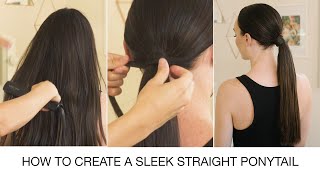
Mid Ponytail Mold Tutorial
- Posted on 02 February, 2023
- Heatless Hairstyles
- By Anonymous
Hey Doll Welcome to my channel! Today I will be showing you guys the molding technique for your Mid/High Sleek Ponytails. This is beginner friendly Like, comment and subscribe to my channel to see how I apply the hair for my ponytails next…
Products Used:
Got2b Spray
Edge Booster Wax Stick
My brand of Sleek Edge Control (Available Summer 2023 )
Instagram & TikTok @Theartistrydollhouse
Booking site www.theartistrydollhouse.as.me
#sleekponytails #sleekponytail #sleekponytailtutorial #barbieponytail #blackhair #tutorial #sleekhairstyles #texashairstylist

I feel like falling in hey dolls, it's your girl, Risha and welcome to my official YouTube channel. Just like I promised y'all. Once I reached my 100 subscribers, I was going to drop a tutorial for y'all, so today I am going to show you guys how to mold um your pointy toes for a mid ponytail um. So right now, um before I even get into molding the ponytail. You want to make sure you freshly wash and blow dry out your client's, hair and then you're going to press it out, as you guys see that I am doing now when you're actually blow drying their hair out preparing to straighten it, make sure you blow dry. It it's uh blow dry it out as straight as possible so that when it comes to flat ironing the hair, you only really need to use just one pass and um using more than one pass, will create heat damage for your clients. So you definitely don't want to hit their hair with more than one pass with that flat iron. I do like to hit the roots twice, but the rest of the hair is just one pass foreign looking like she just got her fresh little: silk, press, nice and shiny and silky, and this is going to set the tone for when you start molding the ponytail. I went ahead and pressed the last section off the camera, but I am going to show you guys how I hit their baby hairs, their edges um just to get them nice and pressed out as well, because, especially when it comes time to doing their baby hairs. You want to make sure their baby hairs are nice and smooth and slicked into the ponytail, and that they will last then not mess up um by the next day, foreign pressing out my client's hair. I am now going to before I add any products I like to do a test ponytail to make sure that my clients, like the placement, the Heights, and if we need to make any adjustments we can before I start adding on products. Because, once you add products, there's no going back, so you definitely want to make sure it's in a good position for your clients before you begin the molding process. So that's what you guys are watching me do right now, as I'm creating this test ponytail, I am going to smooth out the hair as much as I can. I'M pretty good at getting um the height pretty spot on the first time. So I like to just get it nice and smooth right up off the back. You know um, so it could also give them a better visual of how it's going to look when it's all nice and slick down. So she loved the placement. Now, I'm about to show y'all the molding, so before um we actually start the molding process. What I like to do is: ask my clients exactly how they, like their baby hairs, um her preference. She wanted a lot of baby hairs, but she wanted them very simple. So I'm going to pull on them out along her full hairline. So when it's time for us to mold down her ponytail, the baby hairs are already pulled out in out of the way. Now we're going to take our wax. Stick I like to use the edge booster brand and all those baby hairs. We just pulled out we're going to use the wax stick to lay them down once you finish, laying the baby hairs down with the wax stick you're going to go in with your comb and then kind of Comb them down flatten them out, so that when it, When we start molding the ponytail, they will stay in place flat on her forehead and they won't get caught up into the ponytail foreign stick and go along the perimeter of your client's hair. With the wax stick and just smoothing it out. I promise it will not have your client's hair. Turning white like I said, I use the edge booster brand, it never fails me and I never get those complaints or issues with my clients. So I highly recommend using this brand, but if not any wax stick pretty much will get the job done so yeah, that's all I'm pretty much doing with this is just going along the perimeter and we're about to smooth out this ponytail after we finish smoothing down Their hair with the wax stick, we're now going to take our comb and smooth the hair towards the back towards the ponytail um. So when it's time to Slick it down with the got to be it's already pretty much nice and smooth down. So, as you guys can kind of tell um, I take the comb at an angle and I smooth it all up and then I kind of start like combing it in um. If that makes sense, sorry it's kind of hard to like explain but definitely get that comb and just smooth it on up like where the hair tie is, it says, start um getting lumpy at the top. That'S how you know you're getting it nice and smooth um up underneath there, because we don't want any lumps or bumps when it comes to slicking down these ponytails. We need them nice and smooth down. So that's all I'm doing right now, once you finish, combing the hair through and getting it nice and smooth we're now going to pull out the ponytail and we're going to smooth out all the hair that was clumped up around the ponytail. We'Re going to you know. Just smooth it all out so now it's one nice Sleek, smooth ponytail and it's ready to be molded into place. Most important thing is to take your time and not to rush the process if you want it to be as nice, smooth and Sleek as possible. Take your time, especially with this step right here, because when I tell you the hair cracks and just falls apart so easily, you want to take your time when doing this. Do not rush your modes when it comes to your sleep ponytails. Take your time see. We haven't even added any got to be yet and it's nice slicked and smooth. So now, it's time to mode our ponytail. So the easiest way to do this is to work in two sections. Well, first, when it comes to high and mid ponytails, you want to do just one ponytail at a time versus like the low, we section it into three sections, the back and then you have one section on the right and one section on the left. Will you well when it comes to the mid and the high ponytails, you don't section the hair off that way. You just do it in one ponytail, but when it comes to actually molding it, you still want to mold the hair into sections. You see how I just took this small section on the um left part of her head and I combed it out. Then I sprayed some got to be, and now I'm smoothing it down with a hard brush and we're about to go in and blow dry it. So that it gets slicked and stays into place when it comes to blow drying, I like to rotate between medium and cool heat uh, really just so, you don't burn yourself nor your clients, and I like to smooth it out with my hand, because, honestly, your hand Is just the best tool when it comes to smoothing it out, but it also helps when um with keeping track of the temperature, so once it starts getting too hot, the heat is going to hit your hand first before it hits your client. So you will know to start cooling it down, so yeah make sure you guys are rotating the heat, so you're not burning yourself, nor your client and you just want to continue working into small sections until you get around that whole entire head and, like I mentioned Before take your time, get it nice and smooth as possible add as much product as you need. Try not to overdo it, because you don't want um our clients walking around with extra hard crunchy ponytails, but you do want to you know kind of stiff, but yeah. You just kind of got ta eyeball it and just do it to your liking. Me I'm a perfectionist, so sometimes I'm out there just trying to smooth it out for days, but I mean it really doesn't take too much product, though I promise um just make sure you're using the right tools when it comes to smoothing out the hair, and that's Honestly, just the key to the ponytails, so at this point everything pretty much um is repetitive. If you do section by section you comb it out, smooth it out spray it with your section, with the got to be after you spray it with the got to be. You take your brush, you smooth it out with the brush, and then you blow dry your section um. Another key point that I wanted to bring to you guys is when you're blow drying your section do not move to the next section until it is completely 100 percent dry. You do not want to move to the next section if it's still kind of um damped not damp but tacky. Sorry y'all just had like a little brain fart but um Tech is the word. I meant um, you don't you want it to just be completely dry, because if it's not completely dry by time, you move to the next section. That starts to create cracks and stuff, and then you're going to have to go back over that section and fix it. And smooth it out and that could all just be avoided by making sure it was completely dry in the first place before moving on to the next section. That'S why I say just take your time and don't rush the process, because, once you rest the process, that's when it starts to look like a hot mess. So just take your time make sure it's nice and blow dried you'll know it's completely dry because one obviously it will feel 100 dry and two when you're gliding your hand through it's not sticking to that section. It'S not sticking to the hair. So once your hair hand can smoothly glide through dissection without it stick into the hair. That means it is 100 dry and you can move on to your next section foreign. So now we officially made it to the other side of the head. We are now finishing up and, like I said it's quite repetitive, so keep you know, smoothing it out with the comb then going with the got to be as your product and then smooth it out with the brush, and then I'm going to show you guys how To smooth out the top of the ponytail, so now it's going to be one nice leaked smooth ponytail. Now you guys Imma have y'all mold Downs down pat by the time we finish with this tutorial like, and it's really like easy and simple. You just really got ta take your time with it and you just got to make sure you're using the right utensils and you're using the right products, um and you're, using them correctly together, if that makes sense, but yeah. Now I'm finishing up this last little section up at the top and then I'm gon na show you how to finish off this mode. So before we begin to take the hair tie off and smooth at the top, you want to add more got to be to all the hair. That'S bunched up because it's probably gotten hard from the overspray when molding it down and re-spraying it with the got to be is going to loosen it up so that we aren't hurting our clients when it comes time to combing that hair into the ponytail. When it comes to this part, you want to gently comb out the hair so that you don't create cracks and have to go back in with product to smooth it out, because the goal is to not use too much product so that your clients don't leave with Their pointy toes rock hard, but we want to be able to use enough so that it's nice slick and stays in a place. So, as you guys can see, I am gently just combing the hair out, I'm not creating any cracks or anything like that, and we are getting this ponytail nice leaked and smooth, and once you put that rubber band back on, you want to do it. Nice and slow, you don't want to rush any part of this process. Okay, we don't rush, we take our time, so we make sure it's done right. The first time, foreign, now that I've finished recreating that ponytail. I just like to go back in with a little more product and slip down any flyaways and make sure it's nice and smooth um around that ponytail before I go in um. Add in the hair to make sure the ponytail is nice and kind of tight and it sits up high without leaning, we're actually going to go in with a medium sized rubber bands and we're going to place the rubber bands onto the ponytail right. Underneath that hair tie, we used to mold so a tip when it comes to molding, the ponytail use a hair tie and when it comes to um, creating the actual foundation for the ponytail, you want to use the rubber bands. You don't want to use a rubber band when it comes to molding, because you notice how many times we had to take the hair tie off and put it back on with the rubber bands. It will pull the hair out of place versus with the hair tie. It helps a lot better with keeping all the hair together. So that's why I mowed with the hair tie and I create the foundation of the ponytails with the rubber bands. Also, when doing this, I would highly suggest not using no more than five rubber bands and also throughout the process, continue asking your clients if the ponytail is too tight, so that their hair head is not pounding by time they leave so off camera. I pretty much wrapped her hair with the wrap strips and you guys see how that ponytail is just sitting up like that's the whole point of why we add those rubber bands. But before I add on the hair, I actually like to go ahead and style. The baby hairs, so I am going in with my mini um fabulous. I think that's how you pronounce it flat iron and we are going to curl them baby hairs just so it makes it a lot easier to swoop them, and then I'm gon na show you guys how I pretty much swoop the baby hairs into the ponytail mode. So that, as long as, if your client ties your hair down at night, these baby hairs are not going to move out of place. So yeah, I'm showing you guys my curling technique and then I'm gon na show you guys how to Slick these baby hairs down. Thank you now we're about to go in with my brand of sleek edge control and we about to slay these baby hairs. So we're going to take just a little bit of the edge control. Trust me a little bit will take you a long way and we're just going to smooth the baby hairs downwards, with the edge control and now we're about to go in and swoop and style. These baby hairs and, like I said throughout this whole entire tutorial. Take your time, especially with these baby hairs, take your time because they're not as easy as they look so yeah. You just want to swoop in a like C motion and um, just slowly swoop, that little curl and then you kind of want to set it um with got to be, and I'm about to show you guys how to set it in a second. But right now you just want to keep swooping it until that curl is sitting up the way you want it to so when it comes to The Sideburns, we don't swoop those into the ponytails, but now I'm about to show you guys how to swoop all the Other hair baby hairs into the ponytail I mean you're, like I mentioned earlier, you're just going to keep swooping it into that c form. You want to swoop it with the edge brush and with your thumb or your pointing finger um that usually works best for me and, like I said, just take your time swoop. It all the way through and then you once you get it into the ponytail you're, going to use the other side of the edge brush and then we're going to just smooth it out, like you see me doing here and just brush it into that ponytail mode. So it's nice and slick in there, so this is what I mean like as long as you get them nice and slicked into the ponytail and your clients do their job and tie their hair every night. These baby hairs are not going to move trust me when I tell you they're not going to move so now we're going to go in with the got to be. I I originally like to use Spritz for this part, but I ran out of it. So I went with my got to be: that's the next best thing and we're going to go in. I actually like to use cool heat for this part and we're going to spray the uh, those baby hairs and yeah. This is also an extra little step. I like to take just to make sure that these baby hairs do not move out of place and also, if your client needed to touch them up, um or if they just wanted to switch up their baby hairs. They could pretty much comb it out and restyle them um, just as they please if needed. So it's not too much product but yeah. So after you finish slicking and slaying them baby hairs. This is exactly how our ponytail modes are supposed to look like. So this is pretty much the finished results after I went ahead and added on the bundles and everything. Now my girl looks like a cute little little Barbie doll. So if you guys want to learn how to apply the ponytail, the bundles and also when it comes to styling the hair uh, please like comment subscribe and I got y'all
Comments
Lanecia Nicholas: I learned so much !!thank you soooo much ❤!!
L. B: Love it looks really good nd it's sleek asl✌
Danecia Johnson: I can’t wait for your next video