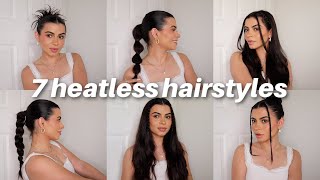
5 Quick & Easy Heatless Hairstyles | Hailee Jhaveri
- Posted on 14 May, 2020
- Heatless Hairstyles
- By Anonymous
Hi guys! Welcome to my channel! In this video, I show you how to create 5 quick and easy heatless hairstyles! Each look takes less than 10 minutes to create, perfect if you're in a rush or want an easy look for the day!
Let me know what your favorite hairstyle was in the comments below! If you try any out, I’d love to see your looks on Instagram! Tag me @cwlblog and use #cwlstyle for a chance to be featured!
Be sure to check on my blog post that goes along with this video!
~~ https://crownedwithlove.com/ ~~
SHOP THIS VIDEO:
Earrings: https://rstyle.me/+Sm1qbZ048YRkVINnaia...
Lip Color: https://rstyle.me/+tSrKqqpKnwplMlmRfpl...
Cream Blush: https://rstyle.me/+i58DO4KvvPpYAvbT4yg...
Favorite Hair Ties: https://rstyle.me/+f6TXi3JL4aBcNqfYKHI...
Neutral Clip Pack: https://rstyle.me/+05ky8_vXIKhtmZob8wG...
Bobby Pins: https://rstyle.me/+SB4Fw85P4CV-7dpXCyL...
Elastics: https://rstyle.me/+qBhK1i5XrLmTpIGN2in...
COME SAY HI!
Blog: https://crownedwithlove.com/
Instagram: https://www.instagram.com/beautifullov...
Blog Instagram: https://www.instagram.com/cwlblog
Make sure to subscribe to my channel!
Hey everyone, my name is Hayley and thanks for tuning into my channel. This is my first video on here, so I wanted to do something that was kind of light-hearted and fun. Since I know everyone has been inside for quite some time. One thing that's been helping me get motivated, is actually getting ready in the morning, so I wanted to bring you a few quick and easy hairstyles to help start your day off on the right foot, let's get on into it. Okay, so for this first look you're going to want to start with a high ponytail and I'm just achieving that by kind of finger brushing my hair because the Messier this look the better, so I didn't want it to be too put together now, just make sure That is nice and tight at the top of your head, and once it is tight, you just go ahead and pull the pieces on the top of your head. Just to add some texture to this look, like I said the Messier, the better, so just go ahead and pull on those until you are satisfied. So now we're going in with a second hair tie and instead of pulling the ponytail all the way through, you want to make sure you leave a little loop at the top and then go ahead and secure it with the rest of the hair tie. And you will have, depending on the length of your hair, some of your ends. Sticking out mine is on the longer end, so I have quite a bit of hair. It'S still sticking out. Instead of keeping the Teletubby look we're going to now just kind of fluff that bun or the little loop that you left on top of your head now. This is why I try not to make it too large, because it's a little bit harder to handle, but one way to fix that is just go ahead and tug on the ends that you have hanging out and it'll. Add some texture, as well as kind of make, that bun on the top a little bit smaller with the remainder of the hair. That is hanging out just go ahead and split that into two sections and then you're gon na want to criss cross them over the front and then again, depending on how long your hair is we'll determine how many times you need to wrap them around and then You'Re just gon na secure them with bobby pins. It may be looking a little funky at this point, so just go ahead and fluff that loop after you've wrapped those two pieces around the base and just go ahead and secure that with bobby pins luf. Until you are satisfied with how it looks you can use as many or as little bobby pins as you'd like next step is optional, but I did take two barrettes and clip them on the back of my head. Just to add some interest to the look. Last but not least, it's time to tame those baby hairs and there you have it a super, quick and easy top knot. I started the next look off with heatless curls, since this look requires two braids. I'M gon na go ahead and make sure I section those off. I just want a thin section at the top of my head. Nothing too bulky. I'M gon na go ahead and pull my hair back just to make sure that it's out of my way go ahead and remove your clip, and this is what your section should look like. So now I'm just going to take a small section from the front and then split that section in half now take the bottom half and twist it up around the top half adding hair as you go so you're just gon na take that bottom piece. Add some hair to it and then go ahead and wrap it around. The top piece continue to do this until you get to the end of the section once you've gotten to the end of the section just go ahead and finish it off with a hair tie. I do suggest using an elastic versus an actual hair tied just because the hair tie is kind of thick, so it makes the little ponytail stick off your head a little bit. I just didn't, have any available to me so a hair tie. It is tighten that section and you are finished with your first side now onto the other side again, you're just gon na want to take that front section and split that into two pieces and take the bottom half and wrap it up around the top half adding Hair as you go once you get to the end of that section, go ahead and secure it with a hair tie now just go ahead and tighten those two ponytails and you have completed this look. The next look. We'Re going to be working on is a half up top knot, so I'm just going to section off the part that I want pulled back into the button once you've sectioned off the hair that you want in the bun go ahead and finger brush it and secure It with a hair tie or an elastic to create some texture in this look just go ahead and pull on those front pieces now take that half up Pony and split it in half after you've split it in half you're, just gon na want to twist those Pieces around each other for those of you with thin hair. Like me, I have figured out this little trick just to make my bun a little bit thicker go ahead and hold the end of the twists in one hand and pull in the opposite direction. Just to fluff them up a little bit, the next step is to wrap the twists around the hair tie, creating a bun, and if you don't have bangs, that should be a lot easier, secure with bobby pins along the way. Once you are satisfied with how the bun looks, you are finished, this look will consist of two twists going to the back of the head. So just section off one side of your part and go ahead and slip that into two and with the same technique that we used for the half up twists we're going to take the bottom piece and wrap it up around the top piece. Adding hair. As we go once I've added enough hair for a pretty thick twist I'll stop adding hair as I go and just continue to twist until the end. Now you don't actually have to twist it all the way to the end, just enough to reach around to the back of your head and secure that twist, with a clip repeat the same steps on the other side. Now, just some final adjustments and you are finished - the last look is the easiest of them. All all you need is a hair tie and two clips go ahead and pull your hair into a low ponytail. You can either do this super sleek or I'm just finger. Brushing mine and secure it with a hair tie, you can either stop here or continue on to the next step for a little flair. I just added these few clips to add a little interest to the look tada the last of my quick and easy hairstyles for Quarantine. Thank you so much for watching. If you enjoyed this video, don't forget to give it a thumbs up and subscribe. Also in the comments down below, let me know what your favorite hairstyle was:
Comments
Kristina Rizzo | Better Together: You’re so cute ily
Nicole Cartner: Aw so cute!