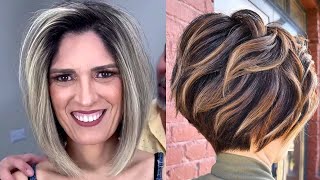
Quick And Easy Long Layered Haircut With Razor | How To Cut Perfect Face Framing Long Layers
- Posted on 19 June, 2021
- Long Hair
- By Anonymous
How to cut a Long Layers with Razor. A layered haircut adds volume to long hair and allows for flexibility when styling. Layers in hair bring volume, make thin locks look fuller, and are really a stylish way to trim your long tresses.
Uh anyway, we're gon na just give her a little face frame. Actually, where she got, we got a brand new uh mannequin head. That'S just got a fresh little highlight, but no cut so we're just gon na kind of go through and do rehearse and face here. I'M gon na use the razor here my favorite uh little tool, the feather plie razor and you can keep an eye out for a fancy version of it coming out in the summer. But really my favorite way to approach face streaming is just to keep it as simple as possible. I like to just kind of like do a diagonal back section right here through the front, and i like to not use too many clips. I like to kind of keep it pretty simple, but if you are doing that, you have to be aware that you're going to go ahead and keep your sections clean, make sure that you can uh keep track of what parts you're cutting and what parts you're you Know trying to avoid, but right now um. I will start with about this. Stick of a section. You want to make it thick enough so that you can kind of see a guideline once you've established it, but i also think they can't cut it or control it, and i like to also kind of like figure out this girl parts in the middle. All the time, but most people, you know if they part in the middle, you got to figure that out. If they part on the side you're going to have to adjust it. So i would part it wherever they part generally before you start cutting, and then i would talk to her. We had a nice talk before the live, because we didn't want to waste time on the consultation part you know, but she mentioned how she loves it when her face frame hits like right around chin links right here so instead of like holding it down here and Cutting it at chin link, which would mean that it would shrink up to like more like cheekbone like uh. We need to kind of like put it where it's going to live and then understand that, like around this long is where we need to cut it. In order for it to like live etch in length, okay, so just kind of get that figured out in the beginning, and i like to start right at the top set it in where it's going to be. And then i can leave my fingers there and i will know where to start cutting and i will work my razor down in a diagonal way: small little movements, you can kind of like see your guideline there and then work right down towards the perimeter and keep Adding in more hair as you go, but don't try to hold it all at once, just try to cut only what you can handle and work your way down towards the perimeter last one down here and connect it all the way down to the length. So we have just a nice little c-shape action. There feel it feel it yeah. It looks good wow yeah. Is anybody talking yeah? Chris just said: that's not jake, oh, it sure isn't you're right. We have taken his phone and we know the password and for a one dollar donation. I will share the password to you. How about that? Is that worth a donation or not? We got two so far: oh wow, okay, uh, yeah, i'll dm you jake's password as soon as this is over. You can go on this page and do whatever you want so anyway. Now that you can see we have this face frame here, i'm going to work on the other side, i'm going to scoot over, like that, i'm going to be able to pick up a piece of this as a guide now, because i want it to connect. You know loosely so i can see where the guy is falling out and i can work right there, so you kind of like connect that through and then i'll stop so now. I know that wherever they part it's gon na, like it's gon na connect eventually and then i can keep moving and i like to hold this out at t to the part you guys heard of that before. This is a way that we talk about a parting, and then this section in relation to the parting, like the section that you're holding, is like the bottom part of a capital t and the parting line is the top part. So that makes like a capital t. Does that make sense, people in the comment sections doesn't make sense. It does like this is not it right here, and this is also not it see how it's perpendicular. That'S a trivia word vocabulary word for you right, perpendicular, so hold it like that, and then you can work your way down. Perpendicular to the part and then continuing that theme. As i move down, i got ta move myself a little bit and move the section so that it stays at t like. I can't pull it over here because it will be out. It'S like just like that, right out from the party, i'm gon na work. My way down with the razor right on the top of the section and you'll see that the blade is actually sitting parallel to the hair, like that, when i first start cutting, it's not actually cutting anything. I just lay the blade on so that it's connected and i can figure out how much texture i want so. However, high i'm bringing it is going to give me that much short to long action short so long like that. So as i move down, i'm moving the blade in the same motion and the same consistency all the way through and that will give me a consistent, balanced texture through the ends. Look at that how about that huh! She looks cute there. We go! Look at that. So that's a good start face frame, and i i find that this is like the easiest way really to do face framing um, because you're you're, just working down and down center out both directions on either side and like sometimes when you're working with scissors. It'S really easy on one side and then it's like you got ta, do these gymnastics or whatever to make it work on the other side. So this way you're just keeping it as easy as possible so like for our next guide, we're gon na go directly behind. Now, in a diagonal back way, and i'm going to try to keep my sections real clean so that i can follow along where i'm at real easy and i do not have to clip it or anything while the hair is wet, it'll just sit wherever you put. It so that is convenient for us again on this next section, i'm just going to use the fine teeth right there. I want to lift this out right at t. Hold it right out, and i can see my guide underneath slide my fingers past and then work. My razor up and down up and down up and down creating a little short to long action, and when you see what you have left in your hand, you should be able to see that the top is all stopping at the same spot generally and then the Bottom, like that's, going to be the most texture that you have these longer pieces, and then this your blade is working from there down from there down from there down, like that, all the way to create your texture throughout the ends is that cool anybody talking? What are they saying? Are they saying i want to join? We get a million join requests all the time. Sometimes um it says. Are you bringing everything to the front if you're giving her layers throughout yeah? This is bringing everything to the front guide really, but it's gon na layer. The bottom kind of section like, however high our razor movement, is going it's gon na it's gon na layer. It like that. It'S kate, everybody hi, look at that! So continuing on this side we're just doing a little kind of razor long layer thing. I'M gon na keep my partings clean, as i can i like to do one side and then the other in order to kind of maintain some kind of balance, because i know that, however high my razor movement was on the last section, i need to do it. The similar way on this side, so it's like about maybe an inch and a half from the ends, and i can slide down to the ends and, as you can see like you, can see the guide underneath there right so make sure your section is skinny enough. That you can see your guide through it, so i'm going to start up here and i'm going to end right there. So it's going to go short to long to there and then back up so that it the ends kind of match the guide, and then the texture starts a little bit. Uh, like that short long short salon, feel that, and if you can make your motion similar you'll see that the the ends are all the same. They all stop at the top in a similar spot. So then continuing add a t to the part sectioning right here and i'm just bringing it straight out from there. If someone had a side part, how would you go about this? You need to go ahead and figure this. The parting out in the beginning, beginning like we talked about her parting is always in the middle. She never moves it. She loves it in the middle. She has a very symmetrical face see so it works perfectly, and if your lady does not part in the middle, you need to figure that out beforehand and put it, i would say, put the parting in wherever you're starting at and then work from there and continuing On i'll and the funny part of this is we're going to ignore our ear, we're just going to make this part and go all the way around. Let me see so now: it's going all the way around see so we're incorporating the sides and the back and everything right now and this i find this kind of technique is pretty straightforward and simple. You know which is the way i do everything, but i think it just uh isn't the easiest way. I know about to just do like a long layer. That'S real soft, so this is going to continue like layering the hair throughout, and it's really good on people with like big curly hair. That gets real triangly on the bottom, because it kind of layers it in the bottom kind of section right here and keeps this skinny at the at the last kind of third, so see to the part. Still i'm putting myself right in the middle of that combing. It out there's the guide underneath slide your fingers past and the blade is moving at a similar pace again and then i got ta scoot myself a little bit and slide right out here continue on and work around on the back as i'm going through the back. I got to move myself and see so now t is like holding down here because the top of that t is right there and the bottom of it's down here. So i i can't hold it right here, because that would not be making a t. It'S got to be just like that, so then working right down and the fun thing about this is also that the perimeter kind of works itself out and you don't need to really cut the perimeter first, if you just cut a layer and the perimeter will kind Of like work itself into like a sort of soft - u type shape there. Does this make sense people uh of earth mhm. Would you say that's a 45 degree angle. Do you have a protractor handy? Yes, probably something like that. I would say so. I feel like when you hold it out. I always feel like i'm holding it right towards my belly button. When i do that, i think i think generally. That is a good way to think about it. Yeah, you know we're trying to do these badges things on live. This is our first time trying it. So if you would like to donate one dollar towards purchasing this nice lady, her name is, she doesn't have one number, four, eight, three, five uh, you know she's. Thank you anyway, we're going to continue on and you can see i'm moving myself right around t still right out from there. You can see the guide underneath and working that little stringy part off and then just keeping on moving yourself around as you go. That'S the whole take to get and then, as you get to the bottom, you're kind of like coming right out down here, see and then just getting a couple little pieces and of course, if they already have a perimeter um that they like, then you can just Work towards that or if they're like oh i'm, going to cut six inches, then you can maybe lay that in first before you do this and then here we go we're going to continue on. Let'S go back to this side, so we're kind of working from the center and then just rotating around each time, and you can see we're getting towards the top of the head now. So i would have sort of give me a little lean number four. Two. Eight five right, four, eight three five. So then, i can lift this one right out and really you can you can have your elevation get higher if you want to layer it more, i want to try to keep it consistent generally, so that it's layering some there's her length right there and my razor Motion is like the last inch and a half or so scoot myself over right. There see it so there's not really much more to cut now on this girl, but i got ta keep moving myself right through to the bottom and that's already cut right cool. Let'S try one more on this side. Has anybody on here come to any of our classes say if you have okay, she has anybody else. Just kate there's a lot of opportunity for you out there. We are traveling a whole bunch, uh coming up we're headed to chicago next, i mean the next couple of weeks. It'S already sold out, but if you beg you can maybe get in yes, we'd love to have you here. I guess someone was at the goldwell class on monday: oh hey, that was fun um. Where do you live person at the golden class, her name's hair by danielle, hey daniel? Where do you live? I cannot pronounce her last name, i'm so sorry! Well, that was fun. We did do a live stream for some golden salons. On monday at our friend's uh video studio called cogigo, it's a very fancy place and has like cool lights and everything. It was really fun, but it's hard because you're just talking right to the camera sort of like this, and you don't know if anybody is laughing at your jokes or that stuff. So it's kind of harder. Her last name is bulowly. She she sounded out for me on the comments and she's from massachusetts. Oh massachusetts, it's cool yeah! I i feel like they're they've, we've done a couple for some kind of northeast she's loud great. Well, thanks for coming back again, danielle we'd love to come to massachusetts. At some time in our lives, what's what's the situation like that? Are people doing live events in massachusetts? We will accept your answer. We could do this like, but yeah check it out. We did we. We have done a face frame here. We'Ve made a little easy, um, easily replicatable face frame layer uh. There are many names for it, i'm sure in the world, but you know just like diagonal back easy face frame and then the the thing that's cool about it, i think, is that if you do have somebody with like more natural wave and you scrunch it in You can kind of like get some volume in the top, but it stays really skinny through the sides and those big curls. Sometimes it goes sort of triangly. This method can kind of help it to go and stay a little bit more skinny throughout the perimeter. Kind of like works itself into like a soft sort of little. U shape! Look at the sun glistening on it. I know yeah, look at that! How about that? How many minutes has this taken? How do you look that up? I don't know, i don't know either yeah. Well, what do you? What do you people want to comment about that? Look at her in the sun, wow she's real cute? Oh i'm cut deep

Comments
Ana Silva: Maravilhosos obrigado
Taslima Karim1993: Wow lovely hair cut, the best I ever saw
Adam Balogh: Your are amazing! I would like to purchase your razor!
Jannu Manyal: very nyc thanks sir
Cher ander: You're shortening the long layers