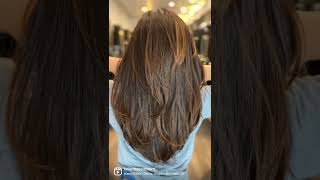
Modern Long Layered Haircut For Women | New Long Hair 2021 | Cutting Tips & Techniques
- Posted on 11 March, 2021
- Long Hair
- By Anonymous
This customizable, long-layered haircut is not your average take on this look. Such layers also make for the freshest and most modern lob of them all.
Tutorial, i'm just going to take a second just to explain the section and pattern you can see. This is a what you call a halo section: i've disconnected roughly just under three quarters of the hair out of the way in case this is essentially keeping the outline safe. The halo section we're going to be cutting relatively short. This is going to supply our internal shape. That'S a wrap, yeah all finished straight away, so the wig wrap i've done here just to secure the hair out the way. The purpose of the halo section is very simple: it's to give me an equal level of disconnection around the head shape, bearing in mind that the head shape guys is circular, it's not a square, so if my section is adopting the shape of a square, it's not Really running fluid to the contours of the head shape. What i'm doing here is taking a central vertical section: we're going to be starting this haircut internally today we're going to be starting it on the halo section and we're going to be starting with the central vertical section. Okay, the reason i start on a vertical is it gives me full control of the shape that is traveling from the top to the bottom. Okay, so just give you a little so i know people don't want to talk too long on these things, but i'm just going to give you a little explanation. So when we look at this shape here, the shape that runs from top to bottom, we have a few choices. We can cut this round, which means each section will be parallel from the head shapes. Each section is going to work parallel to the head shape that will give me an equal if you like, an 8 in real equal distribution, so the length won't be increasing or decreasing. If i work square, we refer to this as a flat line. My flat line could work flat to the head shape, which means, as you can see here, if i work this shape in it's going to be getting longer as the head rounds. If i work a flat shape parallel to the ceiling, let's say what you can do. It'S going to be getting longer more towards the back than it is the top okay. If i do it where i'm parallel to the walls, it's going to be getting longer towards the top than the bottom, so you kind of get the idea. If you work triangular, you direct the length and weight, but what i'm going to go ahead and do? Is i'm going to look around so i'm working around, because i want this layer to blend in relatively well to the rest of the haircut, so i'm gon na start just with the club cutting i'm not really gon na point at the moment. So i'm just gon na keep everything nice and sharp and club cut. So to cut my section, i'm going to take a little bit away and bring the rest into it. So you've got to make sure that each time you take the section your body is parallel to your section. This enables you to have full control over the elevation, which is the movement of the hair traveling up and down hey sharon how's it going babe. So, as i go through here, i'm going to put the head shape at the head position slightly forward, which will make it easier for me to cut the bottom: hey chains, how's it going man by putting the head forward. It enables me to not have to lean over off my center to get my cutting distribution so again, don't take too much hair in your hand, at once. Keep those simple levels of discipline open work, parallel to the head shape and our guideline is coming from the previously cut section. So if you just tuned in my name, is ben brown, i'm tuning in from from the the united kingdom uh and i'm here to show you my version of a modern lead haircut or a shag shape okay, vertical round right we're getting somewhere. What are we going to do? Horizontal so remember? Vertical travel travels up and down horizontal travel side to side. We have a choice between three shapes square circle triangle: there's different variations between each, but i'm going to stay circular following the head shape vertical and horizontal. I'M also going to follow the head shape, which is a risky one. Generally, people always seem to over direct this section. That'S absolutely fine! Whenever i do something for her brained um, similar to some of my hair heroes from slate who you guys should be checking out, i always want to push it a little bit. So i'm out of my own comfort zone as well. So now i've got section one and i've got section two. So what do we do to make this circular? Well we're not going to over direct two onto one, because that'll mean that two is longer than one if we ever direct one on to two. That means that two will be shorter than one. So what the hell do we do we over direct one and two to the middle of the distance between each base. So if i take this section, do it in front of you? So if i take section two, this is when a mirror is a really useful tool. I have a mirror just behind the camera um i the only difficulty with filming at home is i have no one to film me. My wife would never want to do it. So there you go right in between the two sections. So as i work down this section, i take my next column i over direct again, i used the mirror, look how that would be wrong. You see that would be wrong, because section two will be longer than one. We don't want that, so we've got to lift that up. Okay, now i'm just going to spin this girl back around again the head's slightly forward, which enables me to not have to be tilting over to get a hold of my section. I don't know if you guys ever do this if you're ever doing your lives, but i always get like mega nervous that second, before i do one once i'm doing it, i feel a lot more at ease, but that second, before okay, now we've got section one And section two: you want to get rid of section one guys and get it go ahead and take section three. So each time you're doing this to build your shape horizontally, which again is the shape side to side. You really want to be looking to only have two sections of hair in your hand at once. Why is this? This ensures consistency with the position in which you cut your cutting section and where your guideline is coming from. If you have more than one section you have more than one, if you have more than two sections you have more than one guideline, those nerves always hit my breath away at the very start. I don't know if anyone else who works on stage and stuff do that, but i'd love to tell you it's a breeze, but it really isn't. But i get excited about doing anything with hair brain. I really enjoyed the interview last night with jacob he's a friend of mine. I really thought it was really funny so again, i'm taking now removing the previous, so i'm only working with two sections at once: try not to have too much hair on your hand at once. So again, parallel to the head shape. Sorry, if i don't keep an eye on all the comments, if you have any questions i'll do my best to go through the end if you've just joined. My name is ben brown from bb education in the united kingdom. I'M absolutely thrilled to be here today with you all to take you through working with a halo disconnection which is the name of the sectioning pattern. I'Ve used the halone, which i use a lot on salon clients where i'm working to really give a lot of disparity between the length of the internal shape to the length of the external shape. I find that the halo really helps me to disconnect without it. Looking like a feather cut or a mullet, so now i'm going to start with my section one again and take section two from this side. I'M using my new pivot point tripod, which i can't believe uh. Are you using each section? Yes, absolutely correct. Each section is a guideline, but let us review how we utilize that guide, because in many instances the previous section is a guideline for increasing length or building it. So in this sense we want to keep the length the same so like now. I'Ve got section one and a new section two, so i want section one and section two to meet in the middle of each other's guides. So the distance between section, one and section two they've got ta go meet in the middle that'll. Give me a shape. Traveling side to side that is horizontal, that is round and not building in length. Why is it important? It'S not! I wouldn't say it's important. What i would say is it's so easy to blend out a shape like this, because it gives like a uniform layer effect and that uniformality gives, if you like, doesn't build any length or doesn't build any weight. So it's not like. We have a a weight line or a weight build that we have to connect in somewhere. So again, i'm trying to move with each section, if needs be, switching my grip from standard grip to eastern grip, when i feel the tension in my wrist growing lovely. So this is a haircut that i do a lot for a client who i've already already explored a few ideas on. So this is the type of side queue of this client. We'Ve already tried a few things: we've quite a few ways of doing the shack haircut and there's keep coming back from wanting to be a little bit more extreme, a little bit more extreme, and i feel sometimes with some of the shags i've done. The back always gets left without a lot of layers, and this really turns that, because we start to get a lot of layers at the back. With this shape, i mean you can see. The layers are quite short already well. Thank you very much. Thank you. Thank you very much indeed. I really appreciate that. The first time i did a live for hair brained. Well, i was in. I was actually in california the first time i did one, but the first time i did one recently. I got loads of negativity at the very start. I don't know if anyone else experiences that was like just there explaining about how i was going to do a tribute to a firefly which is one of my favorite haircuts and immediately i was getting absolutely nailed, but, oh my god, i don't do it. So each section is pulled out directly from the head shape, giving it a shape that travels vertically the same same length, no increase by ever directing each section to the middle of the previous section. We generate a shape horizontally. That is the same so vertically and horizontally. Our shape is round the advantage of doing this means quite simply that it's a very uniform shape and makes it very easy for us to connect in to the external shape. If i'd worked square here, for example, we would have had a corner of weight built in the front which will left weight pockets at the front. Let'S say we did it the other way around. Where we worked vertically parallel to the ceiling square, we would have had again weight a lot of weight in the back here and it would have looked more multi or certainly off balance. Okay. This is a great haircut as well for not that i'm really focusing on speed, but if i was doing a client on the summer floor, i have 45 minutes to work that work their hair to work their shape for them um. You know i always liked it when i did this because it always looked like they had a sweatband on or something it was always quite cool. Okay. So when both sides are done, i'm going to take down my wig wrap. Okay. So once we've taken down the wig wrap, we've got to do something else. So how do we blend this haircut in without affecting the outline too heavily where's that shag shape you've lied to us right? That'S probably, but you get my point. Okay, it hasn't delivered at the moment. All we've got are short layers that don't go anywhere so the next part i want to do if you're doing this on a clone. Is you go from their crown to their mastodoid okay? So you go from that crown to the corner of their hairline. Okay, why? Why is that important? Well, when you get to the corner of the hairline, the identity levels of the of the hair begin to decrease the hairline begins to. If you like, go higher and higher and higher meaning the amount of hair in one section, the amount of cushioning you have to support a layer is less here, so we've got to do something different with the hair traveling forward than we have here. Otherwise, we'll end up with a shape that looks quite transparent behind the ears and once you when he or she comes to wave the hair. Oh, my goodness me, you know, you'll have some real issues, because you'll find that there'll be an inconsistency in how the ends of the hair look due to the fact that they've been overlayed. Okay, just getting used to my new toy. So, as i take this section here, this is the back section: okay, so i'm just going to get this out of the way for a second. So, let's be clear: okay, we are simply sectioning away the back working from the corner of the hairline to the crown. We understand that the reason for this is that the way our hairs grow mean there's much more hair here than there is here simple, the cushion that a layer is going to fall upon is greater here than it is here. There'S more support here for a layered shape than there is here. So that's one of the big reasons why we're doing that? We'Re going to start at the front, because everyone's favorite area, with a shag haircut so we'll come to the back in a moment. So cool got some a lot of people watching, which is great, so please feel free to share it. That'D be a bit. That'S always a big help when educators are doing something nice, if you like it share, it always helps so we're doing a center profile section. Okay, this would be dependent on where the client wore their parting. It would also be dependent on any hair growth patterns. So bear that in mind that if your client, your guest, if they had a center parting, go for go for center. If they had it on the side. Go for side because, as the great dj muldoon will say that if you're layering and you're not paying attention to the part, partiness you're going to have an imbalance with the way your hair sits to natural fall. If the hair is fine, i tend to work with thicker sections. Okay, when the hair thick, i tend to with finer sections. This is always because the hair that we're taking off is quite wispy, so i'll take a thicker section. I also don't texturize fine hair too much because hi to israel, because fine hair seems to texturize itself over a period of time. Okay, so as we take this section, the first thing we're going to want you to do is to get rid of some hair. There'S too much hair in your hands now to judge it okay, far too much hair. So what we're going to do is, as you pull this section straight out here, we're going to pull it out and we need to make a decision on the elevation. If we go low here with the elevation like this okay, there's gon na be more length at the top of the section than the bottom, so we're going to end up traveling longer. If you go high with it, it's reversed it's long at the bottom and if you go parallel to the head, shape it's more balanced, so we're going to go parallel to the head shape. Okay, okay, like this, i'm just going to remove a small amount of hair. Now this is what we're trying to blend into, which is the section we've just cut. Okay, as you come around, i'm going to blend into that section. So we've got if you like now the halo section which has been integrated to the front and we've got a very clear guideline for the length we want our fringe. The reason i do this first section. This is the only section i cut exactly like this is because we get full control over where we want our shack, our fringe to sit. Whereas if we're just slicing straight away, we lose a lot of that control. So you've got your section one in now, section two is very simple: we're just going to take a parallel section: okay, we'll be over directing it into the middle each time, but we're going to be slicing from this point in okay. You could use a razor if you want. I use a razor sometimes, but i do i've got to confess. I do almost always use my scissors. Okay, so i'm going to turn her around if it seems a bit strange like i'm right-handed it's because i'm using my iphone to film this tutorial and i flipped the front round. So i can see any comments and by doing that, i kind of i can kind of strange, but it looks like i'm actually right-handed. So, as i come over here, i'm going into the middle grooming, the hair in i see my guideline is here and i start to create a short to long distribution. Okay short to long while we swapped from cutting it in the way, we did why we suddenly switch doesn't make sense. It'S because we want to preserve the outline at the front. We need to get a position to start our slice that that connected into the the halo section, but also was suitable to our client. We now take parallel sections over direct each section into the middle and we slice each section with a short too long. This is helping us to preserve the external shape, still giving us the shank shape for helping us to connect in without losing our length or giving our client a feather cut feel so you have to keep taking my sections. My mannequin is from exalto professional they're, a company based in france, um, really nice supply of mannequin heads. My scissors are from mitsutani they're the acro type k. Okay. So then, as i pull this down, i'm getting used to my tripod still as i start to pull this down, then i have a secondary guide, which is my front. Okay, we're going to come to that later, because so what we've done so far is to connect in okay, the halo into the rest of the shape at the sides without shattering the length we're going to come back to this point on the other sides done. So when we do the other side, we don't want too much hair to act as a guideline, because that can be confusing for us. I feel, like you, have too much hair, there's, there's too much guesswork. Sometimes you know if you've got like three or four sections in your hand, unless you're traveling back to a stationary guide becomes difficult to keep track, okay, trying to get the right side for myself here, okay, so you can see as we pull this we've got. Our guideline here, okay, pull it into the middle, that's the previous side. This is the new side beautiful. This is the side that i'm most comfortable doing because the other side i have to come from behind the client to do it, which is a little bit more tricky. So i prefer to keep the distribution short to long, whereas if i start to work long too short, i mean how do you slice along into short, i mean it's going to be really really difficult, so i was always surprised as well how fast these airports can Be done on the salon floor, which is good because i was i don't color hair um, but i was always put behind by my color. I think you just you know if you're a non-colorist trying to book a color service, how to sharpen my scissors good question. Susie um, to be honest with you not very often um, mits, tiny ones. I'Ve got here, they're, absolutely amazing and i've had them for just about a year now um. I was literally today actually clearing out all my scissors, like oiling them and everything and to be fair, even the ones i've had about three years from it's tiny, they're, still really really in good shape, so that gives us nice loose shape. Now we're going to come back to the front, we haven't finished there, yet we're going to take very slight four diagonal section, giving us a fairly slim section for our face frame for our shack. So, let's recap we put a halo section in that was to establish an overall internal interaction with layers. Okay, we started to slice in to blend in the layers everywhere at the front, but by over directing everything up to the middle, which meant the the outcome was lessened at the base. Due to the fact we were over directing everything to the middle now, let me see which side is going to best for you guys, so i'm going to take a small amount of hair. I'Ve got my guideline, i'm putting at the very start. I'M just going to point cut roughly an inch not really any more than that. Okay, and then i bring my next section, which is to the corner of the hairline. When i bring this down low and i'm going to start to point cut this in and a slight curve, you can see that happening there, yeah everyone's familiar with this type of feel so far. Okay, then i've got here where the hell, the transition of length going from short to long, is too great to club, cut or point caught. I work a slicing technique in which enables me to connect in the shorter point here to the base, but i couldn't do that unless i was slicing so now. I'Ve got this other side to do when when lockdown is over in the united kingdom uh, i will pro. I promise you that i will have someone film me, which will be so much easier for me, because the difficulty is that, when you're filming and cutting you're trying to glance at the angle that you guys are watching, but also you're, trying to make sure that i Don'T miss anyone's questions as well, because i watch a bunch of lives, especially pretty much all her brains that i catch so look at that so satisfying, so that essentially helps me just to slice out very simply blending out the shape. We'Ve already cut the front into the length, just double check that beautiful okay, section two is parallel: okay, so yours next section again, this will be saved um on the on the facebook page, so you will be able to watch this in the in the lives folder. So there's some great lives in there. Okay, so sections are working backwards. I love slicing yeah. I do. I never used to really be into it, but i i'm massive into it now. So the objective here now is to lift this slightly. Why would we want to lift this section? Elevation is the control we have the movement of the hair going up and down essentially the lower. We pull the hand the heavier the line's going to be. Any elevation is going to create softness in this line. Let me just see the best way for you guys to see this. So again, i don't want to take my sections too wide an effect around the eyes, but i'd be pulling the section. I'Ve just caught 90 degree from its own base. Okay, so i've just cut that quite low now, i'm putting it this hand. As i pull the section, i'm now going to point cut out the length difference between the two. What would that do that's going to help the fringe area to fall a lot softer. So, as i pull this section up, this is what really stops it from looking too heavy. If i'm honest well, thank you very much thanks for sharing guys so again, this section now look i'm lifting this right up. Why is it going higher on this side? Think about the base? That'S my guideline for the base yeah. So we lift this up. I'Ve got to over direct my cut line to ensure that i'm connecting this in okay, i'm going to connect it into the base, but i'm not going to you know if you like, destroy the base with overlaying. Go through this side. Remember don't forget the back. I'M still at the back lift up. The first section was cut flat to the head. The next section my cut line is slightly lifted. Okay, let me explain that this way, my first section and flat to the head, the sections that come around here, we're slightly lifting the final section. We lift a lot the further lower the further down we go if you like the more we're going to affect the outline of the haircut. So if i came here now and pulled this and just cut this, like that, i'm going to cut away pretty much all the length which which is no point cool, okay, starting to give me a nice uh, a nice feel to the shape. So again, if you've just joined us, thank you so much for joining us thanks to everyone who's watching so far, my name is ben brown. I'M from bb education, an education company based in the united kingdom. I'Ve been very fortunate to have taught in america. Quite a few times and mexico and a few other places and uh tonight, i'm taking you through my version of a modern, disconnected layer, focusing on it being a shag. End result. We started off with a halo disconnection which was a circular section, helping us to establish an internal fractured layer that was easy to blend into an external shape, so it's not too intrusive. So now i'm going to take this next panel. This is section the final section here, i'm going to lift this section up off its own base. Now, when there's a lot of hair, i tend to use the wide part of my comb. I tend to find that the more hair you get in your section, the more tension you start to build with a fine part of your cone, it's just having to pull a lot of hair, so it's really applying the tension. So when i, when i get to a point where i'm using a lot of hair, i would pretty much always use the wide part of my comb. Okay. So let's do this from the back, because i think it'd be interesting for you guys to see the way. The angles change so, as i take this section from here, where can you find me you can find me on instagram? My instagram is at ben brown hair. I am um, that's pretty much it i'm, not cool. I'M i've only just gone on like um. What is it called the clock? One tick tock? Is it yeah? You can tell how old i am by that reference. I imagine again, i'm using mitsutani uh scissors today, i'm using a 5.5 inch. Sheer it's the acro type k the mannequin is from exalto professional. So you see a lot less hair came off that time because it was being pulled forward. I prepped the product today with a product by moroccan oil. I'Ve used a simple cutting lotion. It'S a hydrating styling cream. So if anyone wants to get asked that quite a lot, what helps you keep your sections, nice and neat? I always find that i generally use a product, that's going to just mean i don't have to apply much later on. So sometimes i've used a very light primer but because i know i need the hair to be really smooth and i'm going to blow-dry the hair quite quickly with a wrapping technique that product really works. Well. So what's going on here, so we know here we took everything up, didn't we! Everything came up well, it's totally different here because we cut everything off its own base with no other direction because it can take it here. There'S loads of hair right top to bottom loads of hair. What'S nice, is you can't really see the layer um? You see the way when you work round like that it blends out a lot easier unless the hair is really really thick, in which case we probably want to work with the distribution of weight if the head, let me explain it to you. Whilst i'm getting my section if the hair was really thick and coarse like this, is really quite fine hair isn't so it's quite easy to cut. It'S not really like many of your clients hair. So if you're kind of really thick hair it'd be probably my advice to have worked more flat so that it was short in the middle, but it got longer towards the front and it got longer towards the back. So my i'd have pulled the heck up and worked flat in the halo, which meant all around the circle would have been longer than the middle. This would have made you have less commitment with how short you would have needed to go when it came to your slicing. Why don't i use a razor for this because i'm not very good with one to be realised with you. You know, like my good buddy jacob um he's like a jedi with a razor uh girard girard is like yoda with it with eraser. So you know if you've seen those guys at the razer, then you see me. I think i can tell you: don't use a razor so i'll stick to my shears. So as i pull this out, you can start to see against the hair brain t-shirt that i'm very happy to be given by gerard now. We'Ve got our disconnection so as i pull this out, i'm going to slice, but the key thing here, guys i'm not slicing down. Okay, let me just get that going again. I sort of explained a lot and did very little so my section comes out. I can quite clearly see the round shape. Okay, that's a great one. Susie i'd agree. I think i have a lot more control of my scissors um and i basically sliced to create a short to long distribution. When i said distribution i mean cut line so we're going from around into a triangle cut line. So as it comes down, i'm slicing, if i slice down, i would have had more impact. So i'm slicing more straight across and lifting the hair up to my section: hey chantelle how's it going i'm going to now section that away, because i don't need any guideline, because i'm not going side to side with this, i'm going to be just working flat off The own base on each section, so we're doing it like this here, because there's a lot of hair in this section. Okay, at the front, we did something different. This should equalize the effects this has on the external shape, the outline okay. This should give us a more balanced effect when we finish overall. So, as i pull this out the more tension i have the more impact the slice will have. So as i go through here. Okay, i start to slice. I don't move down: okay, i'm more or less going across yeah. Why? Because i don't want to destroy the length. Imagine you know a lot of my clients would say to me: i'm really bored of my hair and i've got long hair right. I'M really really bored of my hair. Often i think the border, the color, not the cut, if i'm honest, uh most long-haired clients i have the cut - is always a little trim and the color is the main thing they want right. But what i feel is no one even clients with thick hair. I don't think they want their hair to feel thin. So i'm always very conscientious about making sure that if i remove density, not weight and density is the amount of hair in one area. Weight is what will generally sit on the ends, so we want to remove the density sure, but we want to keep the weight. The weight is going to also help to control those hair growth patterns. So as we go through now, that's one side completely done so i can just go ahead and twist it twist and sharp get it out of the way. Okay. So come to the other side now, but i'm going to be still on this. My body position has to stay here so now i'm going to be cutting this side. My body position has to stay working parallel because i'm working short and too long, if i switched suddenly, i start to try to cut trying to slice long into short, isn't going to happen. So again i pull everything out straight, so i can quite clearly see my guideline, which is coming from the top layer. Coming from the top, let's approach, my final section, i took the liberty of cutting the length before we started today. I thought no one was really going to want to see a one length hair core to be: that's really fine on the ends as well. So this is the only thing with mannequins when you're doing long hair is, i think it makes the stylist sometimes look a lot better than it would if it was some if it was an actual model with really thick hair, because sometimes it just doesn't seem to Go like that, so i'm always quite mindful to try to explain alternatives. That'S what i'm doing! Okay! Now we can blow dry to blow dry today, i'm not going to put any products on at the moment. My mitsutonis are the acro type k. These are 5.5 inch. Obviously, i'm basically in the united kingdom, that's where i live, so i work with mona and john bautiste, who are the distributors if you're from the states. Obviously, if you contact any mitsubitani, though they're a really cool family cool group, they'll all help out, i'm driving the nozzle okay, i want concentric heat flow. I'M going to wrap dry all the roots first, so i'm not trying to wrap it flat. I want something i want a little bit about a little volume, so i'm going to move the hand different ways again if there was a difficult aspect here or difficult hair growth pattern, i'd probably focus on drying. That first again, thank you brother. If you've just joined us, thank you for watching uh. Thank you for well, thanks for joining us. If you've been here the whole time, you're amazing, please share it um so that anyone else can watch it. It always helps in the enterprise. If we're up here doing our thing, if people share what we're doing it's sitting nice - actually, yes, the dyson suzy, i didn't get the professional one, because i'm really shallow and i wanted the black one, even though it's not as good it's the dyson, the professional one, Has a different filter: it has a longer power cable. I was quite happy not to have those things, but just having the color i wanted, which sounds great for me to say, like that, i mean my main hope of this tutorial guys is to help you diversify. Your approach to your long-haired clients, by looking at by looking at the practical uses of disconnection, this connection is where two bodies of hair are not knitted together with a guideline. It'S not anything wrong with disconnecting the haircut. A band is disconnected in most of most circumstances, but when you look at this connection, i feel it falls into two main groups. We have practical, and we have visual visual, of course, is it's quite obvious thing to imagine what it looks like, but practical is where we utilize our knowledge and the fundamentals of hair cutting to solve problems in a different way. Practical disconnection helps us to be more innovative with our approach to our day-to-day clients. I also feel it really helps you to create a more diverse clientele. So again, i'm just wrapping it to get the roots dry. When i come to get the ends dry, i'm going to use a large ceramic brush. It just helps me to get a slightly smoother feel on the ends, and i never like long hair to look really flat. I always like long hair to look like it's dried natural, a little bit, so, if i flip into using a large ceramic brush, this is just a ghd one, the large one i feel, the smaller you go with a round brush the more i tend to. I think you get more of a curve like a roller size, so again um this flow file. Take me about 10 minutes, but the reason i didn't want to just end the tutorial is, i think, it's interesting for you to see how it develops. You know and your second, then no i haven't done any texturizing before i came back so when we start just to dry the fringe down a bit. You can start to see how heavy that is in spite of all the things we've done, so you can see. We'Ve still got some things that we've got to add to this haircut, so thanks everybody who's watching i'll, be doing about five minutes, hopefully um yeah. I really appreciate all your kind comments again. The purpose of this tutorial is to hopefully get to look at disconnection as a really valuable tool to help you improve and diversify your perspective and ideas on working with long hair. Not just short, this connection is used a lot in short hair and i always feel like well, i mean i see some amazing work where this connection is used, but i sometimes just like to add a little bit of geometry to that to explain the mechanics yeah. I don't need to worry in here. You know what i don't know. You know, because for like a year now, i've only caught mannequin heads, maybe i need to go through like a refresher blow drying course to make sure i don't burn a client with a hairdryer, because i'll be like this on a coin and she'll be out the Door, how do you keep from creating a hole? I think it's um from creating a hole if you mean around the front area generally, it's probably the elevation as you're elevating. There might be a point where it's been pulled slightly to the head, shape and not being pulled flat by being pulled flat, you're reducing the amount of impact it has in these areas, but by standing square to the head and pulling them you're equalizing. It so often that is the problem i find when i've watched people work. They are stood square to the hair and they're just pulling it flat out from the head shaver lifting it, and that creates a round horizontal shape which will have more impact than a square. Horizontal shape or a flat one, the majority of my clients are all short-haired clients. I don't color hair and um yeah. Most of my clients are short hair, but if i do get some long hair, i am so so happy to do it. I drive my wife's hair at home with her, but it's quite a it's. It'S like a currency. It'S like! I don't have to do that because i just dried your hair, so it's like a currency in my house that is, i will dry your hair. If you, let me relax, i've just switched the comments up for a sec just so i can really check the work over i'll turn on my phone in a moment, so so need that now guys, okay, so the brush is a large ghd round ceramic brush, which Is good fun, uh i've just got these straightened eyes warmed up, which i almost always grown at myself when i, when i grow scrubber a pair of straighteners, but they give that has such a great polish. Oh thank you. I see some nice comments coming through and when i say we're not even finished yet so it's it is quite cool. Uh you've missed the cutting yeah. It maria will be uh on uh their facebook page here, brian's facebook page in a second. So, let's have a look at the shape where it hasn't really been finished blow drying and it hasn't been straightened yet because straightening always removes a load of sins, but it actually blends in quite nice, and we have got these short layers and you can see it Still doesn't really affect the length too much you know recently. I had someone give me a really negative comment on one of my videos and said i was too tattooed. She said my tattoos are grotesque. What'S the word i was like, i don't know how to spell grotesque, so i better not reply to that, but yeah um. She said the tattoos were actually really distracting. I thought i don't know if it's a compliment or so i'm going to go through my shape with my irons and i'm just going to very slightly. You know when you do that curve in the middle of the head, in the middle of the shape, where you don't really flatten the ends, and you don't really flatten the root. I was taught this by john baptiste masala when he does a lot of precision, work and beautiful styling, but he'll take a section and they go through and just curve it slightly in the middle, so you're not really flattening the ends of the hair off because well I'Ve got to cut that yet so, if i flatten that, then i probably it probably makes the shape look a lot better than it really was. I don't know if you find that with. I know. I'Ve certainly found it when in the past, and i've done a haircut um when it's blow-dried really really straight like flat. It doesn't look like anything like how i wanted it to you. I quite like that to be, i won't say, imperfections, but i quite like likely to be their haircut, the client's haircut. You know so it's difficult ignore them thanks. I do get loads of negativity and one question: if i had a question for myself now is: why has your face gone bright red? That would be my first question. Why it's like um, i'm worried like it's off, charlie, the chocolate factory that i've got something funny and i'm blowing up into a into a blueberry. I don't know, let's get some shy, some shies! That'S what it is so i'm just going through and just going in the middle of the shape, and it does make a difference. Actually it really does. Can you style this for somebody yeah? I can't see why not if the bangs are coming back, i think it's. The whole premise of this shape is about seamless connection between very, very short and very, very long. So the whole point of this tutorial really is to show you different methodologies of how to work very, very short sections into very, very long without it being affecting um. The actual outline, thank you, you're making me go shy, i'm going red because there's always nice comments, that's what it is. Um yeah i mean this is the thing now i think, with longer hair, especially i was watching a few i've watched loads of interviews. I'Ve been listening to clubhouse like every day in my life, it feels like at the minute. Um has anyone else been on clubhouse, but all of a sudden someone asks them to speak, and i want to throw my phone out the window. Oh, my god, it's like when i'm texting somebody and then they ring me, i'm like i'm not committing to that level of a relationship with you we'll have to text. I love listening to gina on um clubhouse um. I really really like what she's got to say. I think she's just um amazing person actually and uh. One of my favorite people to watch on instagram is jacob khan, uh he's just so funny. He was interviewed last night on on instagram by gerard he's, so funny. That'S really kim! Thank you so much for that. It'S really really kind of you um. You know, i'm always um. You know with my online tutorials my website, um. The whole point of creating that site was for it to be a resource for any stylist at any stage in their career, which is quite a broad thing to say. So let me sum it up. You know like if you're doing a client and you're really not sure you're, tired, you're fed up you've got many things on your mind. Just just coming on to something different. I want you to be able to access my tutorials in your staff room. If you've got a phone and you've got internet, you can subscribe to it and then you get access to like, i don't know loads of different tutorials. It just was designed to help. You know either, and sometimes it's almost if you're training, your own staff and you just want something quite solid - to base the fundamentals on. You know how to cut hair but you're, not sure about the terminology or you're, not sure about something very classic. So my tutorials were always meant to be a resource, so i'm coming to hey, hey stacy. I was talking to you earlier how's it going babe. So what we've got what's going on? Okay, so we've done we've dried! It. We'Ve straightened it and there's quite a bit more work to do um where's the works do well everywhere. We'Ve got the nice shank shape coming in here, but it's very, very heavy. At the front. My first thing i'll do is: i would start with a little triangle at the very, very front, okay, so roughly about an inch depth in okay, just very simple and i'll start to slice from one side to the other, quite deep, the deeper we go, the more Impact it's going to have. Okay, then i'll go from the other side. This is removing density. Okay, i get. I get a lot of people giving me um. You know i always love a bit of disagreement, but verbal abuse is another thing, but i think density refers to the amount of hair in one area. So if you've got all the hair in one area, that's got 100 density. If you're layering it, you might have 70 density, but i think the density is what you focus on, because no one has ever said to me. I want my hair to feel really really thin like. I want my hair to feel like i've been in a cat fight. That'S what i want my hair to feel like no one says that, but they want it to be more manageable. They want benefits of having hair removed. So i love the method of slicing through these areas, which helps to remove and flatten. And if you like, deflate the shape and already that starts to give me a more desirable look. Then i go and look at the weight and i start to just parallel point cut into it. The deeper you go with that point cut the more impactful it's going to be, which that now has given me more of a shape that i'm happy with. Yes, if you are scared charlotte, that's perfectly acceptable. What you can do instead of slicing is you could lift your section okay, so you're holding the tension in your fingers like this, and if you wanted to, you could literally just slice a little bit there. That still is a bit nerve-wracking elevate, the section and just point cut through the ends with more of a chipping technique. So, instead of just going in and slicing but be aware, that'll be less impactful um, i think filling shears are great. I the only reason i don't use them is, or none of my mentors use them. You know like my mentors jean-baptiste masala gianni scamachi. They don't use them so because i've been trying to learn from them. I don't use them, but i know like chris jones, my dear friend chris from texas. He uses them and he does some amazing work. The problem is, the thing is, i think, the shaggy's like the balayage of haircuts, because there's so many different ways of doing it. Okay, so i've i've, i'm now lessening the impact. Can you go see this okay, i'm lessening the impacts of what i'm doing the closer to the length? I am so when i was doing the fringe, i mean i was going crazy. It was like i was out for revenge, but when i get to here, i'm much more considered as i come to this section again, i'm all about the density and not really going for the weight at the moment, okay straight through okay. Now, when we come to this section here, i'm going to elevate the section drop it over. Okay, which means my hand, is quite close again. Let'S look at some considerations. The lower you go, the more hair's going. The more density is removed. The closer you are to the ends: the more weight is removed, which means that to clarify, if you get a step in your haircut, if you get a weight line in your haircut, where is it it's on the ends? Isn'T it so someone says you've got a slight line there you go. Oh, so i've cut two sections at the same place on the ends. The weight is on the ends. The density refers to the quantity of hair within one area. So i look at that. As saying yeah, is that the it is, though, isn't it? It is the balayage of haircuts, because every client wants one um. Everyone seems to do a different way of doing it, which is great. I love that um like if you take dj muldoon amazing amazing haircutter got unbelievable experience. You know if you take jacob if you take chris, if you take robert, if you take gina, if you take so many other people, you know they all do it differently, and that is wonderful. Isn'T it same with balayage? You know i mean i don't i i i the thought of having to ballyard makes me convulse. I almost felt like i'm going gon na go inside um anaphylactic shock or something because it makes me feel so nervous because you know a client will say to me. I want roots, but i don't want roots and i'm like what does that mean? I want it hot and cold. I want it long and short, i don't know what's going on, but then somebody else will come along. Who really knows about balayage and they'll go yep. I get that, don't worry about thing ben! Go away, don't play angry birds. I got this so again. I'M leaving that bond out elevating the section up, i'm just going to slice through, because why don't i want to remove the weight? What the hell's going on the weight is, what creates the definition? Okay, if i thin out all these ends. Oh sorry, guardian's name is dj. Sorry dj. If i thin out all these ends, i thin out the contrasts between them, which means you don't see the definition. So if you know like, if you're editing something - and you flip the contrast too much - everything just goes really really light. It'S very similar like here, i'm fine to remove some weight, but if i start it on the outline really really take away loads of my weight. I'M going to lose all that lovely definition that lovely curve and that soft 70s feel you can tell i'm old, but i'm very i've, always loved brigitte bardot with her long hair. That'S always been one of my biggest inspirations for long hair. I did a tutorial called the bardo, which was uh disconnected. We have like a pretty disconnected area here which really accentuated this. This curved shape. Okay, so i'm just gon na flip off the comments for a second. So nearly there one of the final things i would do is lift everything all up and just make sure there's no huge contrast between the lengths just knit them together with a little bit of texture. One of the things that razor cutting is great for is, i think, it's great for speed, because it's so good for removing, like texas, for removing uh bulk, removing density. So now, i'm using the actual camera as a tool to help me go into. This is another technique if you've done all this stuff - and you still feel it's heavy, this is called double tap, so i would cut the same section a few times. It creates these shorter pieces of hair. Essentially, that then makes these look more defined because we reduce the hair in between them. So as that falls that will help to collapse the shape and accentuate definition and texture, so double tap double tap. You have to have ll cool j in your head um. To do that, i used to love that call jay. Anyone knows what llc's name stands for. No one know the difference. His name is ladies love, cool james huh. What a guy, okay, yeah density and weight! I do i do i'm not. Everyone agrees with me on that and i think that's a if you don't agree. I think that's great. I don't think that means. Oh look at her. I don't think that means anything bad. If you don't agree. Does it? Oh? Look at her she's ready to sit down now, so we can't go out in england because of covered so she'll look great, sat down in the living room now, um. To finish with, to be fair, it's actually star quite nice, but i'm going to use a texturizing product. This is a dry shampoo by alpha path, so i'm very kind of giving you some products. To be honest, i've not done anything with that. I'Ve actually used all that products and pretty much try to not barely touch it cause. I like how it looks it's nice, too, fair, okay, so let's just have a little recap and let's just give it a spin, double tap yeah. It works, though it does work. Really well to honestly, i just about to say that lucky dolly you think yourself. I want you to know. If i mean i would love to have hair like that, but you'd love someone to cut my hair, nice, okay, so a little recap and then i'll. Let you we'll just end the tutorial, but today's tutorial uh was all about uh, taking you through uh, a way of being more diverse for your approach to long hair. That'S long and sure what we've done here is we start with the halo section which isolated, roughly three quarters of the hair away to one quarter of the hair. Now the but the benefit of a halo section is, as the head is curved. The halo section helps us to isolate sections equally based upon the curves of the head, so we left roughly 75 of the hair out 25 of the hair went quite short. Then we used a slicing method to connect them. If you remember, we isolated not a radial section, but we isolated off the mastoid process, pulling everything forward and over directing everything into the middle allowed us to. If you like, reduce the cut, reduce the effects our blending would have on the length once we completed that we went through and put our shack haircut in by utilizing a sassoon round layer method, and then we just blow dry. Very simply. How much do i charge for a haircut um? Do you want to see that you know what i don't think i've done a hacker for a year, but i think i used. I was charging 90 pound before that, but i'll do it for free now, because i'm just so ready to do some hair. Okay. So just one last spin, oh she's, ready! Thank you so much guys everyone's been so kind. I really appreciate it i'll end. The tutorial and i'll save this, so thank you so much guys stay safe,

Comments
Irma Rewcastle: Thanks for the excelent demo . Best haircut I've ever had and I did it myself.
Maria Lascaibar: Great detail!!! Great hair cut!!! Thank you for sharing. ❤️❤️
Maria Lascaibar: Thank you. Great hair cut. Thank you for details.
BRabra Giordano: Haircut is very nice thanks for the tips you made it make sense
Máxima Bordón: Muy lindo!!!
Wendy: Beautiful cut and wonderful instructions would love you to cut my hair Very talented artist you are.
Line Rondeau: You are the best !Many thanks my dear.....
Marilyn Colon: Beautiful
Salonsloan: Your a fantastic instructor....and your such a cute boo