Modern Long Layered Haircut Tutorial | Easy Haircut & Tips | Long Hairstyle
- Posted on 22 May, 2020
- Long Hair
- By Anonymous
Modern Long Layered haircut tutorial
Easy haircut & Tips
Long layered haircut techniques 2020
Long Hairstyle tutorial
*Giving is hold forever*
*********************************
Thanks for Watching!!
Please like, comment and share!
# LongLayered #ModernLayers #LongHaircut #HaircutTips #LongHairstyle
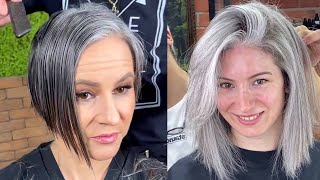
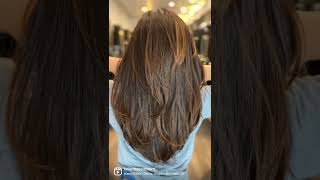
The world we need both, you guys already have open to them as well. Yes, so tell us how things are yeah thanks for joining us today, two things that really dive into so I'm gon na be showing some techniques help you be fast. We clean the chair because I don't know what the situation looks like through you once you go back to work, but we're not going to have as much time right and people are going to want to people out there. They'Re gon na want a big change. So I'm gon na show you a couple different techniques that will help you achieve that yep. So lots of things that we've seen the last couple years is very, very blunt, heavy perimeters right. So we've seen those logs about be very good one without a lot of graduation on there, but what was recently see come back is a lot of shame. Oh my god. That'S so cute! So great, look so great lots of time. Linda is doing it, though people are a little too scared that they don't want to have these like little frayed, and so maybe, like you know, like no hearing, so I think remind me to ensure you get a haircut that hope we can introduce people who may Be going so I'm gon na get so this is a live interview. Then I go back to the back of years. It gets you a 30 day. I'M going to take that section to completely put that out perfectly all right, so you can see now. So what I'm gon na do you guys, with a small section on both sides of the park and pump that straight down and see where I want her primitive to live all right? So, as I see where I want the primary live, I'm gon na be about right here. I'M gon na actually elevate it towards me and I'm gon na start cutting for the guideline of where her fringes will live. Why I'm elevating it just because I want it to be very stop. We know that when you elevate it, it's gon na create some graduation okay. So that is my limit right. There I'm going to start moving on this side and you see and cut straight down, but I'm going to elevate it because I want it to be a lot softer, giving it that graduation there's my printer will start cutting right there. Can you see that's where her face fingers, so they do this on this side there? Let me do the other side Margo. What do you got going up all right guys, so I'm gon na do two different techniques from section and then the back section is 1. So when encouraging it here actually even charge a penny back to the high point of death, so clients where they don't see the most like this is usually run on face right. So this one places that I need Oh, give us more coverage, so I'm horizontal you're gon na get more of like color. So this was on this side of her head. I could use the guide line and open guide light to where I wanted to finish right, but on this side of the head, obviously cuz, I'm right-handed, it's gon na be a little bit thicker than I would have to go from try to meet my guide line Right here, okay, but I always going to go from guide line to where I want to finish. So what I'm gon na do done. You guys is grab the hair. That'S on the way, grab the hair here and what I'm gon na do is I'm gon na? Take my hand here: I'm gon na make an X right with my other wrist and then I'm gon na create where I can go from guide line to where I wan na finish just like creating that X with my hand, I'm graduating it up. So that's fine. Elevating it right here to give it that more softness or what and then I'm gon na, come through here, the cup of left, my perfect all right, so you guys look release these slips here for weird reasons where that Robin is a topic with it and did Your diet go back to the back here, I'm gon na. Let go of these clips now, we'll start with earlier. Yes, so their guns. I think you know that the other people text you over finish their cuts in the mix and orange a problem they are in the reality of it is against there's only four degree haircuts right. There is blood one length which we're going to do later on and then there's graduations, there's where and then there's disconnection all right so but didn't district. I actually use three the principal Freddy's graduation and we use women and also create, surely brief, pretty rare okay. So you got ta solve that guideline that I need right here with it. The fingerprint I'm gon na use that guideline then to create for later it's okay, so I'm going to take it about half an inch on both sides apart and I'm gon na elevate. This completely straight up and I'm going to create a copy later. So it's back on point, so there's going to be a little bit more length in the back to the front and we use her River right there and my life and I once they're cut. This is my guideline for the rest of my layers of my haircut, ready, guys and then of their said. Going is five sections all about protect and create those leaders circling back all the way up, and if you notice that I was using this on dry hair. Okay, I like putting on dry hair one because I can create those layers that create my guidelines very easily, but I can also text rides at the same time. So, as you guys can see, while I'm putting this, I'm cutting big white cuts at an angle. Okay, so all I'm doing that, I'm also creating my guideline in my layers, I'm also creating my now. A lot of them are gon na see it and whether this be a bother as you're in touch with boy over you touch. Will let's say that that one burger ends are already white? Okay, so we're gon na sit down which Beijing federal agency very patient was about right there and then I'm going to pull out her ends like this and then I'm going to pull up my foil and I like to give it one fold. I don't like to crease it much more than that, because that can cause like uneven fifteen inside of the coil, and now I'm gon na leave this tail, because it's been so long since she's been in her glaze or color. The ends of her blondes are a little bit dingy and I still want to pull some brightness through that, but it doesn't need the decolorizer to sit on the whole time that it doesn't quick. So I'm simply gon na keep those and then after I move up the head, I'm gon na go back through and I'm gon na feed on the ends just to brighten up those ends and then once we get to her recession, I'm going to go back and Do the same pattern today, so we don't have a question, but someone says if you mark move you're manic, if you mannequin next to the wall, there'll be less echo, so I think maybe your mouth, possibly echoing, let us know if that's better. Thank you graduation. For me is just where you want, so I was thinking about haircutting and where how hair loose in this way, the congratulation are excellent. Graduation. Anything things come from here now, you're graduating right. I think your cuddle from here on up. Ok, so I'm going to do my back all right and I'm going to cut that split and then you see I'm getting in there. I'M creating my graduation, but I'm also text writing at the same thing, I'm going to take the same section tonight and move it up and 45 and we were nice. Goodbye Larry see I'm doing deep point tux, giving it a lot of texture and we move from one side of the head to the other. So it was straight behind. Go ahead, pull you straight out! This increase that Square graduation and then I'm going to pull it up and forty-five and meet my Larry. I love doing this Technic because I can bang on basically two different areas where just one first of all, when a new disease rush, I really like to use this one. Someone who has, I don't think at all with like the de color aids are on it, but it almost has like a tapered end. So it's really going to give me that softness and what we do is allow you to take a little bit bigger sections. So then, when I go up and feather into it, I won't have as hard of a line. So I love using that I'm using a powder decolorizer on her today, the Monza I love this decolorizer. It really gives me maximum brightness, and I think one thing I was talking to Marc, about which I have so many blondes that are so in between there we're gon na have those pockets of deaths that are in here. That'S in a week, those pieces really pop. So using this foil technique, I can really use minimal oils and get them the maximum lightness that I can be last time and you guys, if you guys, have any news - the launch of the cutter and employee to try all right. It'S already got a blue base. Foot so it's gon na make sure that it not soggy event illness. Right now you said you're using powder, I'm using properties yeah. We have actually have four different types of, and we also mark you have a question: do you usually cut dry? So so so we're gon na ask clients come in with clean, dry hair, and then also I mean, if there's any chance of the virus being blown around by the blow-dryer. It'S gon na cut that down as well so movie backup. Now her ends are already light, but I'm gon na pull a little more. So I pull right to where I put the de colorizer on to leave the tail out. I'M gon na give her one nice little fold to tuck her. In now, I'm gon na go back, and I'm gon na show you. This is when you could utilize our clay to colorizer or even our cream to colorizer. Okay time, oh just slow down a little bit on how fast you're talking, so I'm gon na use our cream to colorize around that so she's already previously blonde. Okay, so I mean we do have another question for you: how wide are the foils? Would you say, but I try to not go too much past the round of the head, so I would say about two inches wide. Now, I'm gon na take my board and I'm going to go through here. I'M just going to paint on with my cream to colorizer pulling the tail out to where you see that de colorizer there and about the last ten minutes. I'M just gon na paint on most tails and what that's going to do is just bump up the brightness of our balayage and really help kick out some of that. Almost like urban dust. That'S been building up on her hair, while she's in quarantine - and I like that too, this friend I've already done our layering and then a different graduation, and then I met congratulation optimal area. One thing that I haven't done yet is: I have not created for everybody out. Okay, I actually like to leave the premiere out last a lots of times, because the reason, why is that, if you create your perimeter first, I find that you can tend to the box that, especially with Bob's, you get boxed in and a letter. Your graduation and your layering lives right, so I, like other things first and then I will create infinite okay, so I'm gon na go down there. Guys and you see it. I section there dog, you should go, I'm not going to use my fingers. Lots of people like to use their fingers when they cut the only thing about that is that you're, not creating a true loser to reap blood cover right, because any time that you use your fingers there's going to be some type of regulation or an elevation or Over direction, okay, so if you want to use a comb, that's perfectly fine for the combs are machine-made, and not many. So I'm going to take my comb and I'm just going to place it exactly where I want to cut okay, then we're cut right directly below it, and this is my like I said earlier, this is gon na, be my mid length. Okay, go in here focus to where I can see at eye level we put in about 10 boils here and then leading these ends out painting on the decolorizer. How bump up the brightness on the ends there, and that's also going to help with a neat application. So it's not quite as messy good stuff, I'm going to be showing you guys a little bit of MTD technique with our plated colorism, using the simple, a similar placement, where we're going to be going on a day but still eating those packets and then mark. You have a question: how did you establish the link, but it is customized to my plant. That'S in my chair, okay, so it's not like. Oh, you must cut. You know three inches per day for something that primates. I would like to look at their face and look in the mirror, and obviously I'm in right now, but Trixie is my weight and for me to see for me like I said I want this like mid length haircut, it's gon na stay a little bit long, But, like I said the reason that I'm creating this, you guys that I'm creating a good effect that it's almost like people steal a lot of shapes, but we're so small. This place that, to be honest, I can't wear shades. This might be a great pick for them, because we all know you guys. We see these beautiful shades and the really cute. I we really really young girls, but we get anybody. You know. Maybe that's time is it up and if we don't stand with them every single day and could look like one of those haircuts that you see at the supermarket and you're like wTF? Is that so I'm just saying this might have popped it out a little bit, because it's still gon na have the softness of creating my last cuts for my trimmer and as you see you guys, I'm not using any influence and just using her hair as it Is cold straight now and the last sections over here and I wouldn't want you got ta think that we should so the ceiling blonde free, booze treatment. What this treatment is! Is it's a spray that you're gon na put on to the para prior to any decolorizing service? What it's going to do is it's going to help speed up your lightening process now you're, not Alonso, decolorizer user. You can actually use this with any light. So it's gon na help maximize your lifting process, and another thing I like about it is: it's gon na help give the hair a little bit more slip, so I have to do my belly. I just add a little bit of a damp hair or even just bring this product under the hair, so you're gon na take the sections spray generously on to all of the hair and comb it through now. Another thing that's great about this product is it's gon na help keep the integrity of the hair. So we, what do we know about lightening? You put it on the hair, it goes in there and it eats right. So it goes in. There opens that cuticle and it starts to eat away at the melanin in the hair. So what we're doing is springing this on. This has a vitamin C flex plus complex in it and that's going to help keep the integrity of the hair and direct the lightener to go in there and eat away at the pigments in the hair and not the proteins. So I'm going to spray that on generously like that and comb it through and like I did before, I'm gon na start taking my section at a diagonal and I always like to make sure that at the back of the ear you can see right here right In the front of the year, I always want to make sure that I have lightness right on that piece there. So I'm going to start working up and nice and we can bounce back to mark and see what he's doing over there right. So, yes, I obviously I believe this girl earlier right combination of either our character healing oil or our de-frizz cream, and this basically, our difference cream is a Creole version of our oil. That'S how I like to explain it: okay and the reason why I like to use these just because it's going to give me that protection of heat. It'S also going to give me that a nice lip that I need to make sure that their hair is smooth and glossy okay, and then I also do like to use a combination of our design film. Alright, this is going to give it their lightness and airiness and also some texture that she needs. When you go in style, her hair, I would say about like 40 %, but now because it won't where it's happening all over the country and all over the world is this common thing is that lots of salons are opening a little is including us we're actually Opening June first and we are going to be eliminating blow drying for at least a couple ways we'll see how long we need to do that, but we're eliminated just to make sure that we are doing the essential things, so lots of people that comes right here. One of the biggest things is that the hand ecstatic it gets really static. People there cut if you use something like our smooth down spray here and if you coat your brush with it, you guys this is a great way to eliminate any type of print and then also any type of static when you are going, if you're waiting cutting On dry hair, but this is a great little trick that I learned here actually from our go-to recently so go ahead and make sure that you, if you have any type of smooth, no spray just sprayed on your your brush. And then, when you brush your hair up, it'll make sure all that static. They want to see a friend and on my second section here and I'm not leaving any hair in between because what's happening. Is that I'm pivoting? If you can zoom into this a little bit here this corner here, it's gon na be almost like a triangle, so this part's, not gon na, have as much lightness I'm painting on the surface of the hair, as you can see once I get up to here Now one thing with clay to colorizer, I think, is very important. You guys is don't be afraid to use a lot almost feel like you're icing, a cake like you think you have enough, go in and go a little bit heavier with it, because what it needs to do is stay wet on the inside. So that way, it has the maximum lifting. Also, when you're doing this balayage make sure that you're staying on the hair and skating with it don't jump around that way. You get a nice slip and nice even peaks and valleys. Now, if you go in and you accidentally see, you get like a little spot right, there make sure that you guys go back and blend it out. This clay to colorizer is pretty forgiving, so just make sure that you go on there and really work it into the hair. Just like that, and then I lose these lines of reusable films to help separate my sections there, and that way I don't get it see. If I pick it up - and I start to go more to a horizontal, I'm going to her recession, so if this makes sense, you guys taking the section here - it's gon na be wider towards the back and then pulling my section down horizontally. Alright, let's dive into that fringe, mr. Dolan, like a basic key of where a friend Eliza head rounds in the front to the recession's on both sides of her face, and you can see where that recession is that's a basic principle of where the fringe lies. Okay, the park to create my guideline for my place, all right, so it's almost like a little triangle on both sides of the park and what I'm gon na do here. What I like to do is I like to take this and find where I want that French to start, and I'm gon na probably do right about her nose? Okay, so I know that that's where I wanted to start. So what I'm gon na do then, is directly pull that straight up. Why I'm doing this today is that I'm creating an undercut. The reason why I'm creating an undercut this means I want the top of the hair to be longer than the interior of the hair. Okay, so the reason why I do that is because we all know a basic principle about hair is that shorter hair pushes longer hair, so lots of people when they want that nice sweeping that Colonel French. They don't get extra incredible persuasions, French, because it's too heavy. So we create this undercut. It'S gon na automatically tape that underneath that's gon na want to push that that's on top of it to one side or the other. Okay. So, that's why you create, then that's sweeping you have a question mark if a side part you begin on the part over direct this movie straight up right and because of how her hair loose it's gon na automatically be longer edges, then it is going to be On the interior, so you can see here where her guideline is right there. So what I'm gon na do is going to take my shoes and I'm just gon na shatter out this fringe and the reason why I'm shattering it is because I want to give it that nice texture and it's also going to be a very free fringe. That'S such a solid block pledge that we want, we don't want. We don't want to see me, listen going through your dad and you do a little bit of texturizing and it's a seat over here Trixie. Even though I created a complete horizontal cut, it's already got an angle that that's what we want. I'M gon na do the same thing. On the other side, it's going to be longer on this side than it is in the interview. There'S my guy right there going here, just shatter a lot of haircut now, I'm going to create my touch resin in here. I'M gon na drop this out and, as you can see here, we've already created that angle, just because of how that hair lives and that's gon na give me that nice sweeping curtain fringe that I wan na see. Am i going through here, yes and texturize. The rest of your hair, I like to do this one technique. It'S in Chile. Your part got cotton up the bottom of this interior. That is where the hair, if you have a question, what scissors are you using seven inch paragon sores? So it's a company called art and it's a it's. A dynamite share. You guys so look in the art. They have lots of different kinds, but this is what this is. What my favorites to do so I mean, if you guys, can watch me this is this interior and what I'm doing you guys, I'm not cutting on the way in I'm cutting on the way up. The reason why I'm cutting on the way out is because I want to make sure that I secure the integrity of that cube all right if I were to go in it's just gon na rip apart that hair move around the head. Why are you doing this? This didn't work all right moving over marble. If you guys see this, do you notice arc makes swivels, I'm assuming that's what this question means? Okay, so they do not as I'm pulling up, but for me it's a lot easier. If I can do it faster, I moved over then, like I did on the previous section and on her hairline, took diagonal partings and then started connecting them and pivoting back to a horizontal, and you guys can decide based on, like your clients, wants and needs. I want to keep her a little bit more Rudy up through the top, so she has that natural lived-in look. So, as you can see, I'm going to paint as close as I can up to the scalp around the face, but then, as I'm starting to drop back my sections here, I'm not gon na paint, quite as far up on the back end of it. So that way, it gives it a little more depth and if you guys missed it before, I did prep her hair with this blonde pre boost treatment, I'm gon na spray, it back on again he's just getting a little dry. What this treatment here is going to do is help speed up the de color rising process, while keeping the integrity of the hair, and it's also gon na give me that nice slip. So when I'm applying my clay to colorizer, I can really work it on there. Now I like to pinch the ends of the hair, get it nice and tight down here. If you guys, I know, there's a lot of people out there that are they're scared to use a clay to colorizer. I strongly encourage you to do it. It'S not as so. What do you get on the brush scene, I'm using the same brush that I was using before by Lanza. Only this one is a little bit longer so, as you can tell it, has that tapered and same with Bali ashes. I love a brush that has a good tapered end and then I like the bristles to be a little bit longer when I'm doing a open-air balayage. So I'm gon na keep it clean just putting the product on the tip of my brush and then I'm gon na start by going in, and I want to get close up to her scalp there and bring it down and then I'm still gon na put a Couple of these and w's in there, but dropping it down and letting that depth of her root really shine through now, like I said before, skating on the hair here, getting a nice smooth transition so that you don't have those spots in there just kind of brushing It on I, like I said I always think of it like icing, a cupcake using my board, then so that way I can grab the ends in placing my decolorizer on the hair and I'm gon na show you guys one other little trick. If you guys, like. I said before, if you ever see any spots, there's nothing worse when you go to rinse out of balayage and you see a big spot and you're like damn, I should have fixed that. So let's say I have you know I got a little bit too heavy-handed right there whoops you take yeah. If you take your tail comb here and you can simply just kind of brush that out a little bit and separate that hair, you guys see that mm-hmm yeah definitely make sure you guys go back and just make sure that you have a clean application. So that's going to be the biggest thing. That'S gon na deter you away from ever wanting to do and hope in her valley advocate. So so you have a question: will the board create a line underneath section? So that's a great question, so the question is: will it create a line? I'M gon na? Show you guys the underneath of the hair. When I do this section, it potentially could. But the thing is: there's already decolorizer on the board, and I'm gon na show you this little flip that I like to do with the board to make sure that I don't get a line from it and then also. How do you make sure it's inside the part you pinched um? How do you make sure it's inside the part you pinch when you were pinching it, Oh inside so great question, so meaning? How do I fully saturate that pinched part? So that's why I use the board, because the board's gon na give me tension right, so I can push the product through now. You see that her ends like that most people's hair at the ends - you're not gon na, have a lot of it. So it's definitely gon na be all fully saturated and through the ends, that's why I use the board cuz up here. I don't want the lightness as you look what's going on with this thing. Sorry we have a okay okay, so if you guys can see underneath here, the Leitner's not going all the way through I'm just surface painting right and then, as I get towards the bottom, I'm pushing it in now. The question was: will I get a line from the board, so I have the decolorizer on here and I'm gon na pick up the hair like this and place it back down on the board. So now, when you see under, can you get under there? Tricks now see how there's a soft transition there mm-hmm, because I'm gon na get the bottom of it as well, so by using your brush, holding the hair, pulling the board out and then placing it back on there painting down, and then I placed another one of These films in front of her face - I was like you know what it could. She has even more face protection. Our clients will be used to that. So we got some more using. We started picking it up and, as you can see, that's gon na give us all these pockets of depth and really give us that great dimension. When we rinse it out, you can glaze it. You can do an all-over Global glaze or you can even go back through and do a color melt situation using a couple different tones and took me maybe 5-10 minutes to apply super quick, hey Mark um. Could you get that thing back? Okay, hey doing my little living wage right now, so what I do is I have to go from the base all the way to the ground, so I'll do a little bit of a twist and turn it at the top and I'm gon na drop that out. As you can see, and I'm just gon na move down the head, so one of the key things is this: is you guys you guys see, there's tension to what I'm using the ayah myth, the sure you have to add tension, this innovation that she doesn't have To DQ remixer here, okay, so that's these lifting weight leads. If you can see so we'll go through the top key one revolution: I'll drop that out keeping tension, move down the hair shaft drop that out and then I'm going to use. My clamp is almost like a platter just to make sure that it goes to the ends and fishes those eyes. Okay, so I haven't done her Frazier. I think a lot of people. Don'T are you getting how about? How do i style the trinity all - and I showed this to Margo the other day and she's like oh? So as you can see, I'm doing regular waves here, I'm gon na start with this side here. What I'm gon na do is I'm going to take the whole fringe and I'm gon na pull up to wear it loose and then I'm gon na go underneath and I'm just gon na let the iron go through. I love that. I just do that. All right! You'Ll I'll show you once more on this side and then it's a little bit different on the other side right so going underneath just lightly press go press hard and just let the I end do the work. Okay go on the other side here. So on this side here we goes one revolution drop it off tension drop it out attention, I'm just going to let it slip through the ends of that iron. Right, so we'll be here. Here'S our friends here, I'm gon na grab the whole thing come from underneath and just gon na. Let the iron be the work you once more here, but I undo the work. So then we got our nice little lived-in fringe with our sweeping bag. All right all right, so why Marc's gon na continue on to the back sections? Curling chamois has a question about our glazes and toners. So within we use lanza healing color, so we have a couple different options for glazing and toning. We recently added on a new line, our liquids, so that's gon na be our deposit-only demi gloss, which is a great way to glaze clients, add a ton of shine. We also can glaze with in our healing colors. So if you guys don't know anything about lanza, we actually have a three-in-one system, so with one tube of color, you can actually change up whether you want it permanent dummy, permanent or semi-permanent just by changing the developer. So we have a translucent catalyst that we actually add to our hair color that helps render that ammonia 99.9 %. So then we can use it as a glaze when going back through, I like to do them after I shampoo at the ball. When I'm doing a color melt situation, I like to rinse them out shampoo at the ball, and then I bring them back to the chair and do a color melt at the chair, so ton of inventory space so for all you booth renters out there. I know I've done that back in my day and you get one little cupboard to fit everything. So I that's one of the main reasons why I switched to Lanza back when I did and it's definitely keeps the inventory costs low and then just gives you a lot more options to be customizable within your color. Alright, so Angela, you have a question: where can you go to see how to use our product step-by-step so make sure that you're following Lanza on Instagram and also we have a wonderful website? I think it's just Lanza com. I think Michaels on here. You can correct me if I'm wrong, but there's a ton of videos and certifications on there explains all of our products, so make sure that you guys check that out. Also, if you follow my Instagram, I do quite a bit of product sharing and my Instagram is Margo MA our geo Therese ter ESC, and then we have one more question from Monica how's, the longevity of the color. You guys it's incredible so, like I said before it, salons like healing color right, so healthy hair will hold. It will hold a hair color a lot longer, so the longevity is going to be there. Do you have anything you want to add on our color mark? Well, yes, I love it, but also you guys just make note I switched to Lanza independently before I was an artist and I loved it so much that I decided to come work for them. So another thing like with our Reds: you guys we have this die, especially in our new Reds, where we put more dye molecules inside of the hair color and our Reds almost look like direct dyes, they're insane and they last longer than any other Reds. I'Ve ever seen so and yes, he has his clients flip their head over always so I tell them to do your best, Beyonce ooh, look at you as you see that crazy smell you literally put in there. That'S that nice sweeping fringe, and we got these curls, and you can see here there's a lot of texture and a lot of layering going on in her hair, which is that a nice burner where it doesn't look like she's got a little. You know, like spider legs hanging out, to be absolutely gorgeous and we'll do a nice little photo shoot with her yeah, we'll throw you guys up a finished look on exactly and what did you spray before you curled? What did I spray before? I curl? I guess for anything actually I use everything to dry and then I use our design foam okay. So these two products are using probably like 95 % of my clients, okay from one wet to dry. Did you do the smooth down spray? Also, when, like I said, we're doing dry haircuts here at evolution, we're not gon na be doing any blow-dry styling for a while. So I just want to make note you guys it's important to use a heat protection even when their hair is dry. You don't know if they put a heat protection on before they came in, so that smooth down spray or even using that oil to prep the hair for the heat is a must. So what do you guys think there's the finished? Look marks modern, mid length, haircut and then just a little recap here on my mannequin. We did a little open-air balayage, leaving the pockets of depths, doing hand painting, and then we also did a hairline file pivoting to horizontal 10 foils, leaving out the ends and then painting on the tails just to brighten up those ends. So, alright guys you guys, you make sure the follow us you guys on our Instagram, usually that have a very pretty PowerPoint when I do my classes but hey. This is zoom season, as I call it all right. So we got Margaret Reese and we also have myself mark Dolan to follow. I don't know how to do that. We could do that. Oh okay, you guys there. We are so we're just gon na close it out here. Thank you guys so much for joining us. I know this is a crazy hectic time, but we're so thankful that we get to have a community like hairbrained, that you know make sure that they're looking out for their artists and also all the hairstyles all over the world. You guys, we love, you guys, stay safe, stay healthy and we will see you guys soon. Okay, bye, guys, bye, guys,


Comments
Vanity: Love the curls and the die