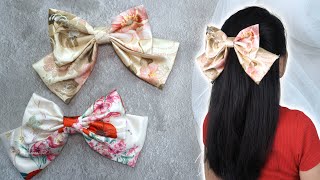
Diy Hair Bow I How To Make Ribbon Bow I Kanzashi Tutorial
- Posted on 24 March, 2019
- Long Hair
- By Anonymous
Hello everyone, all the measurements and materials are in the video.But i am going to write them here as well:
Measurements: Ribbon - With: 4cm
Cut 6 pieces with size: 4cm X 11cm
Materials: Ribbon, Scissors, Gluegun, Needle and Thread, Lighter, Hair clip.
I hope you are going to like this super pretty hair bows. They are super easy to make and are perfect for every hairstyle!
Social media:
Instagram: https://www.instagram.com/bori.theflo...
Facebook: https://www.facebook.com/The-flower-a...
Music: Youtube Library
Hello, everyone, I hope, you're all doing well in this video, I'm going to show you how to make this pretty and cute hair balls. So if you want to learn how you can make them as well keep on watching so, as always, we first start with the materials that you're going to need. I cutted my ribbon in six pieces and here are the measurements that you're going to need. So the first thing that we have to do is to take our piece of ribbon and fold it in the middle. Like this, I actually already showed you a very similar technique, so it's not something entirely new and then we gon na fold it again in half. So you can have a triangle on the top and we have to pin it and now we just have to do the same thing with all the rest of the pieces, and here we have to have six pieces pinned and now we are going to form the Pole we have to take our first piece and we are going to need as well needle and thread and we have to start sewing the piece until the middle, and this is important step because we are going to add there. The next piece. So we have to take the second piece of ribbon and place it in the middle behind the first piece, as you can see here, and then we have to sew it together and here is important to not sew everything until the end, because right here we are Going to add the third piece and we are going to place it right next to the first one, so the second piece of ribbon stays behind, and then we have to sew everything together until at the end of the second piece. So when we finish sewing everything together, we just formed the first part of the bow and, as you can see, the second part of the ribbon stayed behind and now the next step is to form the other side of the bow, and to do that, we have To do exactly the same as what we did with the first half of the ribbon and I'm going to speed it up a little bit, so it does not get too long, and here now, when we see with everything on the same thread, I forgot to mention That but you can see it clearly so now we just have to pull the thread carefully. So now we just have to sew through the left side of the bow, so we can connect the both pieces together and pull the thread very carefully and after that we just have to make few knots, so we can secure the ball well now. The next step is to place a piece of ribbon in the middle of the ball, and since I don't have a thinner ribbon from the same type, I'm just going to use a little piece of the same ribbon and I'm just going to fold it and secure It with a glue - and now it's you attached a piece of ribbon. We just have to put a little bit of a hot glue and place it in the middle. So now to finish the poll, I'm just gon na use a hair clip or their coat barrettes. As well, you can find them online or in any craft store. I think so now I'm just going to use a little bit of a hot glue, so I can attach the hair clip on the back of the ball. I think I didn't use enough hot glue, but still you can use as much as you want and here I'm just putting a little bit more glue in the middle of the hair clip. So I can add such the both ends of the ribbon, and this is going to take a little bit of assignments. You arrange it well, but we're almost done with the ball. So now our beautiful bow is ready. I hope you liked this video. If you did, please subscribe for more videos like this and again as always, I wish you all the best and see you next time. Bye,

Comments
Tambowz911: I love this and it’s so easy and so pretty.
Momen Manualidades: Hola amiga gracias por compartir todo está muy bien explicado y muy fácil de realizar que Dios bendiga esas hermosas manos para que nos sigas regalando esos proyectos tan hermosos un fuerte abrazo y millonarias bendiciones
Sweet Passion: Beautifull! Can't wait to try this!
ItsToya: What do you use to measure the length of material needed for each ribbon
Maria Da Graça: Muito lindo obrigado vou fazer um beijo
별반구름반tv-낚시튜닝-Crazy Fishing Love: Wow, this is a really good product. Thank you for sharing, my friend.
Sew So Cute with Aishah: Omgoodness you made this video so simple.. I love it. Thank you.
Nilza Ribeiro: Lindoooooooooooo
: ~: So beautiful.....l will try to make it
Maria Helena Pacheco Hassan: Lindos. Bjos.
Sandra Maria:
Suelen Três Marias: i love, so cute
Ngọc Thy: Wow beautiful
Richard García: Hermoso
Sapphire Jayde: What ribbon did you use????
The Flower Art: Hello dears! I am back with a new tutorial and i hope you are going to love it! Here is my previous video: https://www.youtube.com/watch?v=RtbzLFu5WQU
N Zafar: ❤️❤️❤️
Maria Centeno: Hello. Very beautifull
Samar Samora: سلمت يداك
Marluce Mendes La Bella Artesanatos: I LOVE IT´S
Zoe Rodriguez: mola mucho
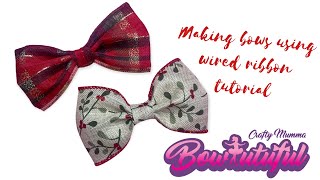
Angela Evington: Is the ribbon wired?
Santosh Dhal: can you tellribbon name in hindi please
Be Yourself: You should edit the video and mention to keep it on the same thread I got all the way done only to realize you have it on one thread waste of time
Zoe Rodriguez: hola