Women'S Medium Length Haircut Tutorial With Face Frame
- Posted on 19 June, 2014
- Medium Hair
- By Anonymous
Please enjoy this haircut tutorial for a women's medium length layered haircut with a face frame.
This is great for a round face shape as well as any other face shape.
SUBSCRIBE: http://goo.gl/aWSkjE
Mannequin from:
http://www.hairartproducts.com
With 20+ years of experience as a hairstylist and media personality, Stephen Marinaro, a.k.a. TheSalonGuy, focuses on bringing fashion, beauty and entertainment content to millions of people through TV, radio, print and the web. Whether he is offering style advice or chatting with stars on the red carpet, Stephen lives by the values of professionalism, respect, and passion for his work.
Since entering the beauty industry in 1992, Stephen wanted to give back to his community in different ways. After serving the public and protecting our families for six years as a law enforcement officer and Firefighter, Stephen decided to forge ahead with a new career path that combined his first loves: Beauty and Technology. Stephen brought his core family values, respect and an overwhelming sense of dignity with him during his transition. Not only is Stephen a mentor to millions of viewers through television and radio, he is also the founder of salonsearch.com, an innovative online directory for salon clients and professionals.
Stephen's YouTube channel, www.youtube.com/TheSalonGuy, features styling tutorials and event coverage. His channel surpassed the 4.5 million views mark, and averages an astounding 500,000+ hits per month.
Not only has Stephen hosted his own radio show, he has also interviews with an impressive list of celebrities, including Sophia Vergara, Alyssa Milano, Regis Philbin, Steve Buscemi, Terrence Jenkins, Pamela Anderson, Daisy Fuentes, Michelle Rodriguez, Dita Von Teese, Nick Cannon, Frederic Fekkai, Kelly Cutrone, Thomas Jane of the hit HBO series Hung, Twilight's Chaske Spencer, Smash's Megan Hilty, and Jenna Dewan-Tatum, among many others.
Stephen is currently signed to Rightster, the #1 news content providers on the web. He was also cast by eHow as an expert, for a 13-episode series on hair and grooming tips. He's chatted with and interviewed cast members of several shows including How Do I Look?, What Not to Wear, The Real Housewives of New Jersey, Real Housewives of New York, Cake Boss, Jersey Shore as well as covering red carpet events and fashion shows that include the Oscars and Mercedes-Benz Fashion Week NYC. Stephen has appeared on Style Networks hit show, Jerseylicious on Season 4 and has worked with other networks such as MTV and BRAVO.
Stephen is also an entrepreneur who helps businesses through consulting, marketing, and media and event production. He has worked with brands and designers such as Dior, L'Oreal, Paul Mitchell, Zang Toi, Rachel Roy, Emiliani, DePasquale, Nike Communications, The Art of Shaving, Beauty Press, Youthful 8, Malan Breton and Ted Gibson.
Whether Stephen is working in front of the camera or behind the scenes, one thing is certain: TheSalonGuy brings a unique blend of creativity, experience and enthusiasm to every project.
Follow me:
http://www.twitter.com@TheSalonGuy
http://www.facebook.com/thesalonguy
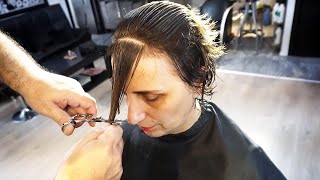
Hey guys, Steve in the salon guy here and I've got a really exciting tutorial for you guys today now you know I love the requests that I get from you guys, whether ranging from you know, soccer players to you know movie stars, but I also get tons And tons of requests and comments on my you know my hair cutting videos that don't pertain to a specific celebrity it just just more of a technique, so I'm gon na be I'm gon na, be cranking out a few more of those lately and just showing you Some really amazing looks you know I get a lot of questions on you know. What'S what's a good haircut for medium length or short, hair or long hair, you know side bangs or for round face. You know so I'm gon na be I'm gon na, be doing a lot of those for you guys to really help you out. So what I have today is a this is Emma from hair or products calm. This is basically I'll, then probably the best mannequin. I say in the world that I've ever seen hair our products calm. This is 100 % virgin European hair. It feels amazing - and this is definitely a high quality mannequin, and what I'm going to do today is give you guys a really cool tutorial on creating kind of like a mid-length angled bob here and then maybe creating some side bangs in through here, because I get A lot of people saying you know: what do you do with medium length hair, so I'm going to really uh. Do something really really cool for you guys today, I'm ready to go so let's get started alright. So the first thing you want to do is you want to section this off, and this will be our first section. This is key because this is where we're going to establish our length, so I suggest going a little bit shorter into the back here and angling. It down going um just slightly going a little bit longer towards the face this. This is great for round faces because, when you're round, when your face has a round shape to it, you don't want to create a haircut that's round, because it does make you your face. Look more rounded, so you want to create something which is more triangular, which is actually making it a little bit longer in the front, and that is going to elongate the face and kind of take away from the roundness. So that's why we suggest doing show a little bit shorter and working towards the face just a little bit longer in the front here. So let's establish our guide right here first and what I'm going to do is I'm going to use no tension all right. Little actually, no tension whatsoever, I'm just going to comb this down with my comb like this and I'm going to establish where I want my guide to be. I might like to be so. You know we're not going to short we're not going to long either. So let's cut this to where it's about right here, right more than on the base of the neck, just about and using not no tension whatsoever, just a comb, I'm cutting just like that. Okay and now the same thing on this side going this way and you're going to leave the corner. Alright you're going to leave that corner because you want to you, don't want to cut that off. That'S going to help you as far as keep the keeping the hair a little bit longer going into this way, so the same thing on this side: you're just using the comb and there you have it. So this is what the the back. The first section should look like just like that. Alright, now what we're going to do is bring everything down to this one point, just like that section by section using the same technique using just the comb, okay and that's going to help really give us a solid, really really straight accurate line. So I'm going to finish this whole back of the head up and then we'll come back and then we'll move on to the next step. Alright, so we want to do. Is here's we're pretty much halfway through out the back of the head? Just want to have your client or model whatever tilt your head forward, just slightly not too much alright, and at this point you can even use no tension whatsoever. Okay, just comb the hair straight down like this alright and you can even come if you are going to use the comb cut on an angle going downwards. This way, alright, as you can see, I'm still using the comb as a guide, but I'm changing my hamstring and like that, alright, now I'm just going to finish this side right here and we'll be pretty much halfway done with the back of the head. Okay, again, I'm angling my comb downwards this way, so it's allowed leaving me a longer section, alright and a longer angle. So when you comb comb down this way, when you blow dry, everything will fall into place just check for balance like this make sure everything is even and then continued. Your next section working and finishing a whole back of that alright, so the back is done and now we're ready to work in through the side here like this and what I'm going to actually sometimes works best with no comb. Okay, so I'm just going to cut the line in just free handing it like this with my shears okay, extending it all the way through the very front, leaving that front bit longer. Okay, now look look what I've done here! Look at that! Okay! You'Ve got a nice sharp line here, going from shorter to longer and we're good to go. If the hair is too thick, you might have to do two sections. Alright, I you can do this in one shot. Depending on how thick the hair is, you know, don't don't take too much hair on it once because, if it's too thick um, it might not be as accurate, and it might be a little more difficult for your cut. So the same thing on this side. Alright comb everything straight down. I like using the fine teeth of the comb simply because it gives me a better, accurate, more accuracy. So here you can see all right. Here'S where that left off and now again I'm going to freehand it and I'm just going to follow with my eye, and it should match to right here just like that. Okay, that sometimes gives you the best straightest lines: you'll ever cut alright, and there you have it so now. We'Re going to do is we're going to go in and start shaping old thing with some layering alright. So now we're going to take on the back right in through here, okay. So what we're going to do is we're going to take our section right here right in the top back of the head here and now. This is going to determine where you, where the layers are going to fall and how you want them to fall. Okay, how short you want them to be and where? So, if you cut this piece right here, this short it's going to fall to about right here. Halfway down, you know in the middle of the head, that might be a little too short for you, alright. So what I like to do is is I'm going to cut this to where I know this piece will fall about around right in through here alright. So it's just going to create a nice soft uh roundness in the back. Alright, just a nice nice shape where it's not too short, and it's not too long either just enough to give it a nice shape all right and there's your section right. There there's your first piece so now what a minute simply do is there's where the piece finished right here and then I'm going to just connect this throughout the very bottom like this, not much hair should come off in the very very bottom. Here, okay and there's my first section: creating a nice soft layer all right now, moving on to your next section, you do the same thing: I'm going to take a piece from your previous section, alright, which is called a traveling guide. So the guide has been pretty much moving around the head shape. Alright, follow down to your next section, going lower towards the bottom of the head, so you're, probably taking I'd, say about three. Maybe four sections: if that Alright throughout this and then there you go alright, it works itself down into the bottom here. What this is doing, it's removing weight, it's creating some movement to it and it's creating a nicer shape in the back. Alright. So, let's finish this whole back of the head up like this, and then we will be ready to move in through the top all right now. One thing I do want to share with you guys: alright, is when you get through these corners into here, alright right in through here, you do want to kind of bring this back towards you. You want to over drag back towards you. You don't want to cut out this way too much. You want to make sure you, because that will leave a little bit more weight in through here, so you're, not printing, any holes or anything. So imagine this is like a box and you're cutting within that box, like this okay and like this. So let's finish this up and then we're ready to move into the top. Alright just want to show you guys we're at what that's done, so you can see. It'S created a beautiful shape and come here, and then here's where the layering is and it works right through here. If you were to shake it up this way you can see so it's got. You know some nice to move into it. A lot like this so just want to see, and you can see the accuracy and how beautiful this is. You know we just do it by hint without using your hands. These are really sharp, accurate line. Alright, so now we're ready to work in through the top of that, alright, so here's the top of the head here and we've already established our guide all right. That'S why we cut this in the back and I'm just going to lower this a little bit. So what that means is that now we can connect this in through the top here all right and how we're going to do. That is we're simply going to follow the head shape. All right, you wan na every hair that isn't going to doesn't need to be cut, will fall out of your hands and then that's where you begin cutting all right. What that's going to do is that's going to connect everything from the back in through the front. All right, because you don't want to you - don't want to cut what you've already cut already, because that could cause a problem that could leave. You know some lines of harsh lines on the haircut all right, so let that fall out and drop out of your hands and continue to work the entire back of the head. I usually like to start right in the middle and then work my way going to left and then work my way and then going back to the center then to the right again. So that's how I follow this pattern in through here. So we're going to take. Probably one more section, this way all right and you'll be able to see the hair that needs to be cut, and now we can work in through the very very front and how we're going to do. That is we're going to take a paddle right down the middle of the head, all right, we're going to take a section just like how we have been cutting everything else, all along okay, right down the middle like this. This is the middle of the head here and we're basically going to cut straight across all right. We'Re going to cut this this section horizontally right here: okay and we're going to continue to do this throughout the whole top of the head till we get to the very very front, so we're picking everything straight up and what this is doing again: its removing weight. It'S also creating some nice soft layers throughout the top of it as well. All right bring the last section up from the front and you want to over direct back just slightly a little bit, because you want to leave the front just a little bit longer. Remember! That'S what we did, we left it longer for a reason, so bring it back to you and just over-direct, okay, and that will end up, leaving it longer now we're ready to work in through the corners now all right on the sides. Okay. So what we're going to do is we're going to now pick up a section right in through here right to the corner and we're going to work it down into the head shape. This is very similar to the back, and what we're going to do is follow a pattern going towards the face, so we're going to pick up where your layer left off all right. There'S the guide right there that need and there's a piece that needs to be cut and we're going to work this down in through the very bottom and again not much hair is probably gon na be coming off into the very bottom, because we've already kind of Established the length all right now when we get to closer to the front again, you want to overdress slightly going pulling the hair towards you, because you want to leave it a little bit longer. So, as you can see into the front here, this is where the hair started to get a little bit longer. Okay, alright, you just skim the bottom there and then probably the last section right in through here you want to over direct back, it's pretty much. The spark back as you can towards you this way not much hair is going to be cutting coming off all right, because you want to leave that length just in the very front and if you have to you, can always go back in and bring lengths up. Alright, what you're doing is you're just creating a nice shape in through on the whole haircut and creating some nice layers in it. So I'm just going to comb this out, and I want to show you what we've done here. Alright, I'm just going to comb this out and then you'll be able to see how the the shape is forming all right. So look you can see it's coming up. It'S really shaping itself nicely and em. You comb this all down. It'S really really pretty um. It'S got a beautiful nice sharp line to it. Alright, so let's do this same exact technique on the other side, alright, what we're going to do is is switch our body position and we're going to cut now. Instead of we did on that side, we're going to do the opposite on this side, I'm going to show you guys so you're clear on what I meant by when you switch sides. So here we are, we do the top now working into the into the corners, but my body position now is is different right. It'S now facing the back of the head, so we're going to work in through the bottom here and again not much is going to come off. So just continue to do this pattern until you get to the very front and when you get to the very very front what you want to do is you want to push away push towards the back of the head and that's how you keep it longer? Okay, so let's finish this up and then we'll be pretty much ready to work on the front and see if you want to create any sort of face, framing or any sort of bangs or anything alright. So what I did is, I basically split the hair, where it naturally wants to split right down the middle here and I'm taking a section right in through here, and what I want to do is I want to create an angle going down towards starting about I'd, Say around the tip of the nose and what I'm going to do is I'm. The comb is straight down like this. I'M going to lock my fingers in this way and I'm going to come in with my shear like this and just using the thumb. Alright, I'm going to slide my fingers. Okay, like this, I'm just closing the thumb, clothing, a thumb and I'm working it in through the length all right like this. Okay and it's creating a soft face frame like that, so you can. If you want, you can bring everything to this one point in through here, because now you've got a section and a guide to work off of so you can just kind of comb this down a little bit in through here all right and you're, just going to Work this in okay, using the thumb, closing closing, closing, closing closing let that hair fall out like that and there you have it so there you have a nice angled face frame arm in the front like this. Okay, now do the same thing on the other side, and you can do that simply by taking the hair all right and you can do it where you you come in like this slide down this way, for what I like to do sometimes is comb it down. This way, all right, there's the guide right there, okay and then you're coming over it like this coming over it slide slide slide slide slide down, and then there you go continue all the way throughout the bottom. Here: okay, calm down, there's the guide right there and you're just going to continue working the thumb in and just closing, closing closing closing all the way to the very, very bottom and again you're leaving the length but you're creating softness throughout the front all right. So I'm just going to finish this up here on this side um, and if I need to just bring this up a little bit more, I will and then we're ready to style. It now a great way to check everything, because I want. I want you guys to see this is very important. Is you can calm all the hair towards you this way all right and then cut up this way all right, and do it on this side to bring everything towards you this way and any longer pieces? You may see you can just kind of chip into them like that, so that everything really is well balanced throughout the front, so it should look like this okay. This is where you should be at as far as the the length and the angle in the front. So, let's go ahead and dry this now and how I'm going to dry. This is, you know, there's a few different ways. You can dry this. You can dry it to where everything is under. You can dry it to where it's got some flips to it like this. You can work a little more messy, so I'm going to go with a little more of the kind of kind of more messy fun look, but also it has a sleek kind of finish to it as well. So when you're blow drying, you want a rough dry. First and then after you're done rough drying, just really getting some of the moisture out, then, when you're ready to go to the next phase, you want to start using a round brush and you want to start right in the front and you want to bring everything And blow dry towards you, okay and that's going to smooth out the front first, but sometimes it's better to smooth out the front first and get that over with then you're going to take everything section by section till the whole front and side are done all right Here we go so the drop the blow dries come is finished now all right and I'm just going to spin this. You can see this way, and this is basically the front now alright and you can see it's all coming in this way and now, if you take your hands and you rake everything back, all right what's happening is look at that you're, creating a beautiful soft shape In through here that works in through the longer length down in through the bottom like this, okay, I'm literally just working this in with my hands and look at that beautiful and then this side. You know if you wanted to you know, depending on you, can tuck it behind the ear. If you want this way to make it look a little more kind of elegant alright, if you wanted to all right - and you can also go the other way too - you can flip this around and you can make this the opposite part, which is also really really Cool and that's where you know really being a perfectionist and really working this in is a really really nice. You know you really, when you put the time in you know it shows in your work. Alright, the effort that you put into this will definitely show alright and there we've got the angle again, leaving it long in the front and we've got kind of like a sweeping fringe coming over this way. So I think this came out gorgeous I'm just going to spin this around for you guys there you can see the angles worked in the back is beautiful. Alright, here we go on this side here, just comb this out like that and it's gorgeous beautiful alright. So I really had a lot of fun doing this, and I really hope that this helps you guys on with this technique, gives you some ideas of what to do kind of with uh. You know medium length, hair that you know it's. It'S not just kind of hanging straight down, but does have some movement to it and you can also, if you want work down the middle like this totally up to you guys but um. I had a lot of fun doing this guys and thanks so much for watching and I'll see you next time with more tutorials for that with the Swan die you

Comments
Wilma82_: Awesome talk thru very helpful. I've been having issues with my corners on when I should start angling and this definitely helps as do all your videos. Medium to short hair seems huge this year and as scary as they are for me(newbie here) to do watching your videos help out.
Kayleigh Papaleo: I love love love this look. I've been dying for this type of haircut to be done.
Fabi Glez: me enamore de este corte, eres grandioso explicando, me gusta tu técnica para poder darle esa textura suave y elegante :)
Ashley Liggins: Hi Steven! I have to commend you on such amazing tutorials. Watching your video's absolutely lights a fire under me and I can't wait to get my butt in my first Cosmetology class this coming new year. As a total hair cutting/styling virgin (besides my best friends that trust me that much lol) Do you have any suggestions or recommendations of study materials (besides your awesome video's) books/other video's/beginners styling tools/products? That may help me be a lil more knowledgeable by my first class. Thanks for putting in the time and energy to educate newbies like me...You Rock! For ever a fan Ashley.
Nyvia Torres: Loved it!! You're really amazing!! Great teacher!! Thanks for the tips!!
adela Achekzai: I love this haircut, in fact I'm gonna do this haircut today and I'm excited, I always watch your work and always learn more, thank you so much
Jeniffer Sandino: Beautiful haircut. I love it <3 Thanks for the video
Charles Penman: Dear Ms. SalonGuy; thank you so much for posting these tutorials; I love them. My issue is with "imperfect" hair; what do you do when there are cowlicks, etc.? These cuts are gorgeous but they are done on a model head with perfect hair growth patterns and no imperfections. As a rule, do you still do the basic cut and then try to "tame" the cowlicks, etc. or would you compensate and cut that section longer knowing that it will bounce up? I have a running battle with my stylist on this topic and am tired of torturing my hair to assume the perfect haircut (which is what she gives me) on an imperfect head.
America theBeautiful: Hello. Very nice job. That's exactly how I want my hair cut but I'm always at a loss for words when I get to the salon. You mentioned the cut being a medium length angled bob with side bangs. Would this be the exact description I would give to the stylist? Would I need to tell them anything else about the cut or style? Thanks for your help!! Beautiful job :-)
Jenny B: I just had a request for a style like this and being a new hairstylist I felt challenged. Thank you for your tutorials I appreciate them immensely!
JC Canales: beautiful, and very helpful :)
Nicole Spadafino: I watch all your hair cutting videos. I am in hair school and learned a lot from your videos. Thank You :).
Gina Haffie: yes! please do other tutorials, on face framing, rounding hair or fixing things!!
R Fernandez: Thanks for sharing. Your videos help me so much to do my own hair.
Nusia: Хорошая работа. Спасибо!
Sahar Iqbal: amazing techniques thank you so much for the video :)
Vlora Blora: Love this cut thanks!
Almavec: Muchas gracias por compartir, eres un gran maestro!!!
R3DGames: Hi Steven. Thanks for the videos, i love them and i always learn something new. Amigo, could you check the setting at the time when you upload the videos? Every time i try to watch your videos on my phone, i get a notice saying that it is private or has been removed by the uploader.
jay correia: Hey Steve thanks for your up beat personality and your dedication to our craft your enthusiasm is infectious and inspiring I would like to know how your product line is coming thank you
Sarah Carlstedt: Beautiful hair cut! Do you think you can maybe make a video on highlighting hair extensions? I have a client who wants me to highlight her extensions but I've never attempted that before.
cheerio: Great tutorial. It would be good if you continued and showed the hair flipped and/or other styling variations. Also, sometimes the camera was too close up and we couldn't see what you were doing and we lost perspective.
leslie lungay: your tutorial videos helps me a lot....i am a beginner so your videos is my first step to learn....... two thumbs up!!
Holly S: Beautiful, I love all your videos. You are the best teacher!
Madeline Texas: That's one perfect & beautiful hair cut look B-)
Raquel QUINTANA-THORPE: Loved it!!!
Ineida Ferreira: CORTES PERFEITOS, PRECISOS. FANTASTICO.
claudia arrejin: gracias por compartir tus videos gracias!!! me sirven de mucho!!
soluv2cuthair: Love the cut and your techniques, love the color too, looks like a dark blonde.
Lisett Guzmán: muy lindos los cortes!!
Hong: What kind of hair do you think would fit with a small round face? My hair is wavy and long layered past the middle of my back, so i'm having a bit of trouble finding the right hairstyle with volume to fit for my face frame.
Jordania Paiva: lindo amei vou fazer esse corti
Cris Andrade: Very nice . I love all videos. Help me a lot. Thank you.
Ineida Ferreira: ESSE CORTE DEU PRA ENTENDER PERFEITAMENTE
Melissa Miller: Will a variation of the cut work if my hair is shorter on the sides than the back?
SingingTrainer: Good day,always love your videos! Please, tell me how long is the first guide on the top/back (the fisrt layer you cut. thanks!
Deborah Buccieri: I think this haircut is AWESOME!!!! Beautiful
marilou eddy: Wow... i really like it! Well done ...
fiorella valdez: muy bonito :)
jakkstone08: I love it! What do you call that haircut? And what's the color of the mannequin's hair? Thanks! :)
L.H Parte: wow....i love this hairstyle
L.H Parte: wow....i love this hairstyle
LuCasley 20: Amazing work! Where I live it is so hard to find a good hairstylist :-(
Ani Jofre: One for square faces?? ;) love your vids ♥♥♥
Carolyn Thomason: I love the the style.I have thick wavy hair and a round face.I dont care to have hair in my face would you suggest one for me to try.Love your videos.
dantifa: It's great, thanks!
Luis Santana: watching most of all your videos helps me!...love this haircut. Can you do a video on how to cut Miguel's (the celebrity) girlfriend haircut?
Geaux Girl: OMG - hands down one of my TOP-3 FAVES?!!!!!
Silky hair salon Mandurah: I love this hairstyle
阮小小: Thanks so much..i love it
PRECIOUS PAULA: Nice job Steven!
Desdiana Murlina: awesome tips beautiful..
Evelyn M: Lovely!!
Lacehairwigs: Beautiful cut
cha ram: gorgeous!
roderick tan gatoteo: thank you for toturial very useful
Jenny lucky: Thank you that was great teaching
MariBL29: This is exactly the haircut I want. The problem is I can't find anyone who can do it!
flee2321: What about very long hair. How do I get shape without thinning the ends too much?
francesannr: I really like this, but I'm too scared to get it done
Shalu Rana: i want that cut so bad but everyone's keep suggesting my present long hair better ...what to do
IamRhianna Marsh: Would you recommended cutting under the comb or above?
Ly Pham: Could u make more video how to blow dry hair for a full volume? Thank you. I love your videos...
Ineida Ferreira: FIQUEI NA DUVIDA QUANTO A PARTE DE TRAS, PARECE QUE PEGOU CABELO MUITO CABELO DAS LATERAIS, E ISSO NAO AFETA AQUELE BELO BICO QUE VC TINHA DEIXADO.
Desiree Peña: I love it.
Ah Zin: Hello! Love ur video! Do they work for asian head shape too? I try to watch your video to hv haircut for my man at home.
Ms Astrid Belmont: I love it
bettyboom01us: Great video and cut.
Rianne19 Edwards: Nice tips thank you
Veronica Ruiz: I like it the way you cut the hair very impressed thanx & Goodluck :)
Melanie Theriault: thank you so much!
Chloe Beech: That's so beautiful. Dam it though it won't suite me I've always had long ginger hair. I wish I had Brown hair so I could have this style.
khánh hoàng: love your work, your video is the real teaching
Suraiya Murray: Can you do a shoulder length layer tutorial please
Diana Fitro: thats beautifulll,,,can that style cut for wavy hairs?
only1me100cdl: 1:30 re: round faces and how this cut will elongate the face..what about ..if the face is long with sharp features?( chin..nose..high cheek bones)
VW FD: I love ur videos :) I sub
Kim TaeYeon: omg you're so good! What do you call this haircut? Well, I want to go to the salon what will i say to the hairstylist if I want my hair to be cut like that?
Ha Myeong Sim: helpful ~ thx dude .
Candela Barsaglini: i love your tutorial. i see you video from Buenos Aires, Argentina
Lyka Mendoza: I want to know what kind of short hair cut wil fit chubby round face? Will this haircut fit?
la barbie que no ! es tu ya.: Its beutiful , thank for ur video, and for sharing lol,
Jennifer Joe: Nice technique.
Sashe Sashe: You are so good I want to get my haircut done Where are you based??
jhanneth franco: Good tips thanks
Tuk Tuk Zindagi: your all hair cuts are too good
Кристина Кольца: Thanks you soo much.
KDivinefem30: This cut is my favorite. .we dont have hair stylist like you around here lol you need to come to R.I.
Dohdz Berida: Nice tutorial broh.... God bless.....
spring flower: beautiful..... .....
spring flower: beautiful..... .....
sowmya sowmi: Does this haircut will suit for thin hair?
Jiminnie cutie: i want my local salon to do this, so what will i sayy?
fatiepenguin: anyone try to cut your hair yourself? did it work? is it hard?
moumita sarkar:
sara soso: يجنن شغل ايده روعه
Supriya Tarayawale: I beg you please do my hair!
Tuk Tuk Zindagi: please show something for medium curly black and lenthy hair
Patrícia Amaral: thankx!
Meowpixl: This kind of reminds me of taylor swift. I don't really know why but it does.