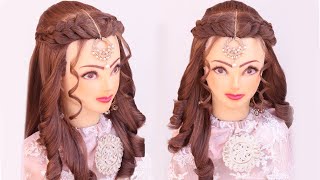
Disco Curls Hair Tutorial A La Mode - En
- Posted on 04 April, 2017
- Medium Hair
- By Anonymous
Nicolas Jurnjack Hair Tutorials DISCO CURLS
Á La Mode Hair Tutorial, Duration 18:32, Level : Advanced
How to use a curling iron to get this look.
Step-by-step technique with infographics, details, tips and tools.
▶Visit Atelier Nicolas Jurnjack.
Attend a Masterclass in Paris hands on training mentored and led by Nicolas Jurnjack
https://www.formationscoiffure.com/
English and French
[Anything but] straight from Studio 54 – this classic ‘70s hairstyle has kept its editorial edge for decades. Pure volume freely grazing your shoulders, these big, fluffy curls offer the perfect combination of relaxed…and chic.
▶ 0:09 Intro. Magdalena, before and after
▶ 0:26 Tools you will need: to create this style: Tail comb, styling comb, paddle brush, small curling iron, hairspray, claw clip.
Tool Kit: http://hairbynicolasjurnjack.com/tools...
▶ 0:50 STEP 1: Preparing the base
▶ 1:23 STEP 2: Hair sections. Starting at the back.
Detailed Instructions step-by-step with with infographics, tips and technique. Separations, how to use a curling iron.
▶ 1:53 STEP 3 : Curling the back and sides
Details with visuals and tips. Using a small curling iron.
▶ 4:53 STEP 4: Curling the front / fringe / bangs.
Four sections of hair. Detailed instructions how to for best results.
▶ 7:32 STEP 5 : Creating the shape. Opening and brushing the texture to create volume that is light and fluffy.
▶ 9:57 STEP 6 : Fine tuning the look. Envisioning the look. Achieving the shape you want.
▶ 12:29 STEP 7 : Perfecting the finish. Precise detailed instructions and tips to get the look you are aiming for. Brushing, backcombing, teasing.
▶ 18:03 : The look glam, fabulous rocking 70s style disco curls
Level: Advanced - http://hairbynicolasjurnjack.com/level...
The most dexterous of hairstylists… looking to learn, add to your repertoire of styles, try out a different technique. After all, the best know — to stay the best, never stop learning.
#disco curls #howto #hairstyles
For this look think a party on the dance floor of vision in the studio, a classic style that conveys relaxed and chic all at once and never loses its editorial edge. Prepare your tools, the road from long limp, hair to wild voluminous curls is paved with a small curling iron flat brush hair clips and some medium hold hairspray step 1. Preparing your base use your flat brush to give the hair a thorough, brushing remembering to brush through the underside as well step to making your sections we'll start by curling. The loose section below the part. First, working from the back create a horizontal part from ear to ear and pin up the hair step3 curling. The back and sides use a small curling iron at maximum heat, be careful to keep both your models head and your fingers safe. Please remember that hot hair tools are just that hot severe burns can occur if used incorrectly, always be cautious and aware to spare your hands when using hot hair tools. Wear a thin cotton glove which allows for grip without any burns. Take a piece of hair about 2 to 3 fingers wide place, the hair between the clamp and the barrel of the curling iron at around mid length for this style we won't be curling all the way to the roots. Warm the hair now inch down the hair shaft using a press and release pumping action, keep rolling until the tips are taken, in'is open, the curling iron and gently release the finished curl while you hold the hair at the roots separate another two to three fingers wide Section of hair and repeat the curling process, as you work through the hair, you can choose to curl to the left or to the right, but whichever way you go be sure to keep it consistent, as you can see, it may be helpful to use your fingers To tend to the tips, if need be, go back in and redo any troubled, curls now unpin the hair and make your second section above the first curl in the same way, and repeat again for the third and final section, the back of the hair will look Like this now, it's time to move on to the front, just as you did for the back you'll create three sections and work with pieces of hair two to three fingers wide step for curling the front now's a good time to remember, to remove the iron gently When releasing the curl, so you don't wind up straightening the hair that we're not curling all the way to the roots that heated hair is very delicate and can easily lose its shape if handled too. Roughly and finally, that you need to allow a few seconds for the hair to cool before moving on this way, you won't risk the curls in the ultimate shape of the hair Step, five, creating the shape heading back to the back, with a top sections pinned up Start to open up the texture underneath by gently brushing through with a flat brush gently backcomb the hair, to create that eye catching volume. The aim is fluffy and light, but controlled, so the style can be shaped. Go back in with the tips of your fingers to further open up the backcombing effect, creating an even lighter foamy. Look, while remembering to work towards a rounded shape now, release the second section of curls and work through them in the same way. Creating the same foamy feel keep working the back comb technique to keep working the volume be sure to hold the hair at the roots as you brush through to keep your model comfortable and cordial, continue to tease the hair into a round shape. Go back in with your fingertips to more finely separate the hair and fluff it out into controlled volume, step 6 fine-tuning the look always protect your models face and skin when using any products and always spray hair spray from a distance of approximately 30 centimetres 12 inches. For photography and video purposes, only the hair spray appears closer to the hair than it should be now envision. The overall shape you're working towards with your crown of curls. You may want to use a medium hold hairspray at this point for more control. Remember to hold it at a fair distance wetting. The hair with spray will only weigh down all that well-worked volume back home. Your way, through the finishing touches Spray, the tips again from a distance of approximately 12 inches 30 centimeters to keep them in place before moving on to the front sculpt the hair, to fine-tune and manage the shape and volume step 7. Perfecting the finish for the front and sides: it's all systems go, don't forget to work out the underside of the hair as well as you back home. The sides keep working the hair into a continuation of the shape you've created in back then move on to the other side, mirroring the volume and shape you've just created, step 8 finessing the front to manage the front brush the hair forward from the crown and down Through the last remaining curls again, don't forget the underside still being mindful of the shape back home the front so that it blends in with the rest of the hair, with your flat brush gently, smooth away any frizz or flyaways manage the front part by shaping it. With your fingers, while all the curls should be a fluffy dream by now work around the head to make sure the texture is consistent and no curls have remained tight with your hands and maybe a little hairspray keep shaping the hair until it's achieved a nice balance To control the crown a touch more use, the touch of your hands place: your palms on the top of the hair, allowing their heat to gently flatten the crown and tame any flyaways. If wala there, you have it. A fluffy foamy feel that dusts the shoulders and draws the eyes


Comments
Fernando Manuel Hairdressing: Please more videos like this!!!
Kiki Lopez de Victoria: Gorgeous!
Johnathan Sarmiento: El mejor