Straight Out The Box Easy Install!! Perfect Curly Bob For Spring 3A/3B Curly Edges | Omgherhair
- Posted on 23 February, 2023
- Medium Hair
- By Anonymous
Hello my beautiful subscribers (and non subs) ☺️
Wig sales page - @CAwigss
Personal instagram- @holaa_caro
EMAIL- [email protected]
PRODUCTS USED:
Maybeline Fit me foundation: Warm coconut
LACE SPRAY- EBIN lace spray in red (to lay the lace)
Nairobi Setting lotion - mousse used
Time stamps
0:00 - 1:23 intro
1:33 - 2:40 prepping the lace
2:40 - 6:04 laying the lace
6:04- 8:45 Detangling the hair and cutting layers
8:45- 9:50 Defining the curls
9:50-13:19 final look and review
▬▬▬★ OMGHerHair Coupon Code ★▬▬▬
$ $ | : Caroline30
▬▬▬★ Free Shipping & Buy Now, Pay Later ★▬▬▬
▶ ▶ : https://www.omgherhair.com/3a-3b-curly...
Length: 18 inch
Density: 150%
Color: Natural
Size: Medium
Edges: 3A/3B Curly Edges
▬▬▬★ OMGHerHair Quality Glueless HD Wigs ★▬▬▬
√ Super Fitted Glueless Wig Cap
√ Real Invisible HD Lace
√ Clean Bleached Hairline
√ Deep Parting 13x6
√ Adjustable Straps & Elastic Band
▬▬▬★ MORE WIGS FOUND HERE ★▬▬▬
▶ OMGHerHair Official Website:
▶ Fitted Glueless HD Wigs:
https://www.omgherhair.com/fitted-glue...
▶ Beginner Friendly 360 Wigs:
https://www.omgherhair.com/360-lace-wi...
▶ Luxury 13x6 HD Wigs:
https://www.omgherhair.com/13x6-hd-lac...
#hdlace #hdlacewigs #360hdwigs #360hdlace #13x6wigs #13x6hdlace #gluelesswigs
▬▬▬▬★ OMGHerHair Social Media ★▬▬▬▬
Instagram: https://www.instagram.com/omgherhair/
YouTube: https://www.youtube.com/c/OMGHerHairOf...
Facebook: https://www.facebook.com/omgherhair
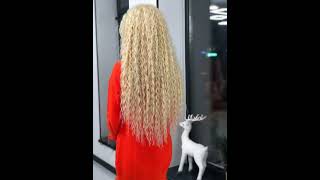
Hello, everyone welcome welcome back to my Channel. It'S Your Girl, Caroline! What'S good, what's Poppin, how are y'all doing you already know, let's hop right into today's install, so I'm gon na be working with this wig from OMG, her hair company. I have worked with them. A lot they are known for having really good pre-made wigs, meaning that they're ready to be installed out of the box. The units come pre-pleased, pre-plugged ready for you to just pop on without any other extra customization hassle. This wig is very different. For me, this is from their pre-curled like Curly edges line. I don't know if you guys been seeing this online, but wigs are now coming with the edges. Baby hair is pulled out and curled like it would to mimic a very like natural, realistic, hairline. I'Ve tried something similar with this with a kinky curly and that had a 4A here. So it's more of a looser curl, which I think is a lot more easier to handle, not something wrong with kinky or textures like 4A, like that's my natural Edge, but I feel like it was just hard to maintain. You know if I'm going to want to struggle with natural hair to maintain it. I'M always wear my real wig, my real hair, I mean you know, I mean anyways hairs with wig right out of the box. As you can see, the knots are bleached for you. It'S a 13 by 6 frontal, so very nice, deep middle parting, which I love, but unfortunately I didn't it does not have enough side parting. I hate when companies do that like. If you only give me 13x6 in the front, give me 13x6 on this side. You know, but a really good middle part parting regardless. The only customization thing I would do is I'd like to tint the lace on all of my wigs. I'M using my Maybelline Fit Me Foundation in the shade 356. Warm coconut - and this is just my exact skin - match - I prefer - to go to liquid foundation versus a powder foundation because there's more coverage in the liquid and I like to use nice little dense brush to just buff that right into the lace. Underneath now that our lace is nice and tinted, we can put our wig on make make sure you adjust the straps on the back of your wig and yeah. There'S me with my little past done braids. As always, I'm going here and just cutting the lace around. My ears, you know I like to just make sure I'm thinking of cutting the lace in a upside down C. So, like an n and just kind of carving a little section around my ears, I do have a very detailed tutorial if you have trouble cutting the lace around your ears, I'll link it below to go and check that out. But once we have our lace, nice and fitted around our ears, I'm going to go ahead and prep the lace for cutting just by cutting some section sections just make the lace a lot easier to work with, especially something like this. That has the baby hairs pulled out. I'M gon na use my ebony spray to lay down my lace. Y'All know this is what I use all the time I will be coming out very soon with a review on all the different type of Evan lace. Sprays, because you know, if you don't know they do come in different cans, there's different cans. I mean different things. The red one I like to use is, like the medium hold, there's a yellow one, there's an extra hole, but for me I've tried a few of them and so far this is my favorite one, but they did come out with some new ones and I definitely Want to try that anyways, I'm just showing y'all over there, don't be like me, I use proper tools out of her using a Sharpie to hold down my lace, because I couldn't find my rat tail comb, but using anything flat, Sharpie whatever you got girl to just Push down that ebb and spray and with your blow dryer on a warm setting just to really get that lace, nice and flat kind of like you're, taking out air bubbles whenever you're installing a iPhone screen. You know when you want to smooth it all out. That'S what I imagine I'm doing whenever I'm trying to get a melted lace with that blow, dryer and and rat tail comb combination. Once I've gone all around laying down the lace I like to like pull the lace back slightly just to see, if I see any lifting like right here, I got some lifting and I just go in again and just you know: tap the spray back in there And just redo the process, because not all the time on the first attempt, the lace is going to stick and I like to make sure I catch the lifting on site, because one crack in the install takes the whole ship down. Like I always say, the key to a Flawless install is really giving attention to detail. I did really like how the edges looked initially like I wish they stayed just like this. Like this looks super natural, like it looks like someone's just real hair, because when you have like naturally curly hair like this, it's not like you're having, like you know, laid edges like how we do with our wigs, but don't get me wrong. I love a good late Edge like that's what I that's what I live for, but this was very natural and really nice, but unfortunately it does not last after the first install, but now, let's get into styling the hair. I went ahead and just put the elastic band over the wig and I just went in and started doing some styling first to help me figure out what I wanted to go for. I was like, let me just detangle the curls, like the first attempt, because y'all know I like to take my detangling process seriously. So this is the first detangling just to like break the curls out of its original. What'S it called Original manufactured curls because I always say the way the curls look out of the box is not the way the curl is going to look at the end, like you got to put some work into it. If you want to look how I make my wigs look, nice and juicy, you feel me the products I was using. I went ahead and used mousse versus water because I wanted this hair to dry faster because I was going out in less than an hour and moose just dry faster than water, but the product, the mousse, that I use, I'm not a big fan of it's something. New and my favorite mousse is the Nairobi rapid set film, I'm going to link that one below, because this one left the hair very crunchy and left like just like a weird cast Over the hair, but it did the job for what I needed to do. This is an 18 inch unit, but if you notice from the beginning intro Clips, this wig is a lot shorter. At the end, this chop that I did right now is not in the last chop for the first night of me wearing this wig. I did it. This length, I did look about a good two inch chop, so it's not about a good 16 inches, but I don't know, what's up with me guys, I've been just so scissor happy. I just been loving cutting hair and I need to stop. I think my toxic tray is just cutting hair. I just feel like. Maybe this will look better if it's a bob, but am I right, I feel, like I end up looking better as a bob. Let me know: does it look better this way or the end Bob look you'll see in a few anyways, so here I am just making sure I'm curling combing through the hair again, because once you cut the ends of curly hair, always make sure you go back In and brush and redefine those ends, because the ends will be blunt and over here we like our ends to be nice and curly and popping now I'm going in, and I want to just do some layers to the hair. I feel like curly hair. Just has a lot more shape. Just any install in general has a lot more shaping, add some layers, so I'm just going in and just doing just some light face framing layers on the bottom and I definitely went for some dramatic bangs on the top okay. I know two days: okay, now, like I said it's time for the real curl defining process, I'm going with that same mousse again, and this is a trick. I just started doing recently to really make my curly hair just really look good for any texture. I go in with the mousse I saturate the hair, I'm using this Denman, not Denman Con Air detangling brush. It'S really good for detangling any type of hair texture and what I do now is I wrap little ringlets around my finger like little finger coils. I don't like to do too many or make it perfect, because I don't like that look. I still want it to look like a natural hairstyle. I don't want to look like some roller set look, so I just go in randomly and look for curls that aren't clumping in a very nice form, and I just pick those and do little finger coils. You don't want to make them too big, but also not too small. You want to do these finger coils and let the hair air dry like this, like At first, it's not going to look probably very cute or appealing, but just let it stay like this. Let it air dry fully. That'S why I'm using mousse, because mousse is going to dry faster than using water, but if you don't have any mousse, you can use just a good water into leave-in conditioner. You just want to get the the hair saturated. So this is how the hair was looking after I let it air dry for a good hour, and I did my makeups to give it. So I can try - and I really did like this concept of the hair with the edges already came out for you. Like look how the hairline looks, I don't have any baby hairs really going any. I didn't lay anything down, but the hairline just looks super natural, which I really liked, but - and this is literally right out of the box - I did not do anything but actually actually install it, but no plucking bleaching, those customized by them, which I just love. The idea here I'm just going in like I was telling you after the hair is air dried. You can go in and start actually separating those tight curls. I like to go in with a little wide tooth comb and just pick everything out since this wig was 150 density. I feel like it wasn't as full as I wanted it. So that's one thing about curly hair. If it doesn't look full, you can make it look full, so I'm just going in and fluffing and separating everything to give it some volume. But here we are the next couple of days I went in to go and reinstall this wig. I wanted to wear it for a moment, so I can really give you guys an honest review on how I felt in the hair you know, but to my surprise well not to, but unfortunately I realized the edges once I try to put them back on. They just were straight and they weren't curling back up and since the edges naturally were very tight curl once it was in a straight form. It was just really long, so I just went ahead and did my standard baby hair routine. I did cut the hair. Some more this day when I was reinstalling it I feel like, especially when it comes to like lower density hair, for you to get that very nice full look. You have to kind of cut it to where the hair is the thickest and the hair was the thickest as this length. So I did cut it all evenly blunt at the ends and just kept the layers light at the top, and I like this look a lot better. I feel like it made the curls pop a lot more curly hair, just pops more when it has a nice blunt, even chop. So I was happy with this. I'M just going back in and just retouching up the curls doing the same routine, adding some mousse. I really like this hair, because the curls do maintain themselves past a day like these curls after you, detangle them do. Last like this. Hair was literally about three days since the initial install y'all saw and the curls in the bottom were still pretty good or just like the curls in the middle and the top, where I play with the hair the most throughout the day that needed to be refreshed. So I really do like this hair for the quality. It'S what itself, not just the actual lace quality, but the hair quality I feel like is really good. Overall, I can say that this wig is definitely worth your money and worth the purchase, and I feel like it's quite affordable for what they're offering. If you want to get this exact, look this wig, I did cut it down to about 14 inches, but I would suggest getting 16 inches and giving it a blunt look. So the ends can be full just like this, but this wig for the same density, 150 density, 16, inches all coming. Pre-Plucked pre-bleached and I did get a medium cap - is 254 dollars and I feel like for the hair quality and the lace, quality and them doing everything for you. It is definitely worth the money, and this is a wig. I can see blasting you a long time and being worth the investment but yeah. That'S all I have to say, for you guys hope you enjoyed this look. I hope you enjoyed this install see you guys another one make sure you like comment and subscribe, and peace out Girl Scouts, good, bye,
Comments
Tori time: Love love love! This wig! Beautiful install as usual my dear❤️
MARY ODE: omg yesss I can't wait for the ebin glue review!! I've only ever used the red one but I'm always seeing the black one but have never really seen a comparison video!! Also have you tried their new mousse and melting spray??- I need to get my hands on that!!!
Whitney R.: I like this wig it looks like your real hair !! Really nice
Chinyere: Look so natural ❤ first!!
Mapendo Tchekanabo: Hello hun what is the name of the first sprayed you use ? The red one
Sweet Sass 🌻: You can do a tutoríal messy bun with a wig lace please
MARY ODE: you chopping your curly wigs I'm here for it though ngl looks so much fuller and cuter
Tori time: Here as usual boo
Aaliweya hair: